Sunday, March 31, 2019

Easter Flower Cart

Hi folks its Angela here with you today with an Easter project.


I laid out the pieces of the Flower Cart to wipe them off (being laser cut you can get a little black sometimes as the laser burns through the material and causes soot)


This step also helps you to determine which bit goes where. I then painted all the pieces with Mowed Lawn distress paint.
 

Once painted I assembled to cart - ensuring the side pieces were in the correct way round, this picture shows the side piece with the handle off to the right.


Once assembled I touched up the bits where the tabs were with a paint brush.

I then chose which flowers I was going to use from the Flower Stackers (yours will come shipped as a sheet and it is easier to paint them before taking them out) I used several different distress paints to paint them, no need for gesso as the paint covers nicely.


I used the largest eggs from the Easter Egg set and applied Gesso to these as I wanted to paint them with lighter coloured Silk paints so I needed a white undercoat. Once covered I used a pokey tool to get the Gesso and paint out of the holes in the pattern on the eggs.


I glued the eggs onto plastic eggs as I want to put something inside them for Easter. The flowers are glued onto coffee stirrers (from a well known establishment) that I painted with the mowed lawn distress paint. I shaped the flowers slightly before gluing them together to give them a bit of dimension. I used a really dense foam block in the bottom of the cart to put my flower "stems" into and then I covered this with shredded crepe paper so you don't see the ugly foam.

Here is a close up of the flowers and eggs.


I hope you like my project and might think about making one yourself.

Supplies used:

Flower Cart

Decorative Eggs

Flower Stackers


Distress Paint 
ColorArte Silk paints
Plastic eggs
Felt bunnies


Saturday, March 30, 2019

Easter Albums


Hi everyone, Dianna here. I decided to make an Easter Mini Album using Gypsy Soul Laser Cuts Bracket Edge Booklet.


The Bracket Edge Booklet contains two photo folders that sit inside. I outlined the edges with a white paint pen so that I did not have to cut the paper to the edges.


The paper I used is Echo Park – Easter and green paper from JoAnn’s Fabric.


I used a magnet inside two of the basket stickers from Echo Park. I also used a magnet on both sides of the pockets in order to have an easy close and open.

Inside the folders are frames that are only glued at the bottom so that pictures can be inserted at the top. I used chalk ink on the Gypsy Soul Laser Cuts Chipboard Frame.


I used distressed ink on the GSLC Chipboard – Basket Full of Joy and eggs. I used white paint pen on the basket and Stickles on everything.


Items Used

Other Items Used
Echo Park – Easter
Stickles


Friday, March 29, 2019

The Butterfly Conservatory

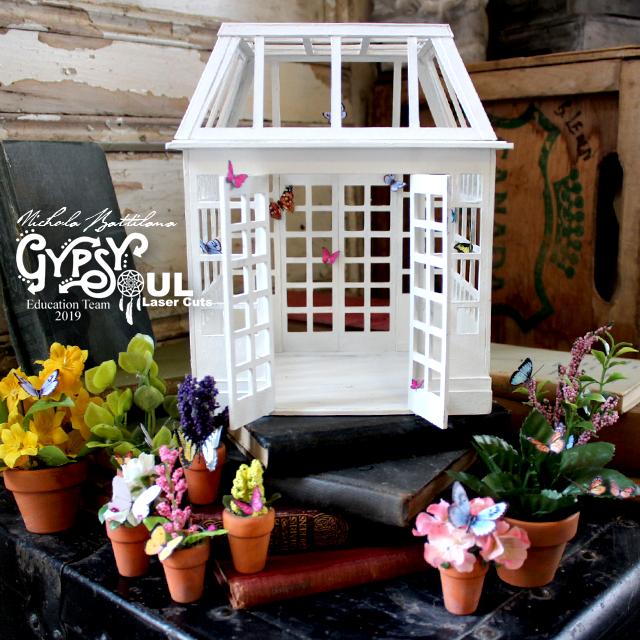
On my trip to London last year I made certain to time my visit with the butterfly exhibit at the Natural History Museum. I made it just in time, squeezing in on the afternoon of the very last day. It was magic. Then again, how could walking among butterflies not be?!

Small Conservatory - Butterfly House - gslcuts.com

This project, is a sort of homage to that memory. A pretty space filled with flowers and fluttery things.

Small Conservatory - Butterfly House - gslcuts.com

This project may take time, but it uses  only a handful of supplies. The structure is a Small Conservatory. That's it. I haven't added any fancy embellishments (but don't let that stop you from adding some dramatic flair!)

Small Conservatory - Butterfly House - gslcuts.com

Inside I've added miniature wooden pots packed with faux flowers and leaves. They aren't properly scaled and they don't even look like any particular sort of 'real' plants, but they give a nice floral feel and provide lots of texture.

Small Conservatory - Butterfly House - gslcuts.com

Those paper butterflies inside are all from my English Fairy Garden collage sheet. I printed it out at 50% to scale the butterflies down to a more appropriate size.

Small Conservatory - Butterfly House - gslcuts.com

I haven't glued any of the pots in place so that I can move those potted pretties around, and even change up the Small Conservatory completely if I want to!

Small Conservatory - Butterfly House - gslcuts.com

Besides paint and glue, the last supply I used was a plain sheet of cardboard. I've used strips to create the 'wood' floor and baseboards inside the conservatory.

Small Conservatory - Butterfly House - gslcuts.com

Outside, again, I used layered strips of plain card to create a subtle architectural element to the bottom of the structure. I also used the card on the roof of the building to hide the slot and tabs that hold the piece together.

Small Conservatory - Butterfly House - gslcuts.com

And that's it! Just those few little bits to make something quite pretty. If you'd like to see how I put this project together, follow along with this walkthrough video.

Small Conservatory - Butterfly House - gslcuts.com

And here is your supply list:
Small Conservatory

Miniature plant pots
Faux flowers
English Fairy Garden collage sheet
Sheet of cardstock
White acrylic paint
Glue (white and hot glue)

Happy making!

Wednesday, March 27, 2019

March Winds

Many of us know the proverb April Showers Bring May Flowers but few of us know that the proverb begins with the words March Winds. It was also a song in the 1930's by the same name by Abe Lyman and His California Orchestra, a slightly different version was sung by Judy Garland in 1955. While a child we were taught another proverb, "In like a Lion, Out like a Lamb" to tentatively predict the weather. I know that in my area of Maryland March is the windiest month of the year. These are the inspirations for this project.   

1.  Use Versa Mark and Ice Resin Enamels randomly to transform the GSLC Flourished Chains, add touches of copper embossing powder and cure with a  heating tool.
 2.  Further tarnish GSLC Flourished Chains using dry brush technique and green and teal acrylic paints.
3.  Use teal acrylic paint and extreme peacock embossing powder to transform GSLC Fancy Frame. Cure with a heating tool.
4.  Take apart GSLC Hot Air Balloons use Acrylic Paints of shades of purple to paint one top part to one balloon and blues for the other.
 
 5.  Shade edges of GSLC Hot Air Balloons with gray acrylic paint.
6.  Once fully dry use GSLC Honeycomb and Decorative stamps to add patterns to your balloons, I used spring green acrylic paint of blue balloon and magenta on purple balloon.
7.   Use browns and yellow acrylic paint to paint basket portion of GSLC Hot Air Balloons.
8.  Glue GSLC Hot Air balloons together and hold securely with metal clamps. 
9.   Once everything is dry assemble your Hot Air Balloon project  placing it inside an appropriate sized frame.
 
Some final thoughts. March may begin as winter but it is the hope by month's end that springtide will be upon us. We can't control the winds but we can adjust the sails. I used to love the song "Wind Beneath My Wings" sung by Bette Midler
Lyrics in part:
 It must have been cold there in my shadow,
to never have sunlight on your face.
You were content to let me shine, that's your way.
You always walked a step behind.

So I was the one with all the glory,
while you were the one with all the strength.
A beautiful face without a name for so long.
A beautiful smile to hide the pain.

Did you ever know that you're my hero,
and everything I would like to be?
I can fly higher than an eagle,
'cause you are the wind beneath my wings.

It might have appeared to go unnoticed,
but I've got it all here in my heart.
I want you to know I know the truth, of course I know it.
I would be nothing without you.

Did you ever know that you're my hero?
You're everything I wish I could be.
I could fly higher than an eagle,
'cause you are the wind beneath my wings.

Did I ever tell you you're my hero?
You're everything, everything I wish I could be.
Oh, and I, I could fly higher than an eagle,
'cause you are the wind beneath my wings,
'cause you are the wind beneath my wings.


 Supplies:  Gypsy Soul Laser Cuts-Hot Air Balloon Stack Up, Gypsy Soul Laser Cuts-Fantasy Frame & Flourishes, Gypsy Soul Laser Cuts-Flourished Chain Large, Gypsy Soul Laser Cuts-Flourished Chain Medium, Coming Soon Gypsy Soul Laser Cuts Foam Honeycomb and Decorative Stamp, Versa Mark, Resin Enamels German Silver, Turquoise, Embossing Powder Copper and Extreme Peacock Gray, Teal and Green Gold, Red iron Oxide, Burnt Sienna, Nickel Azo, Yellow Iron Oxide, Sapphire, True Blue, Violet, Magenta, and Spring Green Acrylic Paints, Color Shift Purple Paint,  Paintbrush, Weldbond, Clamps, Ariel View Magazine Picture, Large Wooden Frame.

I cannot wait to see your interpretation of this project. Share it on the Gypsy Soul Laser Cuts Craft Group Page on Facebook. I would love to see what new creations you are working on!

Tuesday, March 26, 2019

Trixie Likes Bees

Hello everyone, Lora here for Gypsy Soul Laser Cuts.
Beatrix Mellifera likes honeybees.
A lot.
And they like her.
She draws them, studies them, talks to them and generally looks after their well being.
She cultivates their favorite flowers and fusses over them when it gets cold and shoos away naughty insects that might do them harm.
She is a great friend and guardian.
She's a little quirky, but aren't we all?
She has lots of personality and if you ask about bees, she can talk about them for a very long time. And she has great hair...
I began with the Art Doll Nicho (which is coming to the store soon).
I glued down the inside folds of the box and clipped them together until the glue set.
NOTE: the flaps are not glued down, just folded in to help the clips hold the wet gluey bits.
Next, I painted the inside of the box cream and aged up the corners a bit with some brown ink using a Q-tip and cut the papers front and back using the nicho as the template. Notice that when I cut the back paper, I included the circle (head). I did this to give added strength to the piece when I glue the collage sheet face onto the circle.
In the picture above, I glued the box on to the backside of the nicho, painted the side of the box cream and inked it up a bit to give it a little patina. After it dried, I dry fit the paper on to the back, pushing it over the box carefully, adjusting the fit as needed. I carefully removed the paper after I had a good fit, added glue and stuck it down.

I glued Beatrix' head on and then the front papers. I added bits of cotton lace around the nicho opening and gave her a pretty lace collar. I attached the brass bee to a small cork and did the same with some of the sequin flowers, cutting the corks to different heights to give things depth.

I put the flowers and little bits of glitter and sequins in the box before I added the bee. That made it a lot easier to add or subtract detail without having to work around a big object.

 I made a little skirt out of leftover paper and arms and legs for Beatrix from a collage sheet (you can get this or something similar at Alpha Stamps)

 I stuck a command strip on the back of the box to attach her to this pillar. You can do the same thing anywhere in your house.

A little lace, glitter, sequins and a pretty bee....... you can't go wrong!
Thank you for stopping by!

SUPPLIES:
Art Doll Nicho (coming soon!)

Additional:
Acrylic paint
Graphic 45 Olde Curiosity Shoppe paper
Collage sheet
Tea stained lace
Sequins
Glitter


Monday, March 25, 2019

Shabby Spring

Hello, this is Yolie, it's Spring time! Looking forward to warmer weather, but not the Spring Sneeze, thank goodness for paper flowers.
Today I'm sharing a shabby Spring card using Gypsy Soul Laser Cuts Delicate Frames & Ornament Shape set  and Vine & Wire Frame.

I used a Chalky White paint to paint the butterflies, butterfly frame and the wire frame.

Before the paint dried completely, I pinched the butterfly wings for dimension.

Layered the card with different pattern paper and distressed the edges with scissors. I added the butterfly frame to the center opening of the wire background and added an extra butterfly for even more dimension.

I added jute behind the  paper flowers and scattered gold rhinestones throughout the card including the butterfly frame.


Thank you for visiting today and happy crafting.

Supply List: 
Delicate Frames & Ornament Shape set Item No. D139F
Vine and Wire Frame Item No. D83Q

Prima Marketing paper & flowers
Chalky White Paint
Paint brush
Rhinestones
Jute

Tape runner

Black Cardstock
Dauber
Scissors
Paper Trimmer