Wednesday, December 31, 2014

Happy Holidays Shadowbox by Mary


Thanks for stopping by Gina's blog on this last day of 2014. I have a happy holidays shadowbox for you today. I apologize for posting this after Christmas, but it was a gift!


This element piece was made with one of Gina's doilies and a punchelement 1 inch scalloped.


You can see the three different techniques I used on the ornaments. After they were painted I used bling on the first, a rubber stamp on the second, and one of Gina's snowflakes that I glittered on the third.


The number 25 was custom made by Gina.


From all of us a Gina's Designs, have a safe and Happy New Year!


Gina's Designs Products
Faux Metal Number Plates (Custom Ordered)


Other Products Used
Paint: Liquitex - Burnt Umber
Folkart - Lipstick Red, Classic Green,
Wicker White, Thicket
DecoArt - Dazzling Metallics - Luminous Gold
Paper: Bo Bunny - Silver & Gold Collection
DCWV - The Christmas Combo Stack
DCWV -  The Homemade Christmas Stack
White metal snowflake brads
Large metal snowflakes - ButterBeeScraps
Glitter - Martha Stewart
Candy cane
unmounted stamp
red pearl trim
bells
acetate
tag

Tuesday, December 30, 2014

New Year and Winter Cards by Donna


It's almost a new year! I made a few cards using Gina's chipboard shapes to send out in the new year! I thought this was a good idea for those of us that did not send out Christmas cards.


For this first card I used some pine tree chipboard shapes and put a very thick layer of silver modeling cream and fine glitter. Under the trees, I used one of the snowflakes, from the snowflake shape set. I painted it a "weathered wood" color to match the barn, and placed an intricate doily underneath.


I really had fun with this "Let It Snow" card! 


I used one of the large snowflakes and a beautiful flourish! Both have gesso, white paint, and fine glitter on them. 


For the title I used chunky glitter glass instead of glitter.


The gold snowflake was covered with Inka gold, and then a small about of gold embossing powder was heat embossed..


I thought this was a pretty card idea for the winter. I love snow and cardinals!


For this winter card, I used several of the snowflake shapes and stacked them. I painted each piece with white gesso, white paint, and sprinkled chunky glitter glass over each piece. I dabbed a bit of Inka gold on the tree. I wanted some of the natural chipboard to show through.


I used red brick chalk ink for the word Joy.


Gina's Designs Products


Thank you for stopping by today and HAPPY NEW YEAR!!!!!!


Monday, December 29, 2014

Mitten Gift Tag/Ornament


Good morning, Deann here with mitten-shaped gift tags.


I used the Mitten Micro Mini Album and lots of snowflakes from the Snowflake Shape Set .


The mittens were painted with acrylic paint in gold, blue and white. Once dry, I added all the goodies -  layers of snowflakes, flowers, lace,ribbon and dollies. 


 I added spacers between all of the snowflakes and inked the edges of the mitten with blue ink.


For this mitten, I inked the edges with blue ink. I started the stack with a circle of striped paper, then  a spacer,snowflake,spacer,circle of paper, candy cane and flowers.


Thanks for looking!


(((HUGS)))


Gina's Designs Products Used


Other Products Used


and some of my stash


Sunday, December 28, 2014

"A Taste of Summer" - Layout


Hi! Lynne here with a beach-themed layout. I don't know about you, but I'm definitely ready for summer now that Christmas has passed! I had so much fun altering the chipboard pieces from the Beach Shape Set and the banner I chose from the Banner Border Strips set.


 I used homemade texture paste (baby powder recipe) to give the sand dollar a realistic finish.


For the starfish, I mixed salt and acrylic paint to get the rough effect I wanted-love the way it came out!


The banner was painted, then stamped with Versamark and heat-embossed to give a lacy effect to echo the patterns in the paper.


Thanks so much for stopping by. I hope this summery page warms up those of you in chilly snowy spots at least a little.


Gina's Designs Product Used 


                                                                 Other Products Used


 7 Dots paper


 Donna Salazar Mixed Media Inks embossing powder-Jasmine


Versamark Ink


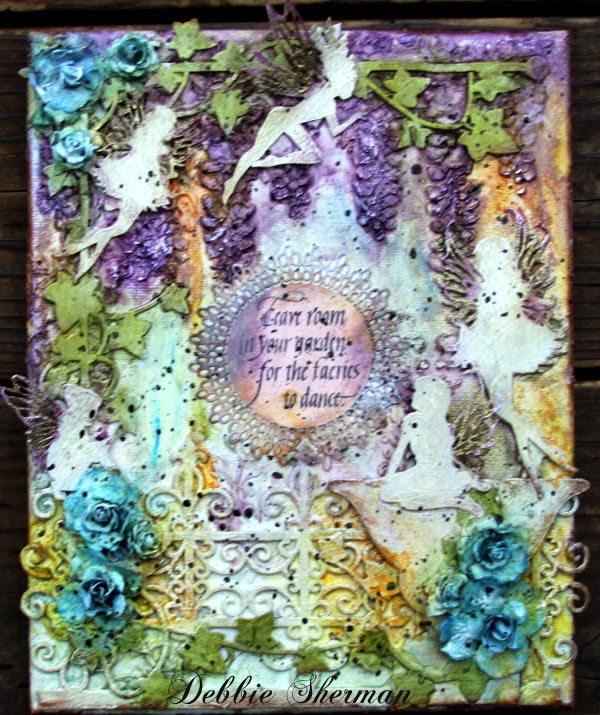
"Leave Room in Your Garden For The Faeries to Dance" Canvas


Hi Everyone!  Debbie with you today sharing a mixed media canvas that was created with Gina's Designs chipboard and various sprays and rubs. The canvas is titled "Leave Room in Your Garden For The Faeries to Dance."


Instructions:


Using modeling paste and stencils of choice, add some texture to your canvas and dry


Adhere all your chipboard


Adhere flowers


Gesso the whole canvas including flowers and chipboard pieces


Spray with different colors of  mists (I used Tattered Angels)


Stamp sentiment on sprayed doily


Adhere to center of canvas


Emboss faeries wings with embossing powder of choice


Rub canvas with finishing rubs (I used DecoArt)


Add splatters with mists


Gina's Designs Products Used:


Thanks for stopping by Gina's Designs blog today!


Saturday, December 27, 2014

Three Fairy ATCs


Hi everyone!  Melissa here with three ATCs  for Gina's Designs. I think the delicacy of the chipboard and these little pictures fit together. To decorate the chipboard, I first prepped the chipboard with gesso,followed by blue chalk ink. When the top one was dry, I put on some Inka Gold. On the bottom two pieces I put on a layer of crackle, followed by Inka Gold.


 Thanks for looking!


Gina's Design's Products Used:


Layered Border Victoria Small


Other Products Used:

 Jaquard Pearlex Powder

Sizzlits Decorative Strip Die -Tattered Flower Garland

Jaquard Pearlex Powder

Watercolor Paper

Winton and Lewis Watercolors

Distress Crackle Paint- Clear Rock Candy

Toho Beads

Pointed Back,Bicone, and Flat Back Swarovski Crystals

Stickles


Snowflake Cards


Hello everyone. Shanna here today to share with you some fun cards I created fro Gina's Designs.


I really have been saving (HOARDING) these papers waiting for a great time to use them. When I pulled out my chippies to play with, the first thing that popped into mind were these papers!


The chipboard pieces that I added to the cards got a coat of gesso. Then I added some stickles.


The tags I really enjoyed leaving a blank chipboard feel to. I did, however, ink the edges to give it a vintage edge!


Both card were finished off with a bow, flowers, and a sentiment.


Items Used:


Thank you so much for stopping by today. Make sure you keep coming back for more inspiration!


Friday, December 26, 2014

Santa's Balloon Ride by Dianna


Hi everyone, I hope that your holidays were wonderful!  Here is my take on 


Santa's Christmas delivery from a balloon with a steampunk twist.


I took a 12 x 12 canvas and painted the sides and border a light brown.  I used Mod Podge to seal the paint and adhere the Bo-Bunny: Silver and Gold - Festivities paper.  The compass is from Gina's Designs and painted gold. It looked like it was printed on the paper so I raised it for dimension. 


I used Sparkling H20's Crystal Green on the  raw chipboard and got an iridescent effect on the trees.  I stamped a jingle bells music stamp on the trees and finished the edges with Stickles - Pantina. I placed chipboard under the trees at different thicknesses to create a 3D look.  I hand drew Santa, colored him with Copic markers and used a snow writer on his coat and hat. The chipboard basket was colored with Sparkling H20's and Bo-Bunny paper.  The list was an old stamp on tan paper and distressed with brown ink.


Gina's Designs Mini Display Tray -Hot Air Balloon tops the canvas on a cardboard "hinge".  I used the Sparkling H20's on the outside of the balloon.  Bo-Bunny - Silver and Gold paper line was used on the whole balloon.  I used Tim Holtz rosette die by Sizzix under the clock face and hands, and a super small one was used as a gear.  A fence from Gina's Beach Shape Set was cut down to make a ladder for the elf.  Gina's gears were painted with silver, gold and bronze.  The peppermint was painted white, red and distressed with brown ink to give it a gear look.  I used a Gina's Design Type Writer Key "25" as gear. The snowflake was daubed with Stickles - Icicle, Gold and Pantina. The Bo-Bunny - Elf Magic paper elves were fussy cut out and the magic ticket was punched out using an EK Success Punch.  Gina's flourishes miniatures were painted black and gold.  The dream in a circle is new for Gina's Design and will be available in the store in 2015!


Gina's Designs Products Used

Pine Trees Shape Set

Mini Display Tray

Compass

Gears Shape Set

Skeleton clocks

Clock Hands Shape Set

Christmas Shape Set

Mini Flourishes Bella

Winter Shape Set

Beach Shape Set

Type Writer Keys


Other Products Used

BO-Bunny: Elf Magic & Silver and Gold

12 x 12 canvas

Mod Podge

Paint: light brown, gold, silver, bronze, white, red, black

Sparkling H2O's: Crystal Green

stamps

Stickles: Pantina, Gold, Icicle

Copic Markers

snow writer

brown ink

Tim Holtz: Rosette Die

EK Success Ticket Punch


Thursday, December 25, 2014

Walking through the Winter Wonderland


Kathi here to share with you my Christmas decor project and to wish you a 


Merry Christmas from Gina and the entire design team.


I  decorated a six pane window with  snow flakes, fake snow & Christmas greenery, with a few different flourish's from Gina's Designs.


 Layered Flourish with Christmas greenery.


Walking in a winter wonderland.


Gina's Designs Products Used:


Other supplies Used:


6 Window Pane


Fake Snow


Christmas Greenery


Trinket Box Trio


Hi everyone! Marla here with my final project. It's been so much fun to be a part
of the team for the month of December! For this project I decided to make a few
trinket/jewelry boxes in a summer/beach theme.


 I altered a trinket box and 2 ATC shrines that Gina
carries in the store. I wanted to go with a beach/summer theme so I painted
them black and covered them with G45 Tropical Travelogue paper


 On
the top of the trinket box I used one of the flourished open circle frames from the store as well as the Art Deco corners. I
used textured paint on the frame to give it a sandy feel and painted it with black
and teal and a hint of white.


 I
covered the inside with the beautiful paper and also put some soft felt to line
the bottom of the box.


I altered the ATC shrines into little earring display boxes. I simply screwed
two eye hooks inside each of the boxes. You are then able to hang your favorite earrings.
Check out Gina's Designs to pick up all the items I used and more!


I
hope you enjoyed my creations as much as I did making them! 


Happy
Holidays!


Marla
Rizzo


My
YouTube channel:


http://youtu.be/wuEkYx9ogEU


Gina's Designs Products Used


Wednesday, December 24, 2014

24 Drawer Storage Unit by Kim


 Hi friends and happy Wednesday!


Now that we are on the other side of Christmas, its time to get reorganized and this amazing 24 drawer storage unit is one of the best ways to do it!


They are super easy to put together and take no time at all to decorate with your favorite paper and embellishments. I used Beacon 3 in 1 glue to put it together.


 My drawer unit will be in my craft room, so I needed some heavy duty handles on mine as I will be opening and closing the drawers often.   I chose some nice paper in the color tones of my room to back the metal pieces.


 This is actually my second 24 drawer unit I have, it holds so much, and as my crafty space grows, so does my need for storage.  The great thing about these storage units is that you can make it anyway you like it, it would be great to have in a powder room, or maybe make it into a jewelry box, or perhaps even to store dry herbs in your kitchen, the possibilities are endless!


Gina has a wide selection of these storage units in various sizes, check out the store today to see what will work for your space!


Thanks for stopping by today.


Gina's Designs Items Used


Other Items Used


Metal Handles from ButterBeeScraps


Paper by Santoro Mirabelle Collection


Beacon 3 in 1 Glue

Tuesday, December 23, 2014

Vintage Parisian Layout By Donna


Happy Tuesday! Today I'm sharing a vintage Parisian layout. When I saw this photo of the stockings it made me think of Gina's Parisian Shape set. So many cute items!


I used two of the corsets; one with black chalk ink, and left one natural. The darling woman in a hat silhouette is also covered in black chalk ink.


I used the boots from the Miniatures Shape Set - Ladies Choice, colored them black and then added then laces.


The round scalloped element pieces were created by our very own Gina! In the store you will find Punchelements 1 inch Scalloped to make you very own elements.


On the dress form,  I painted it with black chalk ink, and finished with a sheer gold mist.


Gina's Designs Products Used


Punchelements 1inch Scalloped (to make your own element sets!)


Thank you for stopping by today.