Saturday, December 29, 2018

Butterfly Specimen Tray

I love museums and old school museum displays. I also love butterflies.

Butterfly Specimen Tray - Nichola Battilana for gslcuts.com

I've created my own butterfly specimen display using a ATC Display Tray, adding a few extra details, and boatload of fussy cut butterflies.

Butterfly Specimen Tray - Nichola Battilana for gslcuts.com

I've kept the embellishments conservative on this project but I haven't left it completely plain. The corners each have a piece from the Petal Corners set added, and I've added a sort of name plate using the Stackable Labels Shape Set.

Butterfly Specimen Tray - Nichola Battilana for gslcuts.com

I've also numbered the specimens with the Tiny Number Plates - Silver

Butterfly Specimen Tray - Nichola Battilana for gslcuts.com

I'm really pleased with the result. Best of all, it didn't take ages to create this piece!

Butterfly Specimen Tray - Nichola Battilana for gslcuts.com

If you'd like to see how this all came together I have a video walk-through for you HERE

Butterfly Specimen Tray - Nichola Battilana for gslcuts.com

And here are all the bits and pieces you'll need to make your very own specimen tray:

ATC Display Tray
Tiny Number Plates - Silver
Petal Corners
Stackable Labels Shape Set

Butterfly Specifics from Graphic 45 Olde Curiosity Shoppe Deluxe Collector's Edition
Old book pages
Acrylic paint
Ribbon
Large jump ring
Glue

Butterfly Specimen Tray - Nichola Battilana for gslcuts.com


Friday, December 28, 2018

Secret Santa Extravaganza


Happy Holidays everyone! Yours truly participated in Secret Santa exchange at work and lavished my intended with a creative gift using Large Hidden Drawer Book Box from Gypsy Soul Laser Cuts.


Products used: Graphic 45 Children's Hour 12x12 & 8x8, Graphic 45 Christmas Magic Collection 8x8, Corrugated 12x12 card stock, Gypsy Soul Laser Cuts Hidden Drawer Book Box Large & Small, Beacon glue, Tim Holtz Ground Espresso ink, double sided foam tape, white chalk paint, stiff bristle paint brush and Canvas Corp Black & Ivory French Script card stock 12x12
I did free hand traces of the the front/back cover, outer spine and outside/inside of hidden drawer of the book box before assembling with Beacon glue. I often ink the edges of my paper for a more polished look as well as to hide some of the cutting flaws. For the faux book pages, I measured the parts to be covered with the corrugated card stock after assembling (for a more accurate fit). After cutting the measured corrugated pieces, I used the distressed ink first to give a more vintage affect; then dry brushed white chalk paint over the ink.


I also utilized G45 Christmas Magic Ephemera cards to decorate the front/back cover of the Book Box, fussy cut elements to compliment the card scenes & used double sided foam tape to pop up the layers.


For the book spine, I decided to use a sprig of greenery held on by a clothespin and added a small piece of chipboard on top of the pin with a Holiday greeting to finish the look. I liked using a typography cardstock to give the allusion of book pages.

I had some leftover scrap - so I made a card companion.


Thursday, December 27, 2018

Cathedral Frame

Merry Christmas and Happy New Year to everyone!  I hope you all are enjoying the holidays and getting ready for the coming year.  I sure am.  As a matter of fact, this will be my last post with Gypsy Soul, unless they will have me back on occasion as a guest designer <hint>.  

I am one of those people who thinks there is always room for improvement, especially for myself.  I am always striving to learn new things, new crafts, new techniques, and more importantly, I continue to try to improve on things I feel I may already know but perhaps I have not perfected.  So, I will still be about on social media, hopefully with some new techniques and new ideas to share.  

front 
back
So, let's get to today's project.  I will be using this beautiful Cathedral Frame and an image from the Medieval Triptychs collage sheet from AlphaStamps. 


I simply laid the top frame with the opening over the images on the sheet until I found the one that I liked and that fit inside the frame the best.  


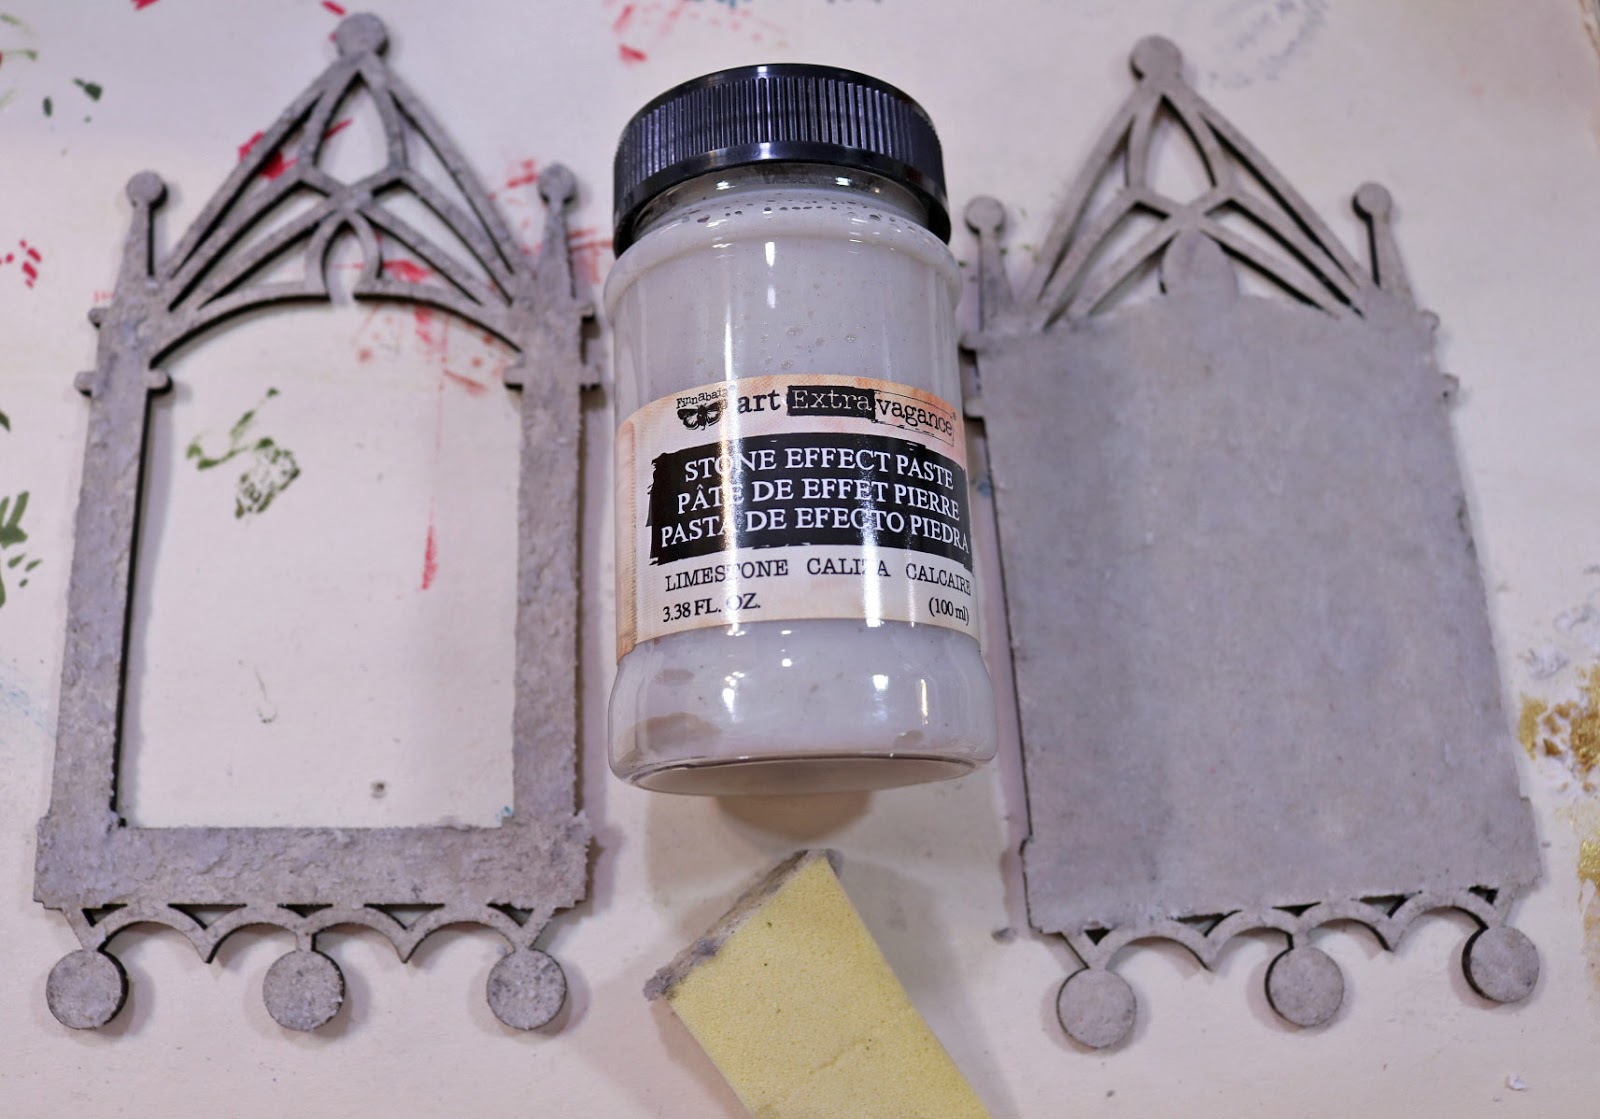
Use a makeup sponge to apply a coat of the Limestone Stone Effect Paste to the front and back sides only of the frame pieces.   Set aside to dry.


Paint front and back of frame pieces with Glorious Gold acrylic paint and let dry.


Delaminate a piece of mica large enough to fit over the collage image, and another piece large enough to fit behind the opening of the top frame piece.  Glue mica  pieces with Glossy Accents or a clear drying adhesive.


Trim excess mica from open top are of frame, and around collage image.  Glue pieces to front of frame (right).  Be sure to carefully burnish the collage image down to the back piece to ensure there are no air bubbles or wrinkles.


The back frame piece (left) is ready to be glued to the front (right) piece, as shown.


Glue the frame pieces together.
To conceal the seams along the edges where the two pieces have been glued together, I used a small spatula and my finger to add a layer of the Limestone Stone Effect Paste.  Let it dry.


Paint the edges with the Glorious Gold acrylic paint and let dry.

Glue metal embellishments to the frame, as shown.


Paint the embellishments with Glorious Gold acrylic paint and let dry.


Pick up the Fire Ruby wax with a brush and lightly hit the high spots over the frame and embellishments.  


Continue doing the same on the back of the frame, as well.


Glue rhinestones to the center of each embellishment.


Supplies used:

GSL Cathedral Frame
Medieval Triptychs Collage Sheet (www.alphastamps.com)
Limestone Stone Effect Paste (Prima/Finnabair)
Fire Ruby Antique Brilliance Wax (Prima/Finnabair)
Mica pieces (USArtQuest)
Makeup sponge
Small spatula
Ranger Glossy Accents
Metal embellishments
Amber gold rhinestones

I hope you enjoyed this quick and easy project today, and be sure to come back to see all the inspirational projects from the design team.

I've enjoyed my time with Gypsy Soul Laser Cuts, and I hope you have enjoyed my projects during my time here.  Thanks so much for your support, and have a wonderful New Year!

Barbara

Wednesday, December 26, 2018

Winter's Calm

As you know one of my favorite bands is Over the Rhine, I love their winter song and Christmas songs because they are not your traditional holiday songs, they are full of longings, honesty and perspective. Now that we have made it though the crazy that can be Christmas I like to take a break and breathe in deeply, binge watch my favorite shows-The Walking Dead, Fear the Walking Dead, and the new season of Dr. Who. This is the inspiration for this project and could be my holiday card if I sent them anymore.

1.  Take apart GSLC Small Cottage Windows an GSLC Little Folding House Shrine.
2.  Make copies of Winter Images and Holiday Greeting.
 
3.  Use Tyvek and UHU Glue to reinforce the hinges of the House Shrine flaps.
 
4.  Make sure side windows fold back completely and are flat.
5.  Cover entire structure in white gesso.
6.  While it is drying use Versa Mark to cover GSLC Small Cottage Window of your choosing and Aged Hunter Embossing Enamel and Tim Holtz Distress Embossing Powder Walnut Stain.
7.   Cure with a heating tool.
8.  Use red acrylic paints sand a paint brush to paint GSLC Brick Wall Stamp on front of side flaps.
9.  Make a wash of Matte Medium and Golden Quinacridone Nickel Azo Gold, paint over stamped bricks to add the mortar.
10.                Measure and Cut Winter Images and Holiday Greeting adding them to interior of hinged house shrine and also to the back outside using UHU Gluestick
 
11.                Edge entire project with a wash of Matte Medium and Golden Quinacridone Nickel Azo Gold.
12.                Use Exacto Blade to cut apart  GSLC prepared Small Cottage Window.
13.                Use Weldbond to secure GSLC Small Cottage window to brick walls and top part of house.
14.                Use micro screws to attach Decorative Metal Latch.
15.                Your small house shrine is now ready to give as a small holiday gift or sent in the mail as your holiday greeting.


This is one of those Over the Rhine Holiday songs I mentioned in my introduction,

Snow Angels by Over the Rhine
Once upon a winter
It seems so long ago
My one and only love and I
Fell down upon the snow

And as the dusk was falling
From our gray and goose down sky
We heard the old cathedral bells
Ring out our lullaby

Snow angel, snow angel
Someday I'm gonna fly
This cold and broken heart of mine
Will one day wave goodbye

Goodbye to this cruel wicked world
And all the tears I've cried
Snow angel, snow angel
I'll meet you in the sky

The rumors of a distant war
Called my true love's name
He packed his leather suitcase
And spoke no word of blame

We walked a while together
I tried to hide my fear
He told me not to be afraid
And whispered in my ear

Snow angel, snow angel
Someday I'm gonna fly
This cold and broken heart of mine
Will one day wave goodbye

Goodbye to this cruel wicked world
And all the tears I've cried
Snow angel, snow angel
I'll meet you in the sky

They brought my love home from the war
In a cart pulled by white mules
The Christmas bells rang out that day
Oblivious as fools

And as the snow began to fall
I kissed his frozen face
They told me in his woolen coat
His last few words were placed

Snow angel, snow angel
Someday I'm gonna fly
This cold and broken heart of mine
Will one day wave goodbye

Goodbye to this cruel wicked world
And all the tears I've cried
Snow angel, snow angel
I'll meet you in the sky

 
Supplies:  Gypsy Soul Laser Cuts-Cottage Windows Small, Gypsy Soul Laser Cuts-Folding House Shrine, Coming Soon-Gypsy Soul Laser Cuts Foam Brick Wall Stamp, Winter Images, Holiday Greeting, UHU Glue Stick, Tyvek, White Gesso, Paint Brush, Aged Hunter Embossing Enamel. Tim Holtz Distress Embossing Powder Walnut Stain,   Heating Tool,  Red Acrylic Paints, Golden Quinacridone Nickel Azo Gold Acrylic Paint,  Deco Art  Matte Medium, Exacto Blade, Weldbond, Decorative Metal Latch, Weldbond, Micro Screws, Screwdriver,
I cannot wait to see your interpretation of this project. Share it on the Gypsy Soul Laser Cuts Craft Group Page on Facebook. I would love to see what new creations you are working on!