Saturday, February 28, 2015

Artist Trading Block - RubberMoon Cross Promotion


Good morning, Deann here with a Gina's Designs-Rubbermoon cross promotion.


I used an Artist Trading Block for the base to hold all the awesome stamped images


I stamped out Heart of the Home to fill in the frame on the front of the box.


 I used tulle for the box filler


The Stamps and Stamping Blankz are from Rubbermoon.


Thanks for checking out my project:)


Have a great day


Gina's Designs Products Used-


other products used-


Cherish Layout


Hello and welcome to a new weekend inspirational piece. I created this layout because I needed to "Cherish" the fun moments. My daughter is an amazingly cute and ridiculously silly girl.


So I am cherishing the moments and created this to share with everyone.


My chipboard got a coat of gesso and some gelatos blended with my finger and water.


After that dried, I gave it a coat of crackle paint to give the hearts some amazing texture. 


I embellished the rest and had fun with my mists and paints to give the background some finishing fun. So I do hope this brought you some inspiration. Now go forth and have fun creating!


Gina's Designs Items Used:


Friday, February 27, 2015

Family Life Mixed Media Wall Tag - Rubbermoon Cross Promotion


Good morning friends! Today I have a special project to share with you. All this month we have been working with the amazing stamps from Rubbermoon. I chose to use the house stamps, they came with some stamping blanks which were designed by Gina for Rubbermoon. 


The stamps from Rubbermoon are so wonderful! They are some of my very favorites to use. I chose to do a little family life scene on one of Gina's Super Large tags. I have used these tags a lot, they are really a staple in my craft room.


I chose to do some mixed media using sprays and texture paste for the background until I got the desired effect I was going for.  I also used paints and sprays on the stamping blanks and when I was happy with the background I used the house stamps on them, and they came out so cute!


I layered on some laces and flowers, and used some of the sprays on some vintage dictionary paper I had then punched out the butterflies and added them to the tag. I then added some fun words and metal pieces from my stash to finish it off.


Thanks for stopping by today!


Gina's Designs Items Used


Other Items Used


Wild Orchid Craft Flowers


Fireworks Sprays


Paper Artsy Paints


Other Metals From My Stash


Thursday, February 26, 2015

Frog and Kitty Cards


Hi everyone! Melissa here with two cards using Rubbermoon Art Stamps. I kept it simple when it came to decorating the images themselves. I used a little colored pencil on the frog, and left the other plain. I surrounded both with lots of different things.


Thanks for looking!


Gina's Designs Products Used:

Hearts Background

Honey Comb & Queen Bees ATC Sized


 Rubbermoon Stamps


Other Products:

Prima and Kaisercraft flowers

Prima,Marion Smith, and DCWV papers

Tsukineko chalk ink

Viva Modeling Cream

Swarovski Crystals

Pearlex powders

Jolees stickers

Kimberly Water Color pencils


Wednesday, February 25, 2015

Snowmen & Birds by Guest Designer Heather Hudson


Hello Friends!!


Heather here and today I would like to share with you another

Guest Design Piece I have done using  

Gina's Chipboard


and some fabby Ribbons and trims from Really Reasonable Ribbon.
First up, I have a couple snowmen that I have done in a shabby chic style using Gina's Snowman Banner and My Floral Digital Papers.


I covered all the pieces with my papers then inked the edges with Ranger's Frayed Burlap.


I used Fauna, Storm, Just Peachy and Arbor Glitters on all of my snowmen.  I also added 1/4 natural crochet lace on each of the hats and then topped them with snowflake chippies that I covered in Fauna glitter.  Then I placed a Deep Ivory Mulberry Rose or


Baby Pink Mulberry Roses on top of that.  I added vintage buttons tied with  Cotton Candy Baker's Twine or Aqua Baker's Twine.  The buttons and snowflakes were elevated using


I also played with one of Gina's Birds on Key Set

I painted the piece first with Gesso, then water colors in blue, pink, and dark yellow.


After I painted it I put a layer of matte gel medium over it.  This way I could add another layer of water colors.  Below you will see I used some Golden Brown on the Key.


Next I added some darker blue to the blue birds and red to their chests and golden brown to the beaks.  I also stamped on the key with Tree Branch Archival Ink.  


For my Final step I added another layer of matte gel medium and then doodled with a black pigma pen.  I just love how it turned out!


I used Gina's 


Thank you for visiting Gina's Designs today!!


Hugs!!


Tuesday, February 24, 2015

Steampunk Clock

Good day to all crafty friends, thanks for stopping by Gina's blog, I'm here to share one of my favorite styles, Steampunk Gina has many different items in here store that go with the steampunk style.


 Front View


 The flight of fancy butterfly girl was embossed using ultra thick embossing enamel by Ranger.


The face was done in a mixture of embossing enamel, black, platinum, gold, &  bronze while her hair was done in the gold embossing enamel. 


Side view showing the black & red roses layered over 3" black cotton lace.


Heart of Gears & large bird dyed red using alcohol ink.


Close up of Butterfly of Gears & a steampunk key from Kraftsupplies4u

Thanks for stopping by.


Supplies Used:


Gina's Designs:


Steampunk key


Black Roses


Red Roses


Rose Bud Roses


Black Fabric Roses


White Spays


Large Bird


Other Supplies:


Wild orchard craft metal clock


Tim Holtz metal pully


Tim Holtz faucet knob


Ranger Ultra Thick Embossing Enamel


Monday, February 23, 2015

Picket Fence Clock


  Hi! This wintery weather seems to be inspiring me to create projects with spring and summer feels to them. This fun clock is no exception with the addition of butterflies and dragonflies (and the little fairy who's  sitting there, braving the elements with no coat, boots, gloves, or hat on!)


The clock face was coloured with Antique Gold Rub and Buff, then I added bits of Perfect Pearls powder here and there for a bit of shimmer.


After painting the bird piece and adding texture paste, I added small amounts of  Rub and Buff as well as some Perfect Pearls, which I brushed on after stamping the area with Versamark.


I heat embossed the fairy and then stamped over with Versamark and added Perfect pearls so all the pieces had some of the same shimmery gold, pink and pearly white. I also added perfect pearls to the stenciling on the paper behind the clock face


This was a fun project to create and will be a useful addition to my scraproom! Have a wonderful week, stay warm, and create something beautiful!!


Gina's Designs Items Used

Picket Fence Clock

Garden Fairies, medium


Bird on Branch Assortment


Other Items Used

Blue Fern and Prima papers from Scraps of Elegance Feb kit

Antique Gold Rub and Buff

Perfect Pearls powders

Lindy's Stamp Gang embossing powder

spanish moss

Saturday, February 21, 2015

Vintage Cards


Welcome to a new day of inspiration from Shanna. 


I created some cards and though you all might enjoy them.


I really wanted to create something vintage for Valentine's Day and Spring. Only a couple more weeks then it will be DAYLIGHT SAVINGS!!! oh yeah and SPRINGTIME!!!


So for my first card... I went with this lovely heart called Heart of Gears (coming soon) and gave it a coat of paint.


The second card I pulled out my embossing powder! I used this amazing Filigree Frame and covered it with gesso first and then a few coats of embossing powder. 


While the embossing powder was still hot I stamped the sentiment into it (ONLY DO THIS WITH RED RUBBER STAMPS). 


I embellished the rest of the card with lace and flowers to make them even more elegant and vintage. I do hope you get a chance to get some chippies and share you creations with us!


Items Used:


Heart of Gears (Coming Soon)


Friday, February 20, 2015

Dreamroad Mixed Media Canvas by Kim


Hello friends! Today I would like to share a mixed media canvas I created.  When I saw the new Flight of Fancy Butterfly Girl from Gina's, I was truly inspired to create something fun.  I used this


 5 x 7 canvas and sprayed several colors of my Fireworks sprays on the background. I really wanted this to be a fun and colorful piece. I then tore up some dictionary paper and layered that on top, then added more sprays and some texture paste and white gesso just to soften the look.


Once I finished the background, I took the beautiful butterfly girl and used some chunky white embossing powder and covered the whole piece of chipboard. While the embossing powder was still hot, I made an impression with my large script rubber stamp in the hot powder and it leaves behind a cool textured look.  After that was cooled I used some of my iris blue Gilder's Paste and gave the whole piece a light going over to pick up the script.


I added some lovely resin butterflies and fussy cut out some paper ones to add to her hair. I love the effect it gave. A few little flowers finished it off nicely.

I hope you have enjoyed my flight of fancy today, and don't forget to check out all the new items in Gina's Store!

Thanks for stopping by!


 Gina's Designs Items Used


Other Items Used


Imagine Crafts Fireworks Sprays


Crafter's Workshop ART Stencil


Viva Decor Crystal Gel


Wendy Vecchi Embossing Paste


Prima Resin and Metal


Wild Orchid Crafts Flowers


Graphic45 Le Romantic Paper

Stampendous Chunky White Embossing Powder


Thursday, February 19, 2015

On the Beach


Hi everyone! Melissa here for Gina's Designs. I love looking at the ocean, and this day at the beach is one I'll never forget.  The chipboard I've used complements and enhances the photo.


To decorate the chipboard I first painted on a coat of gesso. I followed this with layers of watercolors, chalk ink, Twinkling H20s, and Lindy's Stamp Gang sprays. On the title work I used Distress Crackle Paint over the paint, and this made the colors blend together more.


Thanks for looking!


Gina's Designs Products Used:


Other Products:


Gesso


Prima Papers


Luminarte Twinkling H20s


Windsor and Newton Watercolors


Lindy's Stamp Gang Paints


Tsukineko Chalk Ink


Perfect Pearls


Crafter's Workshop Template


Viva Modeling Cream


Distress Crackle Paint


Swarovski Crystals, bicones


Mod Podge and Martha Stewart Silicone Molds


Martha Stewart Punch


Wednesday, February 18, 2015

Perpetual Calendar by Guest Designer Heather

Hello Friends!!
Heather here and today I would like to share with you a Perpetual Calendar that I created using 
I used some digital papers that I designed to cover all of the pieces.
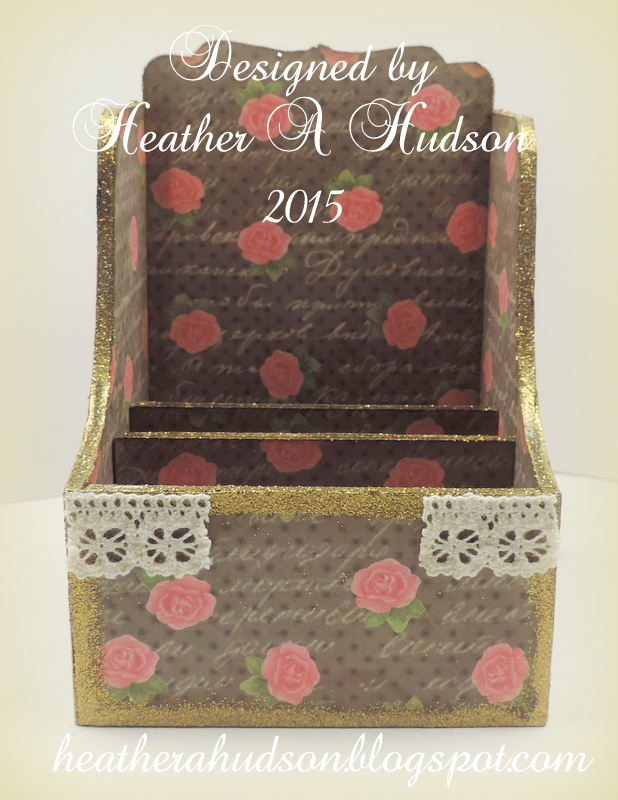
I covered all the insides of the base with paper.  Then glued it together, and then applied paper to the outside.  Trim excess paper with an exacto knife.  I glued lace to just the top edges (please refer to photo below).  
I used embossing medium and tinsel gold to emboss all the corners and the and edges of the base.
I also embossed the words and base part of the label.  I covered one side of each of the tags with one of my digital papers as you can see below.  Then I trimmed the edges with an exacto knife.  Then I applied one of my papers to the other side, trimmed them and then inked the edges with Frayed Burlap.  I applied paper to my label top in the same manner, and then the base was embossed.
Here is a look at the tags finished below.
I used Juliet Lace, Moss Green Leaves, Pink and Ivory Mulberry Roses.
  I added Juliet and Cotton Candy Baker's twine as well as a button with a cotton candy bow to my number pieces.  Martha's yard, Fauna, and Cheeky Pink Glitters were used on the edges of all of my pieces.
Here is a look at it from the side.  I used the Corners which I embossed on both sides of my Calendar base.
I have not decided yet on the words that I will be using on the front, so I left it blank for now.

I used Gina's 
and 

Thank you for visiting Gina's Designs today!!
Hugs!!

Robin's Nest Snowman Mini by Dianna


Hi everyone, Dianna here with Gina's Designs adorable Snowman Mini Album (Coming Soon) and a Cross-Promotion with The Robin's Nest.  On the cover I used a beautiful snowflake paper from The Robin's Nest and Gina's Designs title Winter Wonderland (I cut the snowman off and cut up the phrase to fit on the mini album).  All the large snowmen are chipboard from Gina's and covered with plain white cardstock embossed with an embossing folder.  I daubed Stickles on both the title and the snowmen.  The hats are patent leather paper and scarfs are felt. 


The blue and white striped paper is the coordinating side of the glitter deer paper from The Robin's Nest.  I am kinda proud of the fact that this mini album has fold outs, which are on plain white card stock or drop-off from The Robin's Nest paper. The snowflake rosette is cut from a die and prior to folding the rosette I daubed Stickles on the edge to give it a little something.  The clip is just a plain paperclip with a snowflake charm.  The LET IT SNOW is from Gina's Designs Winter Shape Set painted white and stickled.  The snowflakes thru out is from the Snowflake Shape Set and the Winter Shape Set.  The deer from Gina's Design is being used as a pocket.  I glued the deer on The Robin's Nest glitter deer paper and cut out around the back of the deer and created a folded a flap and glued it on the back of the deer.  I painted the ice skates white, daubed Stickles and used a snow-writer for the "fur" trim.  I created a downward foldout and glued the ice skates on the front.  The rest of the pages are a using the rest of the snowflakes and snowmen.


Items Used


Gina's Designs


Snowman Mini Album - Coming Soon


The Robin's Nest


Other Items


Stickles


Tuesday, February 17, 2015

RubberMoon Cross Promotional Tags


 Hello crafty friends, I am here to share with you today the tags I created using stamps by RubberMoon & laser chipboard by Gina's. I used the deco cat stamp on both tags. The cat is looking out the window on both tags.


Tag 1


Tag 1 was cut from a Accu cut die Album tags using  corrugated paper.  I used graphic 45 paper layering two of the secret garden tags/cards  over the diamond textured sheet and intricate doilies.


 Tag 2


Tag 2 cut from the Accu cut album tags using Robins Nest winter snowflake paper. The cat was stamped on the chipboard cat that was painted with spun sugar distress paint.


The cat is looking at the home across the yard through the lace curtains.


Cat


Robins Nest Paper - Winter snowflakes


Other Supplies Used:


White Cotton Trim


Venuses Lace


Micheal's Flowers


Rosette trim


Wild Orchid Crafts - pearl sprays


Flat lace 


Wild Orchid Crafts - white leaves


Stampin' up stamp


Distress paint 


Prima doily trim


Graphic 45 - Secret Garden