Thursday, March 31, 2016

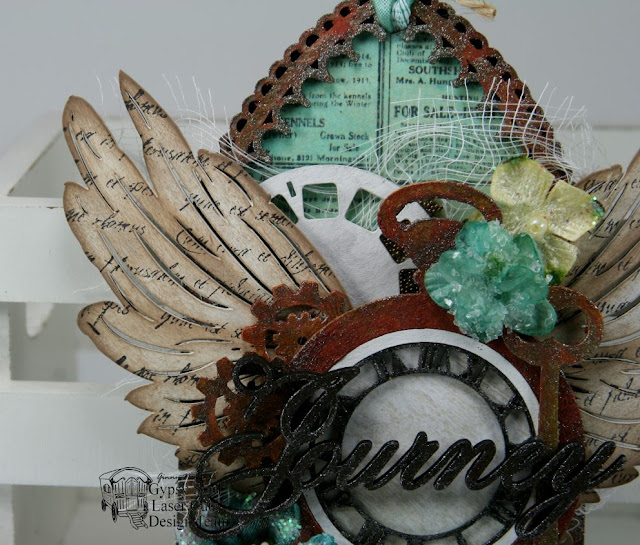
Journey Tag with Tutorial

Hey there Peeps. Well I'm recovering from a little too much holiday fun and getting myself back to the workday.  I created this tag tutorial with lots of lovely chippies and some mixed medias and ribbon and flowers.


Please enjoy this tutorial I've created so you can create a tag just like this for yourself....

Prepare all pieces except the wood charm with a white base coat.
Begin layering on an additional base coat with gold paint, copper paint and black archival ink.
Add newspaper patterned paper to the back of the arch.
Add shading and contouring to the wings with Distress Ink.  Layer on pattern with text stamp and black ink.

Color back of arch with multiple shades of Gelatos. Blend well.
Coat remaining pieces with gold paint. Allow to dry. Add copper colored texture paint being aware of leaving some parts thick and some thin. Once dry dab sections with Steel Luxe paint.
Secure top of arch to base.
With glue secure a tattered piece of cheesecloth.
Clip Photo Reel in half and add to arch.
Sprinkle Micro Beads onto any glue still showing.
Secure wings with middles touching.
Layer on pocket watch, gears and key.
Add a variety of flowers in coordinating colors.

Finish tag with wood charm sentiment and tie off ribbon trim with twine.

Okay that's all for me. I hope I've inspired you to create a mixed media tag of your own. Wishing you all a happy and productive day with lots of time to be creative : ) G

Wednesday, March 30, 2016

Travel Trinket Box by Mary

Hello folks! Today I have Gypsy Soul Laser Cuts' Trinket Box! I fell in love with a globe nob at my local craft store and knew what I wanted to do with it. This box is perfect to hold some of the treasures from my travels.
After the box was completed, I painted all the edges with a dark brown acrylic paint. Once dry, the lid and sides (both in and out) where covered with travel themed paper which I had distressed. The "Enjoy the Journey" from the Travel Shape Set was embossed in brown. The compass was embossed in gold and a pinch of black. I also used distress ink on the compass to try and give it a more antique gold look. The two pictures are from my trip to Ireland and are up on pop-dots.


.
The side pieces were all embossed with the exception of the plane. I painted the plane brown and then sanded some of the painted off for a more distressed feel.
The inside of the box was lined with the same paper as the lid. It will be fun to fill it with my little treasures!

Thanks for stopping by the blog today!

Gypsy Soul Laser Cuts
Travel Shape Set
Trinket Box
Compass
Landmarks


Tuesday, March 29, 2016

Easter Candy Dish

Hi everyone! Amylove here bringing you an Easter project. I used these amazing Easter pieces to create a candy dish from a paper mache egg.
 

It is so cute! I can't wait to display it this year. Please follow this link to my tutorial for this project:

Items used:

Monday, March 28, 2016

Altered Bible Cover by Lynne


Hello crafty friends. I hope you had a wonderful Easter weekend. Although I actually didn't create this project with Easter in mind, I thought it would be especially appropriate to post around this time.

Bible art journaling is a fairly new and popular creative outlet and I recently purchased this lovely interleaved Bible for that purpose....interleaved means that there is a blank page next to every printed page for art, notes, or decorative lettering.. The cover looked like this:

I started with one of the beautiful Gothic crosses as the focal point and used flowers and a dragonfly from the spring shape set as well as some flowers, buttons, and metal bits from my stash.
I dry-embossed the cross with a damask embossing folder to add interest and texture. After attaching all the items where I wanted them, I stenciled with some texture paste, then painted over the whole surface with tan acrylic paint as close as possible to the original cover. I added colour and shimmer with a variety of spray mists.


I love my new cover and I'm enjoying the chance to illustrate my favorite verses. Keep Gypsy Soul Laser Cuts in mind for altering a variety of surfaces!

Gypsy Soul Items Used

Other Items Used
Recollections Bohemian mists
Dylusions mists
Heidi Swapp mists
adhesive pearls

Sunday, March 27, 2016

Serenity Layout by Debbie

Hello friends! Today I'm sharing a layout that was especially fun to create. The photo is one of my favorites and Wisteria is in my top ten of favorite flowers! The flowers are hand made using dies and the rose leaves are chipboard that has been altered to match the layout and flowers. Today I'm going to share how I altered the chipboard Rose Leaves, but first we will talk about the background of the layout. IMG_2509 To create the background follow these steps: Begin by tracing around where the matting and photo will be placed. 106_7769 Add your Mud and stenciling. Allow to dry. 106_7771 Spray the background with Colorations Peacock Feathers. 106_7772 Adhere your photo and mats using cardboard for dimension. Using VersaMark clear embossing ink and 2 colors of embossing powder, emboss your stenciling. 106_7773 Add splatters using Minx in Midnight to your layout. 106_7774 Gesso all chipboard pieces. Spray with Colorations in Peacock Feathers. Emboss with Versa Mark and Utee thick enamal embossing powder. Repeat. 106_7775 When the embossing is set spray with Colorations in Gilded Gold and reheat until it melts into the Utee. IMG_2517 This technique will give your chipboard gold metal flecks and give it a wet look. I hope you give this a try it will give your layouts a unique look! Thanks for stopping by the Prairie Rose Cafe today!! Debbie Gypsy Soul Laser cuts Products Used Gypsy Soul Laser Cuts chipboard Rose Leaves,

Saturday, March 26, 2016

Joy Layout by Shanna

Happy Saturday! How are you all doing? I haven't done a layout in FOREVER!!! So of course I created one and played with some awesome chippies.

I added lots of colors and lots of texture on this layout. 


I titled this layout with Joy. 


The really cool thing about leaves are these leaves with layered leaf petals.

Items Used:

Steampunk Shadowbox by Dianna

Hi Everyone, Dianna here with Gypsy Soul Laser Cut's Small Shadowbox and Graphic 45's World's Fair.  I decided to approach this project by using each square as its own ATC.


I painted the box by using a Deco Art Bronze Paint then used a wood Stain to create a faux wood look. The first box I fussy cut the stamp and little tickets from Graphic 45's World Fair.  I used a stamp punch to create a larger stamp.  Behind the fussy cut of the second box, are beads that match (I used Beacon's 3-n-1 to make them stick).  The Steampunk Frame from Gypsy Soul Laser Cuts was "painted" using bronze, gold, black and teal chalk inks.  The crow was painted white and colored with Copic Markers.


I really loved the Ferris Wheel, so everything was fussy cut and layered.  I used chalk ink on Gypsy Soul Laser Cut's Fleur De Lis from the Parisian Shape Set. 


I used black and bronze chalk ink on a Gypsy Soul Laser Cut's -Wrought Iron corner piece and  Gear Shape Set. I layered the gears with scrap chipboard pieces and a clock charm.  I fussy cut one of my favorite prints from Graphic 45's World's Fair and used Gypsy Soul Laser Cut's Border Stick behind it.  The bronze and gold chalk ink was used on the Gypsy Soul Laser Cut's Word Charm - Journey.


The car and two tags were fussy cut out from Graphic 45's World's Fair and the car layered with Gear Shape Set.


The Gypsy Soul Laser Cuts Square Charm (coming soon) and Fleur De Lis was painted with bronze, gold and black chalk inks.  The metal piece in the back ground was an extra and the metal bobbin was from a metal set that I had laying around.  The Graphic 45's World's Fair Lady was cut out of a larger design and placed in the Square Charm.  


Items Used
Word Charm-Journey
Square Charm - Coming Soon

Other Items