Mother said, "Straight ahead"
Not to delay or be mislead
I should have headed her advice
But he seemed so nice
And he showed me things
Many beautiful things
That I hadn't thought to explore
They were off my path
So I never had dared
I had been so careful
I never had cared
And he made me feel excited
Well, excited and scared
When he said, "Come in!"
With that sickening grin
How could I know what was in store?
Once his teeth were bared
Though, I really got scared
Well, excited and scared
But he drew me close
And he swallowed me down
Down a dark slimy path
Where lie secrets that I never want to know
And when everything familiar
Seemed to disappear forever
At the end of the path
Was Granny once again
So we lay in the dark
'Til you came and set us free
And you brought us to the light
And we're back at the start
And I know things now
Many valuable things
That I hadn't known before
Do not put your faith
In a cape and a hood
They will not protect you
The way that they should
And take extra care with strangers
Even flowers have their dangers
And though scary is exciting
Nice is different than good
Now I know: Don't be scared
Granny is right, Just be prepared
Isn't it nice to know a lot!
And a little bit not
Songwriters: Stephen Sondheim
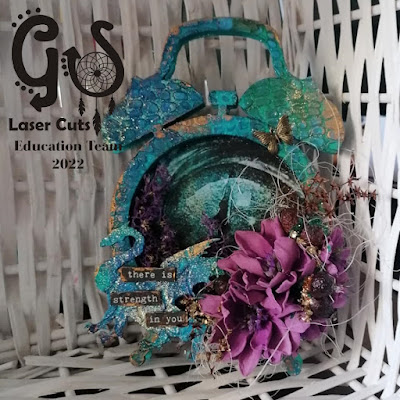
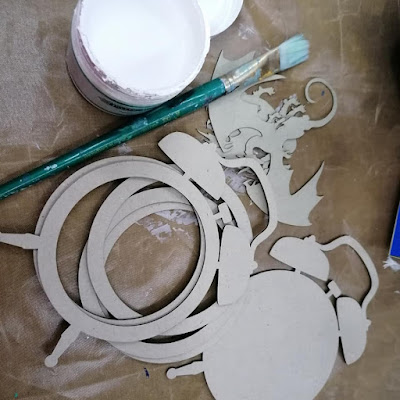
1. Gather Materials
2. Print LRRH Book Covers Re-imaging to fit GSLC Chunky ATC Blanks.
3. Cut and Glue Covers to GSLC Chunky ATC Blanks.
4. Cut and Glue Decorative Pictorial Papers to Back of GSLC Chunky ATC Blanks.
5. Use Black Sharpie to Edge the Prepared GSLC Chunky ATC Blanks.

6. Use Peacock Feathers and Twisted Citron Distress Oxide and Small Plastic Pallet Knife to add Patina to Chunky ATCs
7. Use Small Plastic Pallet Knife to Add DecoArt One Step Crackle to Front of ATCs.
8. Once Fully dry Use Colored Pencils to Fill in Cracks, then Seal with Matte Gel Medium.
9. Resize LRRH Covers, then Print, Cut and add to Inside of GSLC CHUNKY ATCs.
10. Cut Paper and Parchments to Make Pages for Miniature Books.
11. I Added 21-24 Pages to Each Book and Held them Together with a Clip.
12. Using a Ruler with Spaced Holes to Add Holes to Covers.
13. Drill Holes with Hand Drill.
14. Use Spiral Wire Binder to hold Books Together. Cutting off Excess Wire with Wire Cutter.
Some Final Thoughts.
The origins of the Little Red Riding Hood Story can be traced back to 10th century Italy, written by Charles Perrault and a later version by the German Brothers, Grimm.
The original 'Little Red Riding Hood' story was considered to be a disturbing tale of deceit and cunningness. Later on, many sanitized stories were released for the sake of children.
I like that Little Red Riding Hood can teach us many lessons and remind us not to be fooled by Wolves in Sheep's Clothing or even Grandmother's. I also like things are not always what they seem and sometimes the wolf is not the one to blame and pretty is often only skin deep. Let’s be willing to look at both sides of the story.