Showing posts with label Thanksgiving. Show all posts

Saturday, November 20, 2021

The King of Thanksgiving

Happy Thanksgiving, everyone! When I found this happy little turkey figure at my local farm store I knew he needed to be the Grand Marshal of the Thanksgiving day parade. He's gonna have a role in the centerpiece of our table on Thursday.

The first thing to do was figure out how to make him a float to ride on. The small box I used is from the GSL Mini Shadow Box Set and the larger one is a GSL Store Cabinet Base (available over at Alpha Stamps) that were easily assembled with tacky glue.

The paper on the small box is from Basic Grey Curio and the lovely autumn leaves are from BoBunny's Dreams of Autumn. I painted a set of GSL 1.5 Inch Straight Wheels and glued them in place, using yellow brads for the hubs.

Pumpkins, squash and gourds were made by painting dried putka pods which are sometimes used for vase filler. I also made a few polymer clay pumpkins.

I wanted yellow flowers for this project and ended up painting some white ones I had on hand. Autumn leaves were punched from colored sheets of cardstock.

The King of Thanksgiving needs a crown and I just happened to bring a tiny one home from our vacation in Portugal. It is 'interesting' to vacation with me... this was picked up on a walking food tour. “Hey, I'll catch up with you. I'll only be a minute in this very cool shop that nobody else wants to visit”.

Gluing the pumpkins and squash in place.

Here's a look at the rear of the float acknowledging it's sponsor. The Be Thankful sentiment is from Graphic 45's Time to Fluorish collection.

The 'headlights' are acrylic pumpkins. Happy Thanksgiving!


GSL Products Used

Mini Shadowbox Set

Store Cabinet Base

Wheels 1.5 Inch Straight

Other Supplies Used

Tacky glue

Acrylic paint

Basic Grey Curio

BoBunny Dreams of Autumn

Graphic 45 Time to Fluorish

Colored cardstock

Dried putka pods

Polymer clay

Brads

Paper flowers

Schleich Farm World turkey figurine

Miniature crown


Wednesday, November 6, 2019

over the river and through the wood


I realize that for the majority of makers, the beginning of November signals that Christmas crafting is in full swing. I simply don't feel right skipping over Thanksgiving. I always try to work in at least one Thanksgiving project before fully committing to my Christmas and winter creations.
Today I am sharing a harvest sleigh, perfect for a Thanksgiving table centerpiece or home decor piece. Inspired by the Thanksgiving poem by Lydia Maria Child, I thought it would be fun to decorate the GSLC Santa's sleigh with a harvest theme and fill it with all sorts of harvest goodies.
The sleigh arrives flat in seven pieces. This piece has many curves and decorative cuts. I suggest wiping down all edges with a soft cloth or paper towel to remove any of the black left over from the laser cutting process before beginning assembly. Next, I like to do a quick dry assembly to see how all of the pieces fit together. This allows me to envision the piece in its 3 dimensional form as well as gives me a good understanding of what areas are exposed and which ones are covered, which helps sequence the assembly process. Take note of the sections of the sleigh that remain exposed on the underside as well as the areas exposed when the back and front panels are in place. You want to be sure that all surfaces considered exterior to the sleigh will all be painted the same color.
I paint the exterior sides of the sleigh, as well as any exposed edges, with black soot paint. Be sure to cover the inside of the runners and decorative curves as these will be exposed when the sleigh is finished. While this is drying, I select the paper that I will be covering the interior of the sleigh with.
I want this sleigh to be used for multiple holiday celebrations. To avoid it having a distinguishable fall or Christmas look, I decide to use natural colored Kraft-tex. This will give the look of a traditional sleigh with leather interior. The Santa's sleigh set comes with a template that can be used to trace the basic sleigh shape (minus the decorative runners and fancy edge.) I use the template to trace the shape onto the reverse side of my paper. The shape is carefully cut out and labeled to match the surface it will be adhered to. I repeat this process for each of the interior surfaces of the sleigh.
Once all of the pieces are cut, I ink the edges and surface with distress ink. This gives an aged appearance. Before attaching the piece to the interior side, you will need to trace the slotted openings for the base, front and back pieces, then cut them out with an exacto knife. Be sure to test that the tabs are easily inserted into the openings before gluing down the paper.
With all of the interior papers cut and ready to be attached, I return to the painted sleigh parts to add gilded details. This is much easier to add before the papers are adhered. Using an antique gold paint, I dry brush gilded edges and wisps of gold along the runners and edges of the sleigh. I add the gilded touches to all of the pieces where I want to achieve this look. Since I am essentially dry brushing the paint, it does not take long before everything is ready to be assembled.

I add collage medium to the back side of the paper, align it in place, then weight it down so it will dry flat. The same process occurs for both sleigh sides, as well as the front and back interiors. When the adhesive has cured, I dab glue onto the tabs for the base front and back panels and insert them  into the slots on each sleigh side, creating the three dimensional sleigh. Next it is time to add the decorative side panels to the exterior. I want to be sure that the slotted sections are not showing, so I use the template to create two black paper pieces. These are attached to the exterior sides before the decorative pieces. When everything is in place, I clamp the edges until the glue is dry.
I paint sections of the Acorn Border Set antique gold. These pieces are then dry brushed with black soot paint. When they are completely dry, I re-touch the acorn bottoms with the gold for highlights and to make them distinguishable. I use gilded acorns in my holiday decor for both Thanksgiving and Christmas. This will be a nice accent for my sleigh that will tie it into both seasons.
 The finished acorn border set pieces are added to the sides and front of the sleigh and it is ready to be filled with the splendor of the season.
"Over the river, and through the wood,
To Grandfather's house we go;
the horse knows the way to carry the sleigh
through the white and drifted snow.
Over the river, and through the wood,
to Grandfather's house away!
We would not stop for doll or top,
for 'tis Thanksgiving Day."
Lydia Maria Child
Thank you so much for taking time to visit today. 
I wish you all the happiness that holiday crafting brings, 
no matter which holidays you are creating for!
~Ann


supplies used:
Gypsy Soul Laser Cuts used:
 Acorn Border Set
 Santa's Sleigh

Thursday, November 22, 2018

Thanksgiving Art Journal Page with Gypsy Soul Laser Cuts

Happy Thanksgiving and many blessings to all.  In the US, we celebrate Thanksgiving, so since today is Thanksgiving for us, I wanted to use my art journal to commemorate all that I am thankful for.  I will be using some Gypsy Soul Laser Cuts chipboard to help me out.  I love using chipboard in my art journals because it adds some dimension and not too much bulk.  Also, when I find just the right shapes, it seems to get that ole' mojo started again.

I have prepared a video tutorial for you in the hopes you will enjoy watching the process.


CLICK HERE TO SUBSCRIBE TO MY CHANNEL

Supplies Used:

GSL The Good Life
GSL Mushrooms Shape Set
ColourArte Vivid Ultra Metallics
  Peaceful Poppy
  Black Cherry
  Autumn Leaf
  Burnt Umber
  True Metals Autumn Flame
  Bolivian Blue
ColourArte Radiant Rains Dabber
  Yellow Rose
  Nutmeg
  Mediterranean
Prima Metallique Wax
  Aged Brass
  Vintage Gold
  Bronze Age
6"x9" Art Journal (Ranger)
Studio 490 Crackled Texture Paste
Faber-Castell Glass Bead Glitter Gel
Dylusions 5x8 Luscious Leaves stencil
Tree Branch Archival ink pad
Paper Parachute AT-002 cling stamp
Viva Décor Pearl Pen - Cream

I hope you enjoyed today's project, and be sure to check out all the fabulous products found at Gypsy Soul Laser Cuts.  

Thanks so much for stopping by, and have a super holiday!!

Barbara

Wednesday, November 7, 2018

bountiful blessings


I am ever so grateful to mother nature for providing reassurance that the cycle of life is continuous, and that even in death there is beauty. She presents us with this confidence every fall in the stunning display of color we catch glimpses of on the trees and shrubs around us. It is from this wondrous natural display that I find the inspiration for my November Gypsy Soul Laser Cuts design team project "bountiful blessings."
I begin with the Gypsy Soul Laser Cuts wreath rings set. It contains three separate, sturdy chipboard rings that can be used individually as a base to build upon. The smallest ring measures 5" and the largest measures 11". I have chosen to use the medium sized ring as my base for this project. 
Since my wreath will use different shaped leaves to create the design, I realize that their unique shapes may not provide entire coverage of the base; for this reason, I cover the base ring with collage medium and attach a piece of burlap. When the glue is dry, I trim off any excess fabric. To add interest to this layer, I ink around the edges of the burlap as well as intermittently within the flat area of the circle. I mix tarnished brass spray stain with texture paste and apply this randomly on the burlap covered ring through a stencil. I set this piece aside to dry completely.
Next, I begin preparing the pieces that will be included in my design. Using the Gypsy Soul Laser Cuts skeleton leaves 2 set, I carefully remove the three leafy stems from the sheet. 
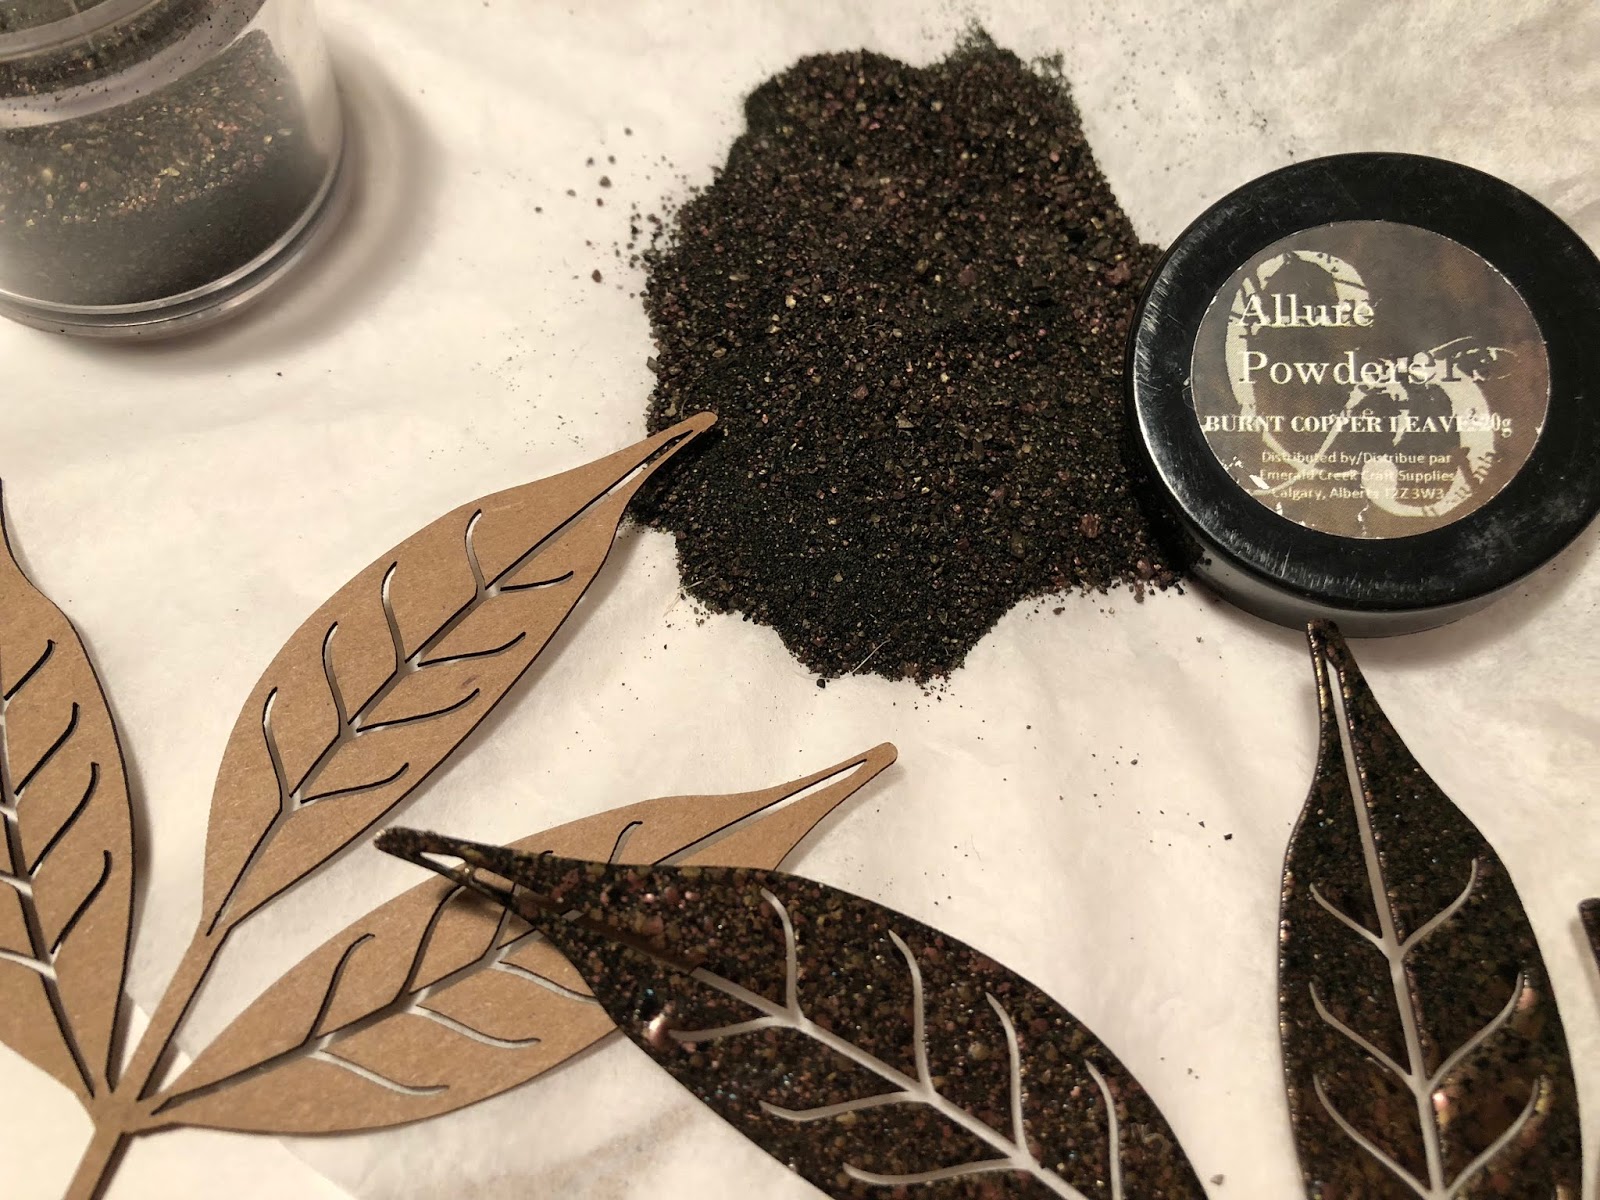
Each section is coated with embossing ink and then sprinkled with burnt copper leaves embossing powder and heat set. These pieces are set aside to allow space to create the other pieces for layering.
Using distress oxide inks, I create sheets of colorful papers that represent the differing leaf colors that can be found outdoors. The resulting patterns are inked with traditional distress ink to create depth. These papers are die cut into leaf shapes of various size and species.

The individual leaves are inked around the edges, as well as on their reverse sides. This will ensure a finished look for any pieces that overhang the edges of the wreath. Some of the more shaft-like pieces are coated with charred gold or moss stone embossing powder. I also gather some beautiful, natural, red maple leaves that I collected last fall, and had coated with resin to ensure their color stay true. 
I begin by laying the skeleton leaves along the circle and then "audition" different layering arrangements. During this process, I realize sometimes less is more beautiful than more. Each section is built up and when I have a section that I am pleased with, the pieces are attached to the base using a hot glue gun. I have included a few progress photos showing how the design came to life.
When I felt that the wreath was complete, I added two clippings from blades of gilded wheat from a recently received floral arrangement. I crossed the pieces forming an X and adhered them in place with distress collage medium. When dry, I add a small acorn from my stash to the juncture.
I adhere a hanging hook onto the back of the ring once my design is complete. This step might be easier to complete prior to attaching all of the elements to the front of the form; however, I want to be sure that the wreath hangs correctly and I didn't want to worry about keeping everything aligned during the creative process.

Thank you so much for taking the time to stop by the blog.
Wishing you a colorful and creative fall, filled with bountiful blessings! 
~Ann

The design team at Gypsy Soul Laser Cuts would love to see what you're making, feel free to join the Facebook group here and share your creations!

Gypsy Soul Laser Cuts used:

Tuesday, November 7, 2017

Thanksgiving Stagger Tags

Hello all! Lora here with some fun Thanksgiving tags from the fabulous Gypsy Soul Laser Cuts folks. I love fall colors and that's what inspired these cute tags. They are called Stagger Tags (small) and the set is three cute tags ranging from 2.5 x 4.5 (largest) to 2.5x3.5 (smallest). Great tags to put on a package, tie to a napkin ring or even use as a place tag on the table or attached to the back of a chair.
The fall-colored napkins are so pretty this year, I decided to use them instead of cardstock for the background of my tags.
 The first thing I did was give the tags a rough coat of white gesso. (you can use white paint as well) Since you are going to peel the napkins apart and they are transparent, it's good to have a white background as the colors will really pop.
After the gesso dried, I peeled the napkin apart, making sure that I got all three ply separated. Nearly all napkins are 3-ply. Make sure you have got the backing (the two separate ply of white layers) away from the 'picture' part of the napkin. If you leave a ply underneath the printed picture, the picture will not adhere properly and will eventually peel off.
And that would be sad.
After I separated all three ply (I always save the plain white to use for clean and etc...) I put of coat of matte medium on the tag (I used Liquitex Matte Medium) and gently laid the napkin over the tag, making sure there were no air bubbles. Folds are okay, but air bubbles will tear and you don't want that!
After placing the picture, I gave the piece a top coat of matte medium, making sure the whole surface is covered then set it aside to dry and worked on the other two. Do not try to tear the edges off at this point...let it all dry or you can tear the napkin right off of the tag.
Also sad.
Because here is what you do and it is so much easier and looks so much better!
After the tag has dried completely, use a fine grit sanding block or an emery board and sand off the extra bits of napkin. It looks so much tidier than tearing and you then have a nice edge to ink on. Easy, fast and purdy.
And now you have a beautiful surface to embellish that was simple and fun. I like the idea of having other options to use as a background surface and some of the designs on napkins these days are so nice.
One note: Make sure you get a quality product. I test all my napkins beforehand by applying a little matte medium to the surface to make sure they don't bleed or run. It does sometimes happen. I usually always buy the napkins on sale but have learned that some manufacturers do not use a stable dye. I can imagine what would happen if you wiped something really wet off of your face.....what a mess.
My favorite companies are Michel Design Works and Caspari, but there are others that are equally good.

Another fun thing I did paint the Miniature Book Plates Shape Set pieces I used on the tags to look a little like wood.
I just painted the bookplates with a mixture of orange and red, let them dry and then dry-brushed some sap green lightly across the top. The red underneath makes the sap green appear brown and simulate (loosely) wood grain.
Add ribbons, metal findings and erudite (not really) sayings and there you have it.  Thanksgiving tags.
Now go make fun stuff!


Thank you for stopping by!

SUPPLIES
Stagger Tags (small)
Miniature Book Plates Shape Set


Additional supplies
Napkins
Matte Medium
Ribbon
Beads
Metal findings
Stickles Glitter Glue

Monday, November 7, 2016

Capture Thanksgiving Memories with Bracket Edged Stagger Album

Hello, Friends!  It's Kathy here with a great way to capture the memories from fall family gatherings.  Our great big noisy family loves Thanksgiving.  We also enjoy creating photo booths for our family gatherings.  We get great snapshots as everyone has fun hamming it up with various props.  This charming little album is the perfect spot to chronicle those events and maybe even tuck in a recipe or two.


The elegant Rose Tudor Singles chip looks great with these Authentique Harvest papers.  I used a mix of the Fall Shapes Set and some additional flourishes on the inside.  And I'll show you how I built this album step by step in this Snapguide tutorial.
 

Here are some still shots of the album and its interior. 


I've also prepared a YouTube video tour where I explain all the interactive elements.  Enjoy!


I hope I've shared some new ideas for working with Gypsy Soul Laser Cuts chips and inspired you to get your craft on today.

Thanks for stopping by!
Cheerio,
kathy

Product Links 

Note: There is a complete supply list embedded in the Snapguide Tutorial