
Showing posts with label Prima. Show all posts

Thursday, December 27, 2018

Cathedral Frame

Merry Christmas and Happy New Year to everyone!  I hope you all are enjoying the holidays and getting ready for the coming year.  I sure am.  As a matter of fact, this will be my last post with Gypsy Soul, unless they will have me back on occasion as a guest designer <hint>.  

I am one of those people who thinks there is always room for improvement, especially for myself.  I am always striving to learn new things, new crafts, new techniques, and more importantly, I continue to try to improve on things I feel I may already know but perhaps I have not perfected.  So, I will still be about on social media, hopefully with some new techniques and new ideas to share.  

front 
back
So, let's get to today's project.  I will be using this beautiful Cathedral Frame and an image from the Medieval Triptychs collage sheet from AlphaStamps. 


I simply laid the top frame with the opening over the images on the sheet until I found the one that I liked and that fit inside the frame the best.  


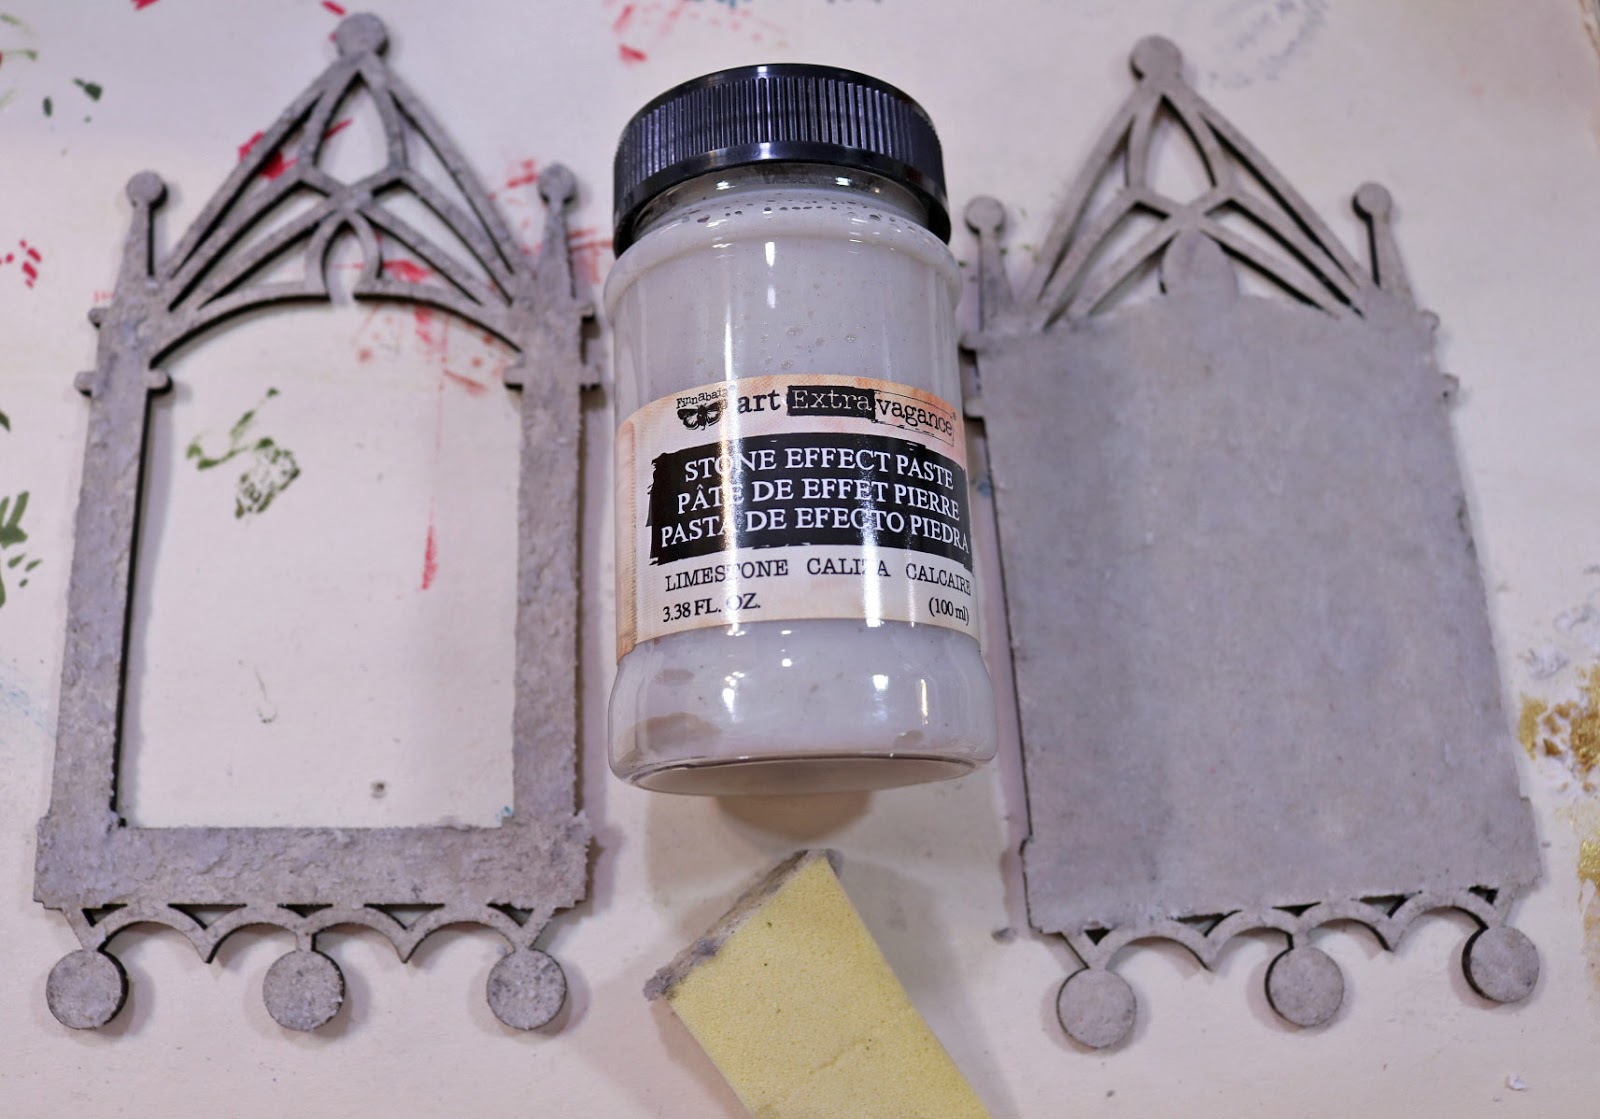
Use a makeup sponge to apply a coat of the Limestone Stone Effect Paste to the front and back sides only of the frame pieces.   Set aside to dry.

Paint front and back of frame pieces with Glorious Gold acrylic paint and let dry.


Delaminate a piece of mica large enough to fit over the collage image, and another piece large enough to fit behind the opening of the top frame piece.  Glue mica  pieces with Glossy Accents or a clear drying adhesive.


Trim excess mica from open top are of frame, and around collage image.  Glue pieces to front of frame (right).  Be sure to carefully burnish the collage image down to the back piece to ensure there are no air bubbles or wrinkles.


The back frame piece (left) is ready to be glued to the front (right) piece, as shown.


Glue the frame pieces together.
To conceal the seams along the edges where the two pieces have been glued together, I used a small spatula and my finger to add a layer of the Limestone Stone Effect Paste.  Let it dry.


Paint the edges with the Glorious Gold acrylic paint and let dry.

Glue metal embellishments to the frame, as shown.


Paint the embellishments with Glorious Gold acrylic paint and let dry.


Pick up the Fire Ruby wax with a brush and lightly hit the high spots over the frame and embellishments.  


Continue doing the same on the back of the frame, as well.


Glue rhinestones to the center of each embellishment.


Supplies used:

GSL Cathedral Frame
Medieval Triptychs Collage Sheet (www.alphastamps.com)
Limestone Stone Effect Paste (Prima/Finnabair)
Fire Ruby Antique Brilliance Wax (Prima/Finnabair)
Mica pieces (USArtQuest)
Makeup sponge
Small spatula
Ranger Glossy Accents
Metal embellishments
Amber gold rhinestones

I hope you enjoyed this quick and easy project today, and be sure to come back to see all the inspirational projects from the design team.

I've enjoyed my time with Gypsy Soul Laser Cuts, and I hope you have enjoyed my projects during my time here.  Thanks so much for your support, and have a wonderful New Year!

Barbara

Thursday, November 22, 2018

Thanksgiving Art Journal Page with Gypsy Soul Laser Cuts

Happy Thanksgiving and many blessings to all.  In the US, we celebrate Thanksgiving, so since today is Thanksgiving for us, I wanted to use my art journal to commemorate all that I am thankful for.  I will be using some Gypsy Soul Laser Cuts chipboard to help me out.  I love using chipboard in my art journals because it adds some dimension and not too much bulk.  Also, when I find just the right shapes, it seems to get that ole' mojo started again.

I have prepared a video tutorial for you in the hopes you will enjoy watching the process.


CLICK HERE TO SUBSCRIBE TO MY CHANNEL

Supplies Used:

GSL The Good Life
GSL Mushrooms Shape Set
ColourArte Vivid Ultra Metallics
  Peaceful Poppy
  Black Cherry
  Autumn Leaf
  Burnt Umber
  True Metals Autumn Flame
  Bolivian Blue
ColourArte Radiant Rains Dabber
  Yellow Rose
  Nutmeg
  Mediterranean
Prima Metallique Wax
  Aged Brass
  Vintage Gold
  Bronze Age
6"x9" Art Journal (Ranger)
Studio 490 Crackled Texture Paste
Faber-Castell Glass Bead Glitter Gel
Dylusions 5x8 Luscious Leaves stencil
Tree Branch Archival ink pad
Paper Parachute AT-002 cling stamp
Viva Décor Pearl Pen - Cream

I hope you enjoyed today's project, and be sure to check out all the fabulous products found at Gypsy Soul Laser Cuts.  

Thanks so much for stopping by, and have a super holiday!!

Barbara

Monday, September 24, 2018

Little Dreamer mixed media canvas

Hello crafty peeps! Lynne here with a 12x12 canvas I created using chipboard from the Baby Girl Clothesline Set, Tattered Angels mists and lots of little goodies from my stash
.

The first thing I did was figure out more or less where I wanted everything, then I took  picture, since I would be moving things to add the stencilling, and would no doubt forget where I wanted everything...


I made the texture paste with baby powder, white glue and white acrylic paint and stencilled in the open areas , then covered the whole canvas with white gesso. Since I was going to be using soft colours, I made sure most of the embellishments were light in colour, as they're easier to cover.


After misting with four glimmer mists, I allowed it to dry then misted again for a little more depth of colour, then I rubbed a little metallic wax on the chipboard pieces to make them stand out a little more.


I have been creating canvases for a local art shoppe, so I'm challenging myself to come up with different themes for my projects. Thankfully Gypsy Soul Lasercuts provided such a great variety of pieces and titles that I don't expect to run out of ideas for a long time!

Thanks so much for stopping by, and I wish you a dreamy, colourful, creative week!
xx

GYPSY SOUL ITEMS USED
Baby Girl Clothesline Set
Little  Dreamer

OTHER ITEMS USED

Prima and Studio75 stencils
Tattered Angels glimmer mists: Festival, Rose Gold, Summer Glow, Coral Reef
Art Alchemy Metallique Wax-Rose Gold
white gesso
various flowers, ribbon, etc.


Thursday, August 9, 2018

Dream Catcher Art Journal Page

Hi everyone, and welcome! Today I want to share another art journal page using the Gypsy Soul Laser Cuts Dreamcatcher 2 chipboard set.  When I think of dreams, I seem to think in vivid color and lots of sparkly stuff.  So, naturally, I decided to share my gold foiling technique that I used on both my background and on the chipboard.  And as for the glitter, I know what you are thinking.  You are thinking, "Oh no, not glitter.  I will have that stuff everywhere1!"  Well, I have another technique to share that will keep  you from wearing your glitter, or in this case, sparkly mica, for the next week.  So, scroll on down and check out the step-by-step tutorial to see how!


Cover both pages with an uneven coat of white gesso using a silicone spatula, leaving some space uncovered.  Let gesso dry.


Brush  Deep Waters metallic paint over background.  Spritz with water to thin and spread paint.  Before paint dries, remove excess with damp baby wipe.


(NOTE:  You can see how dark the paint is where the page has no gesso because it sucked the paint right into its fibers.)


Use baby wipe to pick up the Deep Waters and dab the paint through the Well Rounded stencil to add texture to the background.  You can remove some of the stenciling before the paint dries for a more muted and grungy look.  Dry well.


Do the same thing with Coral-Teal Opal Magic paint through another section of the same stencil.


I used a foam blending tool to stencil the Emerald Green Metallique paint through a different part of the stencil.


I used the Steampunk Copper Metallic paint with a foam blending tool to dab the color onto the words and dream catcher.  Using a dabbing motion adds texture to the chipboard and even gives the slight appearance of hammered metal. 


For a bit of color variation on the feathers, I dabbed the Emerald Green lightly over them.


I used the Tomboy mono adhesive (white) glue to adhere splotches of the gold foil.  This is not gold leafing.  Gold foil is applied to a clear carrier sheet, and when it touches sticky glue, the gold comes off and leaves the carrier sheet.  I used a cheap brush to apply random splotches to my background and let the glue dry.  This particular glue is perfect for this application because it drys sticky.


I used the same technique to apply the glue to my dreamcatcher.  You can see the gold is coming off the clear carrier sheet, but you can continue using it until there is nothing left on the sheet.


I also added some of the gold foil to the top of the dreamcatcher, using a new piece of the sheet for better coverage.


Next, I adhered all of my chipboard pieces to my art journal pages, as shown.  I let these dry well before continuing so I wouldn't accidentally move them around.  Then I took the journal outside to give it a good spray with a clear gloss acrylic coating.  This covered any of the sticky glue that may not have been covered with the foil, and protects the pages, as well.


Now for the addition of glitter.  I prefer to mix my glitter in a puddle of clear drying glue.  I am using Mica Delights, which is actually mica particles that resemble glitter and are about the same size.  I mixed copper and gold together for a more antiqued look.


I then picked up small blobs of the glue mixture and carefully dropped it into the openings in each feather.


Before the glue mixture dried, I picked up the tiniest amount of the sapphire mica and sprinkled gently over the glue sections.  I wanted just a hint of the blue.  I also glued dew drops to the dreamcatcher and feathers, as well as a few more colorful ones randomly on the page.


Here is a closer look at the dried glue inside the feathers.


And here are closer pictures of the two pages.


Although I added  Simple Feathers in my supply list below, I would have used them if I had been working in a bigger art journal.  My words were large enough to fill up the pages, but I wanted to point them out in case you work in a larger size and can't think of what to add to your project to make it all come together.  

Supplies Used:
GSL 10 Words
GSL Simple Feathers (not used on this journal page)
TCW 384s Mini Well Rounded stencil
Dina Wakley white gesso
Prima Art Alchemy acrylic paints
  Deep Waters Metallique
  Emerald Green Metallique
  Steampunk Copper Metallique
  Coral-Teal Opal Magic
Tombow Mono Multi Liquid Glue 
Paper Studio Clear Glue Pen
US Art Quest Mica Delights
  Gold
  Copper
  Sapphire
Robin's Nest Dew Drops
  Light Vanilla
  Multi colors
Rub-On Foiling Paper
Silicone spatula
Assorted brushes
Paper piercer tool or tooth pick
Clear Acrylic Spray Sealer (Hobby Lobby)

I love how this turned out.  I know I may sound like a broken record when I say that chipboard is fabulous to use for dimension without all the bulk, and it is a perfect addition to art journals, as well as many other uses.

I hope I've inspired you to make something with laser cut chipboard and share what you make!

Have a wonderful rest of the week!

Barbara xo

Sunday, April 22, 2018

Mothers Day Photo Clipboards


Hi everyone can you believe that it's Sunday already.  I have a fun and quick project that you can make for Mother's day next month with one of my favorite products the Mini Clipboards.  I wanted to make something that you could give this year with a picture attached and then use it to decorate afterwards.  So these clipboards were the perfect thing.  I decorated them with Prima papers and flowers and lots of ribbon and they didn't take much time at all.


To make them simply measure around the chipboard piece and cut the paper to fit.  The clips are separate so you can glue the paper and decorate them first and then add the clips in the end.  This makes it really fast and easy and you can even stamp sweet sentiments on them like i did.


Using papers that have pretty patterns is also a fun idea and you can place them on your clipboard to really accentuate the sentiments that you pick to put on your clipboards.  And the colors are just beautiful and perfect for a gift for Mother's day.


 This one has a really cute design at the bottom and all I did was add flowers.


And you can get these cute easels at Micheals to send with it so they can set them up and show them off.  How is that for a fun and easy afternoon project?  

Thanks so much for stopping by and hope to see you again in 2 weeks!!  

Teresa

Supplies:


Paper:  Prima marketing
Ribbon: Really Reasonable Ribbon.com
Adhesive, scissors, paper trimmer

Sunday, March 11, 2018

Vintage Style Perpetual Calendar


How wonderful that you stopped over today to see what is new with our projects on the blog.  I found a really neat Perpetual Calendar in the store last week and thought I had just enough time to make one up for this new year to try and stay organized.  It's a super great set in that it contains the box and all the tags for the dates and months and weeks.  And all the chippies to put on them.  It's amazing and was a really fun set to create with.


And I just bought a brand new line of paper from Prima that was filled with antique roses in gorgeous shades of pink and rose so I thought it would be perfect to use.  Above you can see all the days of the week chippies and the tags that I used for each of them.  And the paper line comes with lots of other goodies and you could really have fun decorating each of them.  Be sure and stay flat though because you only have so much room in the file box for each of the tags.


I am going to search around for more fun things to add on my tags but this is a good start :)


 I used this water colored pink paper for the numbers.  I had a super cute die cut that the numbers fit on perfectly and did them in white so that the numbers would stand out more.


And here is a quick view of the box and the different compartments it has for the tags.  I painted the box a vintage white first and then I traced and cut pieces of the paper to fit on the outside and inside layers.  I adore cabbage roses so I am very happy with the way this came out.  I hope you like it too!

Have a wonderful weekend...   Teresa

Supply List:


Prima Papers and stickers 2018

Scrapbook Adhesive by 3L
Scissors, paper trimmer,  chalk paint, Scotch quick dry adhesive