
Showing posts with label Art Journal Page. Show all posts

Thursday, April 22, 2021

Art Journal Page - Think Like A Queen

Hello everyone!  Today I have the second art journal page I mentioned in the last post, which has been made by following the prompts in the journal cards I made in this post.  

This time, I will keep pulling cards till I feel like the page is finished. I will be drawing one card at a time and obeying it before moving on to the next card.  I shuffled my cards and then drew one prompt card as follows:  SPRAY

I'm not a fan of spraying so I wasn't so happy about drawing this card but I must obey the cards, so I used a Prima Color Bloom spray in Dark Tulip and added some water to make it spread around the page.


After drying with a hairdryer, I shuffled and drew a second card:  COLLAGE

I chose to use these gel printed backgrounds for my collage.


I used matte gel medium to stick everything down on my page.


The next prompt I drew was:  FOCAL POINT

This is something I prefer to add at the end, however, I am obeying the cards so I had to add it to my page now.  I had this image of Marie Antoinette on my desk and also this frame which I had previously painted gold, but the photo is the wrong shape for the frame so it was time to improvise.


I glued the image to the frame and then used the excess to fill in the gaps.


I used some Pitt artist pens to blend it all together and hide the joins in the paper a little bit.


Focal point added, it was time for another card, and this time I drew the COLOUR CARD.  This card has six options and I rolled a 5 which was BLUE.  I was a bit worried about adding blue to this page, but if the cards demand it...


I chose a Prussian Blue heavy body acrylic and painted it carefully around the sides of my page and other places, hoping that they didn't clash too much.


Time for the next prompt and it was another colour card:  BLACK OR WHITE


I chose WHITE and used Titanium White acrylic and a palette knife to apply it randomly over my page.


Once the white paint was dry, it was time to pull another card:  SOMETHING METALLIC

I already had something metallic on my page thanks to the gold frame, but that was not done specifically for this prompt so I decided to add more metallic to the page.  Firstly a Champagne metallic Gelato scribbled across the page on top of the white paint.  Then some gold ink splatters and finally some of the gold leaf collage pieces leftover from making the prompt cards themselves.


Time, for another prompt and this time it was:  MAKE SOME MARKS


I used black pencils to make my marks around the edge of the page and to draw around the gold leaf collage pieces..


No drying time required so time for the next prompt:  BOOK PAPER

I had these scrap squares of book paper on my desk and they were already painted blue, but a different shade of blue to what I used before, but I decided to use them anyway.  So I glued them together to make a larger journalling block and then wrote this quote by Oprah Winfrey in white pen:

Think like a queen.  A queen is not afraid to fail.  Failure is another steppingstone to greatness
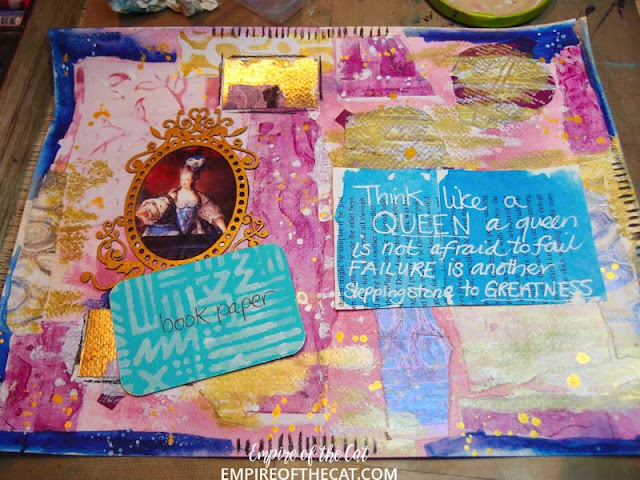
So there we have it, after eight prompts, the page feels finished to me so I decided to stop pulling prompt cards and called it done.

Let me know what you think in the comments!

Till next time,

Elle
Empire of the Cat


Project Recipe:

Flourished Frame Elizabeth BB66A
In the gel prints: PE126ES Seaweed Circle *coming soon*, PE129ES Oceanic *coming soon*, Leafy Swirl C7G
my art journal, Prima color bloom spray dark tulip, collage materials, gel medium, photo, black pencil, heavy body acrylic, gold ink, PITT pens, gelatos, book paper, white pen, and of course, the journal prompt cards!

Thursday, November 22, 2018

Thanksgiving Art Journal Page with Gypsy Soul Laser Cuts

Happy Thanksgiving and many blessings to all.  In the US, we celebrate Thanksgiving, so since today is Thanksgiving for us, I wanted to use my art journal to commemorate all that I am thankful for.  I will be using some Gypsy Soul Laser Cuts chipboard to help me out.  I love using chipboard in my art journals because it adds some dimension and not too much bulk.  Also, when I find just the right shapes, it seems to get that ole' mojo started again.

I have prepared a video tutorial for you in the hopes you will enjoy watching the process.


CLICK HERE TO SUBSCRIBE TO MY CHANNEL

Supplies Used:

GSL The Good Life
GSL Mushrooms Shape Set
ColourArte Vivid Ultra Metallics
  Peaceful Poppy
  Black Cherry
  Autumn Leaf
  Burnt Umber
  True Metals Autumn Flame
  Bolivian Blue
ColourArte Radiant Rains Dabber
  Yellow Rose
  Nutmeg
  Mediterranean
Prima Metallique Wax
  Aged Brass
  Vintage Gold
  Bronze Age
6"x9" Art Journal (Ranger)
Studio 490 Crackled Texture Paste
Faber-Castell Glass Bead Glitter Gel
Dylusions 5x8 Luscious Leaves stencil
Tree Branch Archival ink pad
Paper Parachute AT-002 cling stamp
Viva Décor Pearl Pen - Cream

I hope you enjoyed today's project, and be sure to check out all the fabulous products found at Gypsy Soul Laser Cuts.  

Thanks so much for stopping by, and have a super holiday!!

Barbara

Monday, September 10, 2018

"walls"-an art journal page by Lynne

Hello there, crafters!  Ever since I first received the new stamps in the mail, I have had an art journal page idea in mind, and it has taken me this long to finally bring it to life!! I think most people build walls in their lives at some point, and I found a sentiment that put a positive spin on that concept:

 I started out with brick-background patterned paper, and then added tears with yet another brick paper peeking through them (sometimes we have multiple walls!) I then stamped with the brick stamp using leather brown ink. (Misting I added afterward also shows in this photo) I added the ink to the stamp unevenly to give a varied depth of colour.


I decided I wanted the stamped stones to have a little more texture, so I did the stamping with Versamark ink, then heat, embossed the stones with Distress Embossing Powder, aptly named Pumice Stone. I love the texture it created, and the stamps worked beautifully with the Versamark.


The Brick Wall texture sheet is a huge favourite of mine, and I managed to use not only pieces from the sheet but also the brick-shaped pieces punched out from it. Those pieces were painted grey, then I hand-printed the words of the sentiment onto them, and added a little in in Leather and Honey here and there for interest. The mist adds a little more colour and interest as well.


The texture sheet pieces were cut to go around the window in the center and painted brick-red, then heat embossed with Pebbled Copper embossing powder. I love the variegation in the embossed colour!


As for the window in the center, I don't have a closeup (oops!) but I ran it through my Cuttlebug in a woodgrain embossing folder, then painted it Antique White before rubbing a little Honey ink  over the raised surface. I decided to stick a photo of myself inside the window to make the page more personal. A few spritzes of Tattered Angels mist in Old Penny finished the page.

Thanks for visiting, and I hope you enjoyed seeing my page; I don't often use stamps but I really do like these! Have a terrific week xx
Lynne

GYPSY SOUL ITEMS USED

Brick Wall
Windows 4-panel, square
Foam Stamps-coming soon

OTHER ITEMS USED

Colorbox inks-Leather, Honey
Tattered Angels mist-Old Penny
Ranger Distress embossing powder-Pumice Stone
Pebbled Copper embossing powder (brand unknown)
Versamark Ink

Thursday, May 31, 2018

Messing around at being creative!

Hi folks, its Angela with you today.

Sometimes I just feel like I want to mess around and experiment with different ideas and not create anything specific. This is why I have an art journal, I can play for the sake of playing and then stick the resulting artwork in there.

Today I took various bits of Mixed Media Fragments from the store (I just LOVE these bits, they are so versatile) and made two art journal pages. I wanted them to go together so I used the same colours on both pages.


For the first page I wanted to stamp the design of the media fragments over the page, but I need to make a stamp to do this. I separated the off-cut pieces from the design (hold on to these until you finish as you may decide you want to use them) then I took out some Cut and Dry foam and I heated the back with my heat gun and pressed the media fragment into it to make my own stamp. Once made I inked it up with Spiced Marmalade distress ink and stamped it on the page. As you can see from the picture I did the same with the diamond mixed Media fragment, you can use the same bit of foam because as you heat it up the previous indent disappears.

Once I had the background stamped I just added ink and distress stains randomly so it wasn't so white.


For the second page I wanted some texture on it so I turned to the texture paste. 


I used a palette knife to spread the paste through the square Mixed Media Fragment then lifted and repeated the process to give me 2 textured areas. As you can see by the third small picture, a little paste gets left behind on the piece but it is still perfectly usable for another project.

I used some gesso and then paint and distress stain on this once it had dried overnight.


Once I had the background done it was time to work on the decorative pieces. I took the diamond Mixed Media Fragment and applied gesso which I then dried with my heat gun. I squiged (very technical term I know) my distress ink - Wild Honey, Spiced Marmalade and Picked Raspberry - onto my craft mat and sprayed with water. I then dragged my gessoed piece through the ink. Once dry I applied a random layer of Rock Candy Distress Crackle and left to one side to dry overnight.

I gessoed all the other pieces I wanted to use and applied paint, stain and ink to them to get the look I wanted.

Finally I stuck the pieces where I wanted them on my pages and added some White Enamel Accents (by Ranger) to various pieces to help them stand out.

And there we have it - getting messy just because you can, no other reason than that.


Ingredients:

Mixed Media Fragments 2
Retro Frame Set
Butterfly Corner Bottom
Words & Phrases 1

Monday, November 13, 2017

Life Lessons art journal page by Lynne

Hey crafty folks! Happy November! I've got some Christmas themed projects underway but thought I'd get one more regular project up before I start bombarding you with Jingle Bells and Joy to the World stuff!

This art journal page uses lyrics from a George Michael song that came out when I was just barely out of my teens (yeah, I know I'm dating myself here!) It came to mind recently when I was pondering how difficult some life lessons can be and how I'd really rather not have to go through the experiences necessary to learn them. I think most people can relate to that sentiment at one time or another, and creating this was a form of therapy for me.


I used papers from the Authentique "Curiosity" collection, tearing and collaging them to form the basic background. The collection has the feel of an old-time classroom, so I thought it was perfect for the "Teacher" theme and lyrics...


I painted all the chipboard pieces with red acrylic paint first, using pieces from the Vintage School Set, the Eyeglasses Shape Set and the Scribbled Frames and Lines set.


I then rubbed them with the black ink and silver wax, the apple with much less and the eyeglasses with quite a bit more. Those two pieces were heat-embossed with UTEE, and all the others were brushed with the matte medium to keep the product from rubbing onto the facing page in my art journal.


These two after UTEE was added:


I stencilled with the clear paste then rubbed over the stenciling with the black soot ink when it was dry; the letters and numbers are a Tim Holtz stencil.


I found this word on one of the papers and tore it out separately to use as art of the journaling. Circling it with red pen makes it stand out and adds to the classroom feel.


I added some misting with a couple shades of yellow and some tan and white sprays, then attached the journaling strips which were cut from some of the coordinating paper.

 I did some hand journaling around the edges after this photo was taken, printing in block letters to stay with the theme. Thanks for checking out my page, and may all your visits to the School of Life be happy ones!

GYPSY SOUL ITEMS USED

Vintage School Set (contact store)
Eyeglasses Shape Set
Scribbled Frames and Lines

OTHER ITEMS USED

Authentique Curiosity collection
Ranger Black Soot Ink
Red acrylic paint
Prima Art Alchemy Metallique Wax-Aged Iron
UTEE (Ultra thick embossing powder)
Ranger transparent gloss texture paste
Ranger Multi Medium Matte
Tim Holtz stencil-Schoolhouse


Monday, May 30, 2016

"Ready to Fly" - Art Journal Page by Mary

Welcome to the blog today! I have a page from my art journal page to share with you. My inspiration was lyrics from a song (Ready to Fly by FFH) and I knew which of Gypsy Soul's products I had wanted to use! I first used a light blue chalk to lay a sky base. To make the "clouds," I cut a piece of scrap paper into two different cloud shapes. I then used the template and a darker blue chalk.
The hot air balloons were covered with paper and distressed with ink while the baskets were heat embossed!
 The letters on the balloons are adhesive and the other words are rub-on letters.
 The three birds were all inked and then liquid embossed.


On the left is my first page and I didn't like it! That is the great thing about art journaling; you get a chance to play around with different techniques. I took the pieces off, rechalked the clouds and reattached the pieces. I so like the final page way better. It is less cluttered and I still feel the inspiration of the lyric.

Thank you for dropping by today!

Gypsy Soul Laser Cuts Products Used
Hot Air Balloon Stack Up
Birds Shape Set

Other Items Used 
Chalk
Prima Paper
Gathered Twigs Distress Ink
Rub-on and Adhesive Letters from stash
All Night Media Liquid Embossing - Clear Glass Finish
Stampendous - Aged Marine Embossing Enamel

Saturday, May 21, 2016

Shanna's Art Journal Page

Hello lovelies, Shanna here to share something new I created. How are you all today? Ready for a little art journal inspiration?


Okay so first you know everything gets a cat of gesso! 


Then I layered up the background with some scraps of paper and covered it with more gesso. Then I went to town with some ColourArte Twinkling H20's. You can really see the shimmer. 


Then I added some finger painted circles with ColourArte Silks Acrylic Glazes and then once dry went around them with some black acrylic paint. I also did some background stamping and splatter marks. 


Once everything was dry I added my Yarrow chipboard to the page along with some Tim Holtz Chit Chat stickers. I added some a a tea stained tea bag behind the words to give them a little extra pop.


Overall I just love how I incorporated the chipboard into my art journal page. 
I hope you have found some inspiration here today and that you grab your chippies and have fun creating. 

Product Used:

ColourArte: Silks Acrylic and Twinkling H20's