Showing posts with label Cardstock Doily Set 1. Show all posts

Saturday, December 26, 2015

Two Cards from Shanna

Hello lovelies!!!! Shanna here with cards to share.bI wanted to make something bright and fun and I thought I should play with some texture sheets from Gypsy Soul Laser Cuts. What do you think???

This is my first card I created and I painted my chipboard with gesso first. I also used a Cardstock Doily from the store. 


I created my own mist and sprayed the chipboard after the gesso dried. I used a heat gun to dry the mist so it had this watercolor look to it. Do you see the shimmer?

For my second card I had actually used some paper to clean up the blue spray and thought why not tuck it behind my other gesso covered chipboard. 

I think the white just pops off the card. 
I wanted to finish this card off with a rustic key I created with a few layers of Silks Acrylic glaze paint that was dried with a heat gun in between layers. 


Items Used:

Tuesday, December 15, 2015

Shabby Glam Angel Banner

Hi everyone! Amylove here with the next addition to my shabby Christmas decor. Everything is really coming together! I think my hubby even likes it...he won't admit it though.
Follow this link to my video tutorial for this beautiful banner: Shabby Banner Tutorial

Products used from Gypsy Soul Laser Cuts:

Happy Holidays!!

Tuesday, December 8, 2015

Recipe Shadow Box Frame by Amylove


Hi everyone! This is a gift I made for a Christmas craft swap. It is a framed holiday recipe. I just love the idea and plan on making more of these as gifts.


Follow this link to a step by step tutorial of this project: Holiday Recipe Frame

Products used from Gypsy Soul Laser Cuts:

Saturday, October 24, 2015

Bright Artist Trading Block


Hey all you lovelies out there. Shanna here today with a little inspiration. I know everyone is so excited to share Halloween projects, however I just wanted to do something bright and colorful! (Weird I know!)

So I grabbed my last Artist Trading Block (ATB) and got to creating.

I used watercolor paper and did some stamping and inking and stenciling. Once my papers were ready I covered my block. 
Then I continued decorating it. I inked the cardstock doily with Distress Ink and used Distress Paints on the knob, feet, and a Punchelement. Stacking each on each other. I love the contrast of bright colors. 
The feet are dowel ends you can get at any craft store. 
Then for the final piece to make the ATB pop out, I colored the bird with some distress paint and added a Tim Holtz small chat on the front which I thought was befitting of the ATB.

I do so hope you enjoyed my little creation. Make sure you keep coming back for more design team inspiration!


Gina's Designs Products

Monday, September 28, 2015

Inspirational mini-canvas set


Hi there! Lynne here sending greetings from beautiful, warm, sunny southwestern Ontario along with a sunny, happy set of canvases I created with lots of awesome goodies from Gina's store. The sentiments are from Teresa Collins' Nine & Co papers and are on 8x8 canvases.


I ran the border strip through an embossing folder, attached all the elements to the canvas, stenciled with texture paste, then coated the entire project (except for the sentiment) with gesso. I then used Twinkling H20s to add patches of various colours all over, covering the entire gessoed area. When those were dry I then applied another coat of gesso to blend and soften the colours. When that was completely dry I covered the sentiment with a piece of cardboard and misted the entire surface with a variety of colours until I achieved the intensity and blend I wanted. Splotches of black acrylic paint added contrast and tied the black elements of the sentiment pieces in with the rest of the project.


I know it sounds like a lot of steps were involved but they were all simple steps and the most time-consuming part of the project was allowing the layers to dry, although I did use the heat tool when I wanted to get to the next step a little sooner!


Thanks so much for stopping by and I wish you a wonderful, happy, sunny week!


Gina's Items Used


Other Items Used


Teresa Collins Nine & Co paper-cards


Colourarte Twinkling H20s


Prima and Crafter's Workshop stencils

Friday, September 11, 2015

"You Make Me Smile" Card and Gift Box With Mini Book Charm by Kim C.


This week I have done two projects.

The first is a simple card created with kraft colored cardstock and some vintage pattern paper from my stash.I then added a doily to the side of the card.  The edges were distressed with ink.  I made some flags from the vintage paper and added them to the right top corner.


I took the sentiment "You make me Smile" and embossed it with black embossing powder. A dew drop from The Robins Nest was added to the "i" to make it stand out.


I also added more of the dew drops to the bottom right corner.  I took the other half of the doily and added it to the inside of the card.  I then added some flowers from my stash to the bottom left corner.  I inked all the paper and cardstock with distress ink.


My next project is a gift box with mini book charm.  I made the box from kraft cardstock.  I wrapped vintage pattern paper and some lace around the middle of the box.  I inked the box and paper with distress ink.


I then added some flowers from my stash along with a vintage dressform.


I made a mini book charm that hangs from a lobster claw clasp, which I attached to a book mark style tag.  I added beads and a charm to the chain and also added some lace and a metal flower to the front of the book.


I just love how these two projects just go together.


Gina's Design's Items Used:


Other items used:


Dew Drops


Wild Orchid Craft Flowers


Mirabella Paper Collection from The Paper Studio


Lace


Cardstock


Distress Ink - Vintage Photo

Monday, August 24, 2015

Catch your Dreams Canvas


Hi crafty people! This week I decided to create a mixed media canvas with a quote from a sheet of Kaisercraft "Be-YOU-tiful" paper and lots of awesome Gina's goodies.


 After figuring out where I wanted everything, I added the stenciling, primed the canvas and all the pieces were covered with gesso, and then glued them on. I then painted the entire project with gold acrylic paint before adding several different colours of mist. Some I dried between colours and others I didn't. This created a marbled effect in some spots. I also dabbed at some areas with a wad of paper towel to create a mottled effect and remove larger spots of mist. To define the edges a bit more, I dry brushed the pieces with black acrylic paint.


After everything was dry, I slid the quote into place (I had glued only the top of the arrow one side of the flowers, and only part of the key so this would be possible). I had a great time putting this together and getting messy with the mist and paint was so much fun! Have yourself a terrific weekend and be sure to find time to get messy!


Gina's Designs Items Used


Other Items Used


Kaisercraft Be-YOU-tiful paper


gold and black acrylic paints


misc spray mists


Tim Holtz metal arrow


Prima metal shape


Prima and Crafter's Workshop stencils

Saturday, May 30, 2015

"Beautiful" Altered Canvas by Kim C.


Welcome everyone to this weeks DT project for Gina's Designs!


This week I decided to do an altered canvas that has a picture of my "Beautiful" daughter just before her prom.  I wanted to keep this simple and elegant.  This is a 12 x 12 canvas, that has paper from My Minds Eye.  I layered the paper with white cardstock and layered the photo also with the same cardstock.  I inked all the edges with Broken China distress ink. 


Layered behind the photo is the Deco Lattice Panel 2. Gesso and watered down Broken China distress ink was used to give it a softened look. Cut up Grape Vines were tucked in behind the flower clusters in the corners.  I also used a doily from Cardstock Doily Set 1.


Here you can just see the doily sticking out from under the trim and lace under the pattern paper.  You can also see more of the grape vine piece.


"Beautiful" is one of the many words in the Words and Phrases 1 set.  Gesso was first applied to the word then inked with distress ink. Clear embossing powder was applied last to make it pop. 


Here you can see the other half of the doily I used, along with more of the grape vine.


I hope you have enjoyed this weeks project.


Gina's Designs Products Used:


Other products used:


Distress Ink : Broken China


Lace/Pearl Trims


Wild Orchid Crafts Flowers


My Minds Eye Paper


White Cardstock


12 x 12 Canvas


Thanks for stopping!!


Kim :)

Saturday, April 4, 2015

Easter Card and Treat Holder by Kim C.


Hello everyone!  Welcome to my first project for Gina's Designs.


What I have created today is an Easter card and treat holder.


First is my card which I used several pieces from the Easter build a layout on; the basket, the small eggs, and one of the bunnies.  I painted the bunny with gesso then added snowtex to make it look like fur.  One of the small bows was added to the bunny, which I inked with distress ink and used glossy accents on it.  I added paper to the small eggs and the basket.  Twine was added as well to the basket handle.  I also added some trim, seam binding and flowers all from my stash.  Along the side of the card, I added some metal letters and a word bead which says "Easter Love".  I inked all the papers and the embellishments with distress ink.


My treat holder is an altered fry box.  I used the large eggs and the lamb from the same collection.  I also added a doily from the "Cardstock doily set 1".  I used the same technique on the lamb as I used on the bunny.  I also added trim and flowers from my stash.  I inked all the papers and the doily with distress inks.


Gina's Designs items used:


Easter build a layout (Coming to the Store soon!)


Other items used:


Graphic 45 Paper


Wild Orchid Craft Flowers


Fry Box


SnowTex


Glossy Accents


Trim


Seam Binding


Metal Letters


Word Bead


Distress Inks; Vintage Photo and Victorian Velvet


Gesso


Cardstock/Corrugated Cardstock


I hope you have enjoyed my first project.  More pictures can be seen on my blog:


Thursday, January 29, 2015

Snow Angel Layout Featuring The Robin's Nest Product


Hello friends! Today I am sharing my layout with you which features the lovely papers and cut outs from The Robin's Nest.  This is our third year working with the Robin's Nest team and we were super happy to be able to create with this fun set of paper designs.

I chose to do a layout this time as I just loved this Snow Angel Paper!  Gina's garden fairies, snowflakes, and pine tree shape set went really well and kept with in the theme I was going for.


I layered on lots of lovely Venise trim and flowers from Kraftsupplies4U, and then tucked in some of the snowflake cut outs we got with our Robin's Nest Papers.

I heat embossed the Fairies with some white and gold powder and then touched up their wings with some silver and gold Silk Acrylic Glazes.  The snowflakes were also heat embossed and then I added some fun Prima Bling to the center of each.

The pine trees were a lot of fun to make. I used more of the Silks Acrylic Glazes on them in some blue and green tones and then topped them off with some Snow Tex to give a wintery feel.  The lovely lady in the photo above I thought went perfectly with the snow angel theme and I surrounded her with some rosette trim and snowflakes.

I hope you have enjoyed seeing my layout!  I had lots of fun creating with The Robin's Nest Papers, you can check out their site HERE for more information.

Thanks for stopping by!

Gina's Designs Items Used

Other Items Used
Robin's Nest Paper and Cut Outs
Silks Acrylic Glazes
Laces and Flowers from Kraftsupplies4U
Petaloo Flowers
Tim Holtz Rosette Trim & Found Relatives
Snow Tex
Prima Flower Centers
Kaisercraft Acrylic Overlay

Monday, January 5, 2015

Altered clipboard


Hi folks and Happy New Year! In the spirit of new beginnings, I decided to alter this basic clipboard to hang on my scraproom door to hold messages, reminders, quotes, or whatever...my memory is NOT my best         feature so I need all the help I can get!!


I painted the chipboard Flourish Miniatures with acrylic paint then sponged them with a lighter shade to soften the look; they're so pretty they didn't need much embellishing. The fairies were painted pale blue then heat embossed with Lindy's Silver Moon Turquoise embossing powder; love the glow it gives them! I also added one of the Cardstock Doilies, which I cut in two and added to both sides.


Thanks so much for stopping by and I wish you  a wonderful, creative, colorful New Year!!


Gina's Designs Products Used


Flourish Miniatures

Garden Fairies small


Other Products Used

Lindy's Stamp Gang embossing powder-Silver Moon Turquoise

Blue Fern Studios Montage papers

Wednesday, December 31, 2014

Happy Holidays Shadowbox by Mary


Thanks for stopping by Gina's blog on this last day of 2014. I have a happy holidays shadowbox for you today. I apologize for posting this after Christmas, but it was a gift!


This element piece was made with one of Gina's doilies and a punchelement 1 inch scalloped.


You can see the three different techniques I used on the ornaments. After they were painted I used bling on the first, a rubber stamp on the second, and one of Gina's snowflakes that I glittered on the third.


The number 25 was custom made by Gina.


From all of us a Gina's Designs, have a safe and Happy New Year!


Gina's Designs Products
Faux Metal Number Plates (Custom Ordered)


Other Products Used
Paint: Liquitex - Burnt Umber
Folkart - Lipstick Red, Classic Green,
Wicker White, Thicket
DecoArt - Dazzling Metallics - Luminous Gold
Paper: Bo Bunny - Silver & Gold Collection
DCWV - The Christmas Combo Stack
DCWV -  The Homemade Christmas Stack
White metal snowflake brads
Large metal snowflakes - ButterBeeScraps
Glitter - Martha Stewart
Candy cane
unmounted stamp
red pearl trim
bells
acetate
tag

Sunday, December 28, 2014

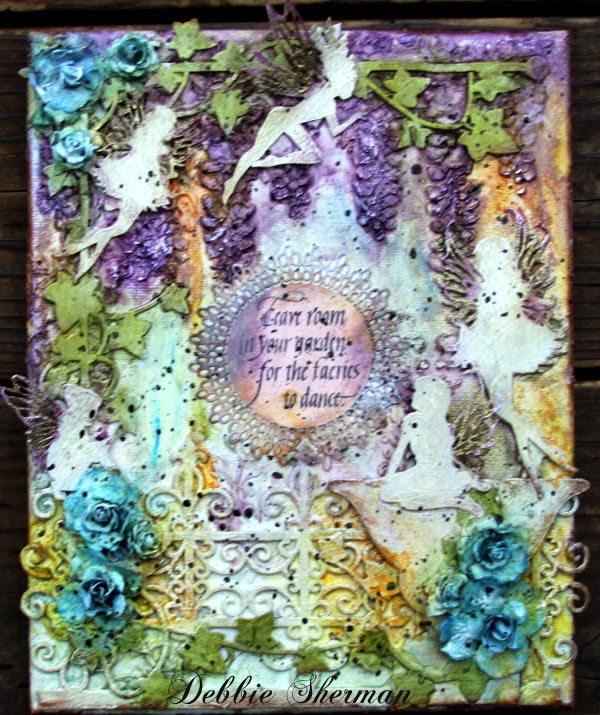
"Leave Room in Your Garden For The Faeries to Dance" Canvas


Hi Everyone!  Debbie with you today sharing a mixed media canvas that was created with Gina's Designs chipboard and various sprays and rubs. The canvas is titled "Leave Room in Your Garden For The Faeries to Dance."


Instructions:


Using modeling paste and stencils of choice, add some texture to your canvas and dry


Adhere all your chipboard


Adhere flowers


Gesso the whole canvas including flowers and chipboard pieces


Spray with different colors of  mists (I used Tattered Angels)


Stamp sentiment on sprayed doily


Adhere to center of canvas


Emboss faeries wings with embossing powder of choice


Rub canvas with finishing rubs (I used DecoArt)


Add splatters with mists


Gina's Designs Products Used:


Thanks for stopping by Gina's Designs blog today!