Showing posts with label Valentines Shape Set. Show all posts

Sunday, July 30, 2017

"Best Friend" altered photo frame

Hi there! Lynne here with a wooden picture frame from Dollar Tree that I altered with some great Gypsy Soul pieces and a little stencilling, mist and this 'n that!


I started by priming the frame with antique white acrylic paint, then figuring out which chipboard pieces and other embellishments I wanted to use and their placement. I then primed them with the same paint.


I added some stencilling with texture paste, then attached all the embellishments-I used white glue for the chipboard and hot glue for the flowers. I also added some drywall tape and one more coat of paint over the whole thing.


Before misting, I spongepainted the whole surface (including the embellishments)with white and light blue acrylic paints for some background variation.

Misting is fun! I just sprayed with pretty much every shade of blue I could find in my stash, adding a little more colour in some areas, until I was happy with the effect. I added turquoise microbeads to the heart and clear ones to the wings, and attached the large clear embellishments with hot glue. The quote banner was fussy-cut from patterned paper (unfortunately I'm not sure what line it's from) and popped up with dimensional Glue Dots.


The frame came without glass, so I just cut a piece of clear acrylic packaging to put over my photo, a "selfie" which I took about a year ago on my bestie's balcony. Thanks so much for stopping by; I hope you too have a fabulous best friend in your life like I do!

GYPSY SOUL ITEMS USED

Steampunk Shape Set 
Five petal flowers with flourishes-coming soon
Valentine shape set

OTHER ITEMS USED

acrylic paint
glimmer mists
Crafter's Workshop and Prima stencils
texture paste
drywall tape microbeads
white glue, hot glue gun and Glue Dots

Tuesday, May 30, 2017

Lily of the valley card


 Hi everyone, just another simple card today with lots of Gypsy Soul Laser Cuts items. They are so easy to use and make a lovely card to give to someone special.


I began by deciding which items I wanted to use on my card and decided on a floral theme, with the lily of the valley being the prominent item.


I began by gessoing  the items to go on the card, then I used distress inks to colour them all, ( you can use any colouring medium you like really, it doesn't have to be inks, paints will do just as well, I quite often mix them).

I started with an 8 x 8" scalloped edge card blank from my stock, and covered this with a paper from my stash which I edged with brown ink. Onto this I stuck the chicken wire which I had cut diagonally, covered with gesso and some white ink, but then dabbed it spasmodically with a pale brown ink. I stuck this to the bottom right hand corner.

I then added the Lily of the Valley onto the left hand side, slightly overlapping the wire. (you will notice from this photo that the Lily of the Valley are yellow, but when I had put all the card together I decided that the yellow was too bright so I toned it down right at the end with some white distress ink)


Next came some pretty floral embellishments. I used ones by Petaloo, but again any flowers can be used, and because they looked like roses I added some rose leaves underneath.


I didn't think that the heart was enough to finish off with so I coloured up a butterfly, adding flat back gems to make it sparkle, and added that just above the flowers.


 Then to finish off I added the heart which I put self adhesive metal accents onto, and also added these to each corner of the card.


This card is really easy to make so I hope it will inspire some of you "beginners" to have a go, maybe with other items from Gypsy Soul Laser Cuts, there are loads of them.

Gypsy Soul Laser Cut items used:

Chickenwire
Lily of the Valley
Rose Leaves
Butterflies and dragonflies
Heart (Valentine shape set)


Wednesday, January 28, 2015

Mini Album by Dianna


Hi everyone, I hope the weather is treating you well and not dumping snow where you live.  Below are the first six pages of my first ever mini album.  This mini album was created for January's color challenge on Gina's Designs Craft Group located on Facebook.  A designer for Gina's Designs and co-host of the Craft Group Page, Deann McNulty, challenged members to create an item using the below colors. 
 I decided to challenge myself even more and create a mini album.  There was a lot of stress and yes, I will say it, cursing on my part, but it turned out to be a labor of love and something I really enjoyed creating.   Please enjoy the first six pages of this mini album (yes it is completed and you will have to visit the Craft Group page or my blog page to see the finished product in a couple of days).

The first page is one of the last pages that I created. It has two folds that are interactive and fold upward.  The key, flourish and double hearts are from Gina's Designs.  I sprayed them with a favorite of mine, Maya Mist -  Blue Agave and then used Stickles, a lime color, on them. All pages in this mini album were distressed with Vintage Photo ink.  The owl is from Rubber Moon.

The second page is a sideways interactive fold that was punched and attached to the folder.  The owl stamp was colored with Copic markers and placed on a Gina's Designs flourish and love ticket.  Both chipboard pieces were sprayed with Maya Mist.

The third page has Gina's Designs scribble frame hearts and flowers. I left the top open so that a picture can be placed inside. The butterfly is from Gina's delicate frames and ornaments.  I used Blue Agave on both, but with the butterfly, I sprayed it three times not waiting for it to dry. This gave it a tie dye effect. The owl is a punch from Hobby Lobby.

The fourth page is actually my first page. You can see the manilla folders used to create the 4 x 6 pouches that are used on each page.  Inside each pouch is a pull out for two pictures (one on each side).  The double hearts and dream butterfly frame are from Gina's Designs and sprayed with Maya Mist.  The pocket was made with Taylored Expressions, Tag Pocket.  I made the tags with my new Fiskers tag punch (very cool, it punches the tag, creates the hole and puts the eyelet). 

The fifth page is an interactive downward fold. The flag with the word stamp was made with a Fiskers punch and the dragonfly was a punch. The inside flower was made with punches.


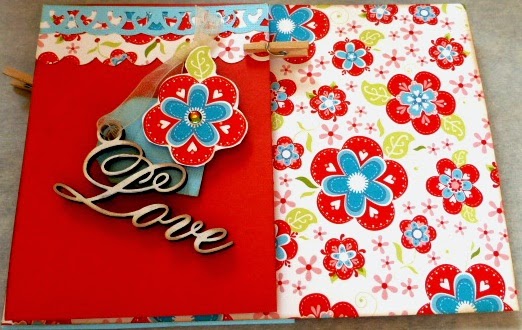
The sixth page was a downward interactive fold.  The Love is from Gina's Designs 10 words and top was painted white and distressed.  I punched out a small tag and cut out one of the flowers, poped it up and added a rhinestone.

Standing Flip Book by Guest Designer Pat


For my final project, I saved the "best" for last. I chose to use the Wood Hanging Stand With Pages and I chose the bracket pages. I painted the entire stand with Martha Stewart Pearl Paint in the color Jet Stream.

Using Prima's Something Blue Collection, I covered the pages with that gorgeous paper. For the "title" page/front page, I used some of the words from Gina's Word Art Romance and Valentine's Shapes Set.

Spelling out Beautiful Love as the title of my album, I tried to match the paint to the paper line, so I painted both with a mixture of orange and pink paint to get the right hue. I then painted the word "love" with Martha Stewart Satin Paint in Mint Green.

I then took a dark pink and made polka dots on both pieces using the handle of my paint brush to make the dots. I added a doily to the right corner and then added a cluster of flowers from the Prima collection. On the base of the stand, I also added some Prima flowers to decorate. Thanks for stopping by the blog today!

Wednesday, January 21, 2015

Memory Tray by Guest Designer Pat


This
week I had the pleasure of working with the Memory Tray Shadow Box. 


I
started off by spraying the entire piece with Lindy's Stamp Gang
Starburst sprays (in pink and red). I added some K & Co. paper to
the inside edges of each box, as well as the top and sides of the shadow
box. I painted some of the hearts from the Valentine's Shape Set with
white and pink paint. I painted a heart and locket from the same set in
metallic copper. Once everything was painted and papered, I began
assembling each section.


 For
the very top, I added a piece of lace cut to the shape of a fan. I
layered the phrase "A Little Romance", in its raw form, from the Words
& Phrases 1 set. I heat embossed the lips with Ladybug Red from
Martha Stewart, then added it next to the phrase at the top. I added an
"XOXO" ticket from my stash.


For
the largest compartment in the shadow box, I added a doily from the
Cardstock Doilies Gina sent me. I stamped the Victorian couple on
vanilla card stock and loosely cut it out to add on top of the doily
using dimensional adhesive. I added a ticket that says "love" from my
stash. I placed one of the hearts from the Valentine's Shape set in the
left upper corner and layered a raindrop sticker on top. A couple of
gorgeous roses finished off this compartment.


  The rest of the small compartments are pretty self explanatory, I think, by looking at the photos. I added a few more roses here and there from my stash, along some bows and a clock charm from my stash. The dress form embellishment is one that I made last week, but it does use Gina's dress form and doily.


Gina's Designs Products Used:

Memory Tray Shadow Box

Valentines Shape Set

Words & Phrases 1

Cardstock Doily Set Intricates

Word Art Romance 

Dressforms 2 Shape Set


Wednesday, January 7, 2015

Love Wall Art Kit by Guest Designer Pat


Hello everyone! Pat here with my first guest design project, the Love Wall Art Kit. I was so happy to be asked to be a guest designer for this month.  

Let me tell you briefly what I did for this project. Using DCWV's Once Upon A Time paper, I
covered the 4x4 pieces. I then dry brushed white paint onto the corrugated pieces. Next, I painted the letters and one of the String Alongs - Hearts with FolkArt's Metallic Rose.
I used some white lace from my stash to attach the letter pieces together to make the wall hanging.

I chose some pieces from the Valentine's Shape Set and painted them.  White feathers were added to the swans for wings.


I then added some bling throughout the entire project.


A sheer pink bow was added to the very top and a loop of ribbon for the hanger part.


Gina's Designs Products Used:
Valentines Shape Set

Please visit my YouTube channel - PatsTreasuresNCrafts,

Thanks for stopping by the blog today!

Friday, February 14, 2014

Victorian Frame with Easel by Kim and Wall Art by Heidi


We have two projects to share today beginning with a gorgeous Victorian Frame and Easel set by Kim.

Hello Friends and Happy Valentines Day! Today I'm sharing my altered Victorian Frame & Easel.  I just love this frame set, it really hearkens back to the time when photography was just starting to come into its own. The photo I chose for the center is a copy of a vintage one taken back in 1887, the name on the back of the photo was "Aunt Emma" so that is what I call this lovely lady.
I embossed all around the frame, and used Gilders Paste to give the effect of aged copper. I added some metal copper corners to add to the metallic look.

The bottom left corner of the frame has some of Gina's Feathery Flourish Pieces, which I embossed and then layered on some two toned burgundy and tan roses to complete the look.
Above is the front of the easel. I have gone over it with gesso, then used Gilders Paste in 2 different colors to give a worn metal look. I layered on some vintage laces, a metal Love embellishment in bronze, velvet ribbon, flowers and  a crochet button. I have also added a gorgeous metal peacock to the side of the Love frame.

You can see more of the Feathery Flourish there, which I embossed with the same colour as the other pieces on the frame.
Above is a close up of some of the Steampunk Angel Wings from the  Dressform and Wing Set on the top right, and an applique and flower from my stash.  

Below is a photo of the Easel you receive in the set. You can see how I distressed it to give it a worn look. The frame just sits nicely on top of it..

I hope you like my project today and thanks so much for stopping by!

Gina's Designs Items Used

Other items used
Stampendous Embossing powders in Aged Copper, Aged Silver and Shabby White
Making Memories Love Frame
Wild Orchid Crafts Flowers
Lace and Applique from my stash
Metal corners from ButterBeeScraps


Next up is Heidi with a beautiful home decor wall art piece, one of several new products that were designed with Valentine's Day in mind, but can used anytime of year.


Hello, it's Heidi again with a little wall art from Gina's Designs.  The actual kit comes with the chipboard square that I covered with Valentine papers, the corrugated board  and then the letters L O V E. I used the swans from the Valentine set as the hanger at the top!


I painted the letters with a deep red paint and then left everything else natural!   Adding a few bits and pieces from the Valentine Sets that Gina has along with the ever so lovely doilies! 

Gina's Designs Products: