Wednesday, May 19, 2021
Little and portable frame
Thursday, April 22, 2021
Art Journal Page - Think Like A Queen
Hello everyone! Today I have the second art journal page I mentioned in the last post, which has been made by following the prompts in the journal cards I made in this post.

This time, I will keep pulling cards till I feel like the page is finished. I will be drawing one card at a time and obeying it before moving on to the next card. I shuffled my cards and then drew one prompt card as follows: SPRAY
I'm not a fan of spraying so I wasn't so happy about drawing this card but I must obey the cards, so I used a Prima Color Bloom spray in Dark Tulip and added some water to make it spread around the page.

After drying with a hairdryer, I shuffled and drew a second card: COLLAGE
I chose to use these gel printed backgrounds for my collage.
I used matte gel medium to stick everything down on my page.
The next prompt I drew was: FOCAL POINT
This is something I prefer to add at the end, however, I am obeying the cards so I had to add it to my page now. I had this image of Marie Antoinette on my desk and also this frame which I had previously painted gold, but the photo is the wrong shape for the frame so it was time to improvise.
I glued the image to the frame and then used the excess to fill in the gaps.

I used some Pitt artist pens to blend it all together and hide the joins in the paper a little bit.
Focal point added, it was time for another card, and this time I drew the COLOUR CARD. This card has six options and I rolled a 5 which was BLUE. I was a bit worried about adding blue to this page, but if the cards demand it...

I chose a Prussian Blue heavy body acrylic and painted it carefully around the sides of my page and other places, hoping that they didn't clash too much.
Time for the next prompt and it was another colour card: BLACK OR WHITE
I chose WHITE and used Titanium White acrylic and a palette knife to apply it randomly over my page.
Once the white paint was dry, it was time to pull another card: SOMETHING METALLIC
I already had something metallic on my page thanks to the gold frame, but that was not done specifically for this prompt so I decided to add more metallic to the page. Firstly a Champagne metallic Gelato scribbled across the page on top of the white paint. Then some gold ink splatters and finally some of the gold leaf collage pieces leftover from making the prompt cards themselves.
Time, for another prompt and this time it was: MAKE SOME MARKS

I used black pencils to make my marks around the edge of the page and to draw around the gold leaf collage pieces..
No drying time required so time for the next prompt: BOOK PAPER
I had these scrap squares of book paper on my desk and they were already painted blue, but a different shade of blue to what I used before, but I decided to use them anyway. So I glued them together to make a larger journalling block and then wrote this quote by Oprah Winfrey in white pen:
Think like a queen. A queen is not afraid to fail. Failure is another steppingstone to greatness
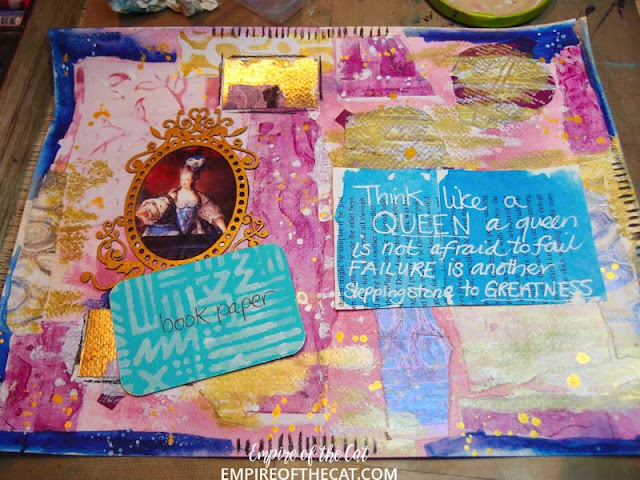
So there we have it, after eight prompts, the page feels finished to me so I decided to stop pulling prompt cards and called it done.
Let me know what you think in the comments!
Till next time,
Project Recipe:
Flourished Frame Elizabeth BB66A
In the gel prints: PE126ES Seaweed Circle *coming soon*, PE129ES Oceanic *coming soon*, Leafy Swirl C7G
my art journal, Prima color bloom spray dark tulip, collage materials, gel medium, photo, black pencil, heavy body acrylic, gold ink, PITT pens, gelatos, book paper, white pen, and of course, the journal prompt cards!

Friday, June 26, 2020
This year I'm hoping to be prepared for Halloween and Christmas! I have a huge collection of scraps and decided to use one of them with the Gypsy Soul Laser Cuts "Layered Wire Frame Tulip".
This scrap of paper is an old one from my stash, Making Memories, but the design fits perfectly.
I used Stampin' Up Dimensionals on the four backside corners of the fancy front of the frame to pop it up a little and also used bling from Queen & Copany to give it a little more surface to adhere to.
Monday, May 6, 2019
Vintage Confidential
Do you ever purchase a paper collection in duplicates? I sure do! Especially Graphic 45. So in love with G45's Communique designs. I used it on the card I am sharing today.
At the moment I don't have access to all my fun paints so I used an airbrush to "paint" the Stained Glass Fergus frame. I used a Sharpie adapter and airbrushed the frame with black for full coverage. I used a brown Sharpie on the Leafy Swirls with light airbrushing in black.
The flowers were a bit creamy so I took the brown Sharpie and airbrushed them for a more antique look.
Before adhering the paper, I also airbrushed the edges in brown for a vintage vibe.
Everything on the card got airbrushed. Excluding the typist. I wanted her to pop so I masked her off before airbrushing the edges.
I added a bit of jute on the tag and used pop dots to adhere to the frame and finished it off with bronze matte sequins.
I hope you enjoyed my vintage card and thank you for visiting.
Supply List:
Leafy Swirls and Buds D83L Coming soon
Stained Glass Frame Fergus D83G Coming soon
Graphic 45 Communique
Glue gun
Tape runner
Airbrush
Markers
Flowers
Pop dots
Twine
Sequins
Friday, March 3, 2017
Victorian Frame and Easel
I mean, just because I'm annoyed, that doesn't mean I don't want things to be pretty!
• Acrylic paint
• White glue if you want a crackle finish
• Faux flowers and leaves
• Paper butterflies
• Hot glue
Monday, April 6, 2015
Spring Frame by Barb
Hi Everyone! After spending last month as a guest blogger here, I am absolutely thrilled to be a more permanent Design Team member! I have so many ideas for things to make and share that my head is a-whirl with them.
It is springtime and I have been delighting in all the vivid colors that Mother Nature has been flinging about. For some reason Spring and Easter take me back to my childhood even more than Christmas does. Oh, those days of finally getting to play outside without having to wear boots and five layers of clothing!
I remember the Easter gatherings... going to church and then coming home to the scent of ham already slow-baking in the oven, and "You kids change out of your good clothes and go play!" So, this picture of my younger brother and me captures those days perfectly. It's long been one of my favorite pictures and I'm so happy to finally have it framed.
I began with an inexpensive wood frame that I purchased at the local dollar store, and I selected various elements from Gina's Designs Spring Shape Set.
I coated the frame with bright green acrylic paint, spritzed it with water and wiped it down to give it a transparent look. I then used a little bit of white acrylic paint on a sponge and swiped some of it on the frame.
I recently discovered Radiant Neon Amplify and it is so much fun to play with! I thought it would make a nice contrast to do some of the flowers with it. How it works is: first the piece is coated and allowed to dry thoroughly; then heat is applied resulting in the ink puffing up. It gives things cool texture!
For the umbrella, I sponged some white acrylic paint on the domed part. Then I stamped little yellow suns all over it. I used my gold Pico Embelisher for the handle and lines.
For the "Spring" banner, I first sponged on white acrylic paint. Then I sprayed on various colors of irRESISTibles. Once all that dried, I outlined it with my white Pico Embellisher.
I love the joyful colors in this piece. It's so nice to have this sitting on my desk as a reminder of the beauty of Spring and the love of family.
Happy Crafting!
Gina's Designs Products Used
Other Products Used
Acrylic Paints
Beacon's 3-in-1 Glue
Wood frame
StazOn Studio Glaze
Radiant Neons Amplify
IrRESISTible sprays and pico embellishers
Rhinestones
Sun Stamp by Rosie's Roadshow


