
Showing posts with label journal prompt cards. Show all posts

Thursday, April 22, 2021

Art Journal Page - Think Like A Queen

Hello everyone!  Today I have the second art journal page I mentioned in the last post, which has been made by following the prompts in the journal cards I made in this post.  

This time, I will keep pulling cards till I feel like the page is finished. I will be drawing one card at a time and obeying it before moving on to the next card.  I shuffled my cards and then drew one prompt card as follows:  SPRAY

I'm not a fan of spraying so I wasn't so happy about drawing this card but I must obey the cards, so I used a Prima Color Bloom spray in Dark Tulip and added some water to make it spread around the page.


After drying with a hairdryer, I shuffled and drew a second card:  COLLAGE

I chose to use these gel printed backgrounds for my collage.


I used matte gel medium to stick everything down on my page.


The next prompt I drew was:  FOCAL POINT

This is something I prefer to add at the end, however, I am obeying the cards so I had to add it to my page now.  I had this image of Marie Antoinette on my desk and also this frame which I had previously painted gold, but the photo is the wrong shape for the frame so it was time to improvise.


I glued the image to the frame and then used the excess to fill in the gaps.


I used some Pitt artist pens to blend it all together and hide the joins in the paper a little bit.


Focal point added, it was time for another card, and this time I drew the COLOUR CARD.  This card has six options and I rolled a 5 which was BLUE.  I was a bit worried about adding blue to this page, but if the cards demand it...


I chose a Prussian Blue heavy body acrylic and painted it carefully around the sides of my page and other places, hoping that they didn't clash too much.


Time for the next prompt and it was another colour card:  BLACK OR WHITE


I chose WHITE and used Titanium White acrylic and a palette knife to apply it randomly over my page.


Once the white paint was dry, it was time to pull another card:  SOMETHING METALLIC

I already had something metallic on my page thanks to the gold frame, but that was not done specifically for this prompt so I decided to add more metallic to the page.  Firstly a Champagne metallic Gelato scribbled across the page on top of the white paint.  Then some gold ink splatters and finally some of the gold leaf collage pieces leftover from making the prompt cards themselves.


Time, for another prompt and this time it was:  MAKE SOME MARKS


I used black pencils to make my marks around the edge of the page and to draw around the gold leaf collage pieces..


No drying time required so time for the next prompt:  BOOK PAPER

I had these scrap squares of book paper on my desk and they were already painted blue, but a different shade of blue to what I used before, but I decided to use them anyway.  So I glued them together to make a larger journalling block and then wrote this quote by Oprah Winfrey in white pen:

Think like a queen.  A queen is not afraid to fail.  Failure is another steppingstone to greatness
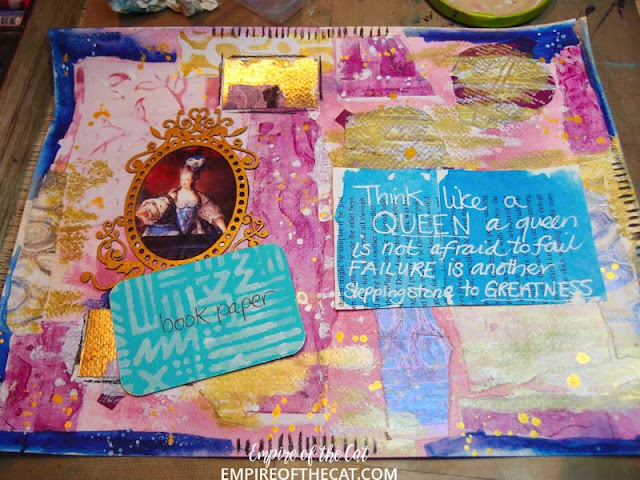
So there we have it, after eight prompts, the page feels finished to me so I decided to stop pulling prompt cards and called it done.

Let me know what you think in the comments!

Till next time,

Elle
Empire of the Cat


Project Recipe:

Flourished Frame Elizabeth BB66A
In the gel prints: PE126ES Seaweed Circle *coming soon*, PE129ES Oceanic *coming soon*, Leafy Swirl C7G
my art journal, Prima color bloom spray dark tulip, collage materials, gel medium, photo, black pencil, heavy body acrylic, gold ink, PITT pens, gelatos, book paper, white pen, and of course, the journal prompt cards!

Thursday, April 8, 2021

Art Journal Page - Off With Their Heads

Hello everyone!  Today I have an art journal spread to share and for my inspiration, I will be using the journal prompt cards that I made in this post.

To make this art journal page, I am going to use the prompt cards I mentioned above. There are many ways to use prompt cards and this is only one way. I will have a second post soon, showing another way to use the cards if you want less control over the process!  So for this exercise, I shuffled my cards and then drew six prompt cards as follows:

This time, I chose to pull all the prompt cards at once and to use them in whatever order I wanted, and not in the order in which they were drawn. 

So firstly, I did some journalling on the background for the HANDWRITING prompt.  The journalling is personal, so it is blurred in the photos. 

For my second prompt I chose ADD CRAYON and used neocolours on top of the journalling by scribbling all over the page which also takes care of the MAKE SOME MARKS prompt, then activated them with water to spread the colour over the background. 

At this point I also chose my FOCAL POINT which is this image of Marie Antoinette.


For the COLLAGE prompt I am using some of these gel prints I made using GSL chipboards in this post and some scraps leftover from making the prompt cards.


To make the focal point more of a feature, I thought I would give my regal queen a frame.


This is a two part chipboard frame also from GSL, so I chose two colours to paint it.


I used Pearl Magenta and Pearl Turquoise (I also painted a backup frame in Sunset Gold just in case).

At this point, there is only one of the six prompts left - TEXTURE - so first of all, I used a palette knife to scrape this turquoise heavy body paint across various parts of the page.


Then I added some gold paint splatters that were left over from something else I was working on at the same time. I covered up my focal point so she wouldn't get splattered.  It adds a little more texture and interest to the background.

For more texture, I took some texture paste and mixed it with Magenta heavy body paint.


I used this leftover negative diecut piece of watercolour paper as a stencil and applied my texture paste mixture through it.


Here's a closer look at the magenta paste on the page...


So now we are here and all the prompts are used but is it finished? 

Well it could be, but then I decided to add more collage pieces which were leftovers from this project.


And then for some extra HANDWRITING I added something I could imagine her saying!

xx

So that's the finished page using only six prompts but of course you can use as many as you need, more or less, and stop when you are happy with your page.  Let me know what you think in the comments!


Till next time,

Elle
Empire of the Cat


Project Recipe:

Layer Frame Felicity C58O
In the gel prints: PE126ES Seaweed Circle *coming soon*, PE129ES Oceanic *coming soon*, Leafy Swirl C7G
my art journal, black pencil, neocolours II, heavy body paint, texture paste, gold acrylic ink, collage materials, photo, cardboard scraps used as a stencil, magenta and turquoise metallic paints, glue, gel medium, black pen, and of course, the prompt cards!


Thursday, March 11, 2021

Art Journal Prompt Cards

 Hello everyone,

Today I have some journal prompt cards for you, made from the gel prints I made a few weeks ago. So first we make the backgrounds and then we turn them into the cards.

Introduction and Collage

If you do a lot of art journaling then it can be helpful to have a set of journal prompt cards. 

Start by gathering the monoprints from the previous tutorial.  I had nine prints but I will only be using three prints on each page.


I made two bases using 300gsm watercolour paper.  For the first one, I chose three of the backgrounds in complementary colours and torn them up and arranged them on the watercolour paper.  I took a photo at this stage to remind myself of the layout in case any of them moved.

When I was happy with the layout, I pasted them all down using matte gel medium.

Next, I moved on to the second background and repeated the process. 

Repeat the same process as above, tearing up the prints and laying them out on the watercolour paper until you are happy with how it looks and then paste them into place.

Once they are dry, use some gold size to cover all the white bits not covered by the collage.  If you don't have gold size, you can use glue that dries tacky.

Adding Gold Leaf and More

If you don't have gold leaf you can use gold acrylic paint.  Add the gold leaf, pressing it down on top of all the parts that are sticky from the gold size/tacky glue.  


I use my hands for this and then brush off the excess with a paintbrush.

Use the brush and your fingers to rub the gold leaf down into all the sticky bits and off of the collaged bits.  I felt like my backgrounds needed some black so I took a black stabilo and scribbled on it.

Then I activated it with water and a brush.

I did this to both pieces and left them to dry.  Please note:  stabilo pencils are water activated so you may want to seal them with a spray sealant at this stage or you may want to wait till the end and spray both sides.  

Decorating the reverse side

As the reverse side is where the journal prompts will be written, I decorated them too using some chalk paints in complementary colours.  

I added the paint and then smoothed it out using a brush and then a brayer.

Then when they were dry - they dry very quickly on their own or you can speed it up with a hairdryer - I added some stencilling in white chalk paint using a sponge.


The stencil I used is A4 size, the same size as the paper.

Here's a look at the pages after stencilling.

Making the Cards

Now to turn these pages into cards. If you are also using A4 paper you will be able to get 10 cards out of each sheet if you cut your cards to be 2.25 x 3.5 inches.  This is narrower than the standard ATC size which is 2.5 x 3.5 inches, but I wanted more cards and less waste.  If you want ATC size, you will only get 8 cards per sheet. If you are using a different paper size, you will have to do some calculations!


I cut them at the smaller size by first cutting them into 5 x 2.25 inch wide strips, and then cutting those into cards that were 3.5 inches long.

So now I have 20 cards ready to go.


And the reverse side looks like this...


I like to round my corners, so if you have a corner rounder, do that now.


To hide the white edges and tie them in with the front of the cards, I dry brushed some gold acrylic paint along the edges.  This is easy to do if you hold all your cards together and using a brush with very little paint on it, carefully brush along the edges.


Then just leave them to dry which should only take a few minutes.

Journal Prompts and how to use the Cards

Using a black waterproof pen, write your prompts on the cards.  Here's a look at the prompts I chose but yours can be anything you like.  There are two colour cards, one offers a choice of black or white and the other has six colour options - red, orange, yellow, green, blue, violet - or any colours you prefer.  For this one you can either choose your favourite or roll the dice!


To use the cards, shuffle them like a regular deck of cards and then select one or more and follow the prompt/s. The cards can also be hole punched and stored on a ring or you could keep them in a box or a small bowl.  They would also make great gifts for a crafty friend.


Hope you like this project.  Let me know in the comments below and I would love to see your cards if you decide to make a set.

Till next time,

Elle
Empire of the Cat


Project Recipe:

PE126ES Seaweed Circle *coming soon*
PE129ES Oceanic *coming soon*
watercolour paper, matte gel medium, gold leaf, gold size, stabilo all, Paperartsy chalk paint, stencil, black waterproof pen, gold acrylic paint,
Other: paper trimmer, corner rounder(optional)