
Showing posts with label Art Journaling. Show all posts

Thursday, April 22, 2021

Art Journal Page - Think Like A Queen

Hello everyone!  Today I have the second art journal page I mentioned in the last post, which has been made by following the prompts in the journal cards I made in this post.  

This time, I will keep pulling cards till I feel like the page is finished. I will be drawing one card at a time and obeying it before moving on to the next card.  I shuffled my cards and then drew one prompt card as follows:  SPRAY

I'm not a fan of spraying so I wasn't so happy about drawing this card but I must obey the cards, so I used a Prima Color Bloom spray in Dark Tulip and added some water to make it spread around the page.


After drying with a hairdryer, I shuffled and drew a second card:  COLLAGE

I chose to use these gel printed backgrounds for my collage.


I used matte gel medium to stick everything down on my page.


The next prompt I drew was:  FOCAL POINT

This is something I prefer to add at the end, however, I am obeying the cards so I had to add it to my page now.  I had this image of Marie Antoinette on my desk and also this frame which I had previously painted gold, but the photo is the wrong shape for the frame so it was time to improvise.


I glued the image to the frame and then used the excess to fill in the gaps.


I used some Pitt artist pens to blend it all together and hide the joins in the paper a little bit.


Focal point added, it was time for another card, and this time I drew the COLOUR CARD.  This card has six options and I rolled a 5 which was BLUE.  I was a bit worried about adding blue to this page, but if the cards demand it...


I chose a Prussian Blue heavy body acrylic and painted it carefully around the sides of my page and other places, hoping that they didn't clash too much.


Time for the next prompt and it was another colour card:  BLACK OR WHITE


I chose WHITE and used Titanium White acrylic and a palette knife to apply it randomly over my page.


Once the white paint was dry, it was time to pull another card:  SOMETHING METALLIC

I already had something metallic on my page thanks to the gold frame, but that was not done specifically for this prompt so I decided to add more metallic to the page.  Firstly a Champagne metallic Gelato scribbled across the page on top of the white paint.  Then some gold ink splatters and finally some of the gold leaf collage pieces leftover from making the prompt cards themselves.


Time, for another prompt and this time it was:  MAKE SOME MARKS


I used black pencils to make my marks around the edge of the page and to draw around the gold leaf collage pieces..


No drying time required so time for the next prompt:  BOOK PAPER

I had these scrap squares of book paper on my desk and they were already painted blue, but a different shade of blue to what I used before, but I decided to use them anyway.  So I glued them together to make a larger journalling block and then wrote this quote by Oprah Winfrey in white pen:

Think like a queen.  A queen is not afraid to fail.  Failure is another steppingstone to greatness
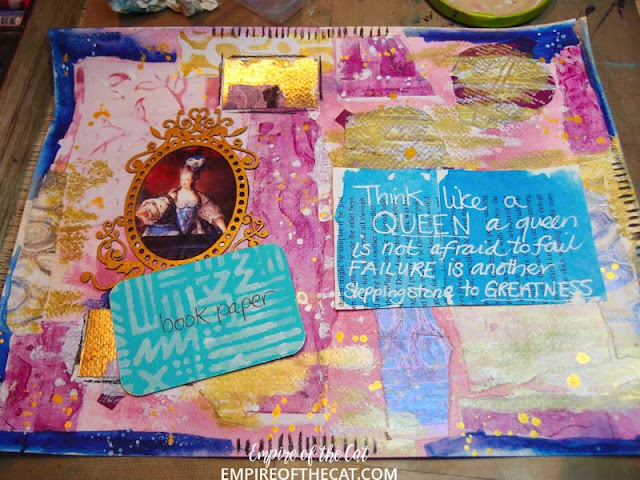
So there we have it, after eight prompts, the page feels finished to me so I decided to stop pulling prompt cards and called it done.

Let me know what you think in the comments!

Till next time,

Elle
Empire of the Cat


Project Recipe:

Flourished Frame Elizabeth BB66A
In the gel prints: PE126ES Seaweed Circle *coming soon*, PE129ES Oceanic *coming soon*, Leafy Swirl C7G
my art journal, Prima color bloom spray dark tulip, collage materials, gel medium, photo, black pencil, heavy body acrylic, gold ink, PITT pens, gelatos, book paper, white pen, and of course, the journal prompt cards!

Thursday, August 9, 2018

Dream Catcher Art Journal Page

Hi everyone, and welcome! Today I want to share another art journal page using the Gypsy Soul Laser Cuts Dreamcatcher 2 chipboard set.  When I think of dreams, I seem to think in vivid color and lots of sparkly stuff.  So, naturally, I decided to share my gold foiling technique that I used on both my background and on the chipboard.  And as for the glitter, I know what you are thinking.  You are thinking, "Oh no, not glitter.  I will have that stuff everywhere1!"  Well, I have another technique to share that will keep  you from wearing your glitter, or in this case, sparkly mica, for the next week.  So, scroll on down and check out the step-by-step tutorial to see how!


Cover both pages with an uneven coat of white gesso using a silicone spatula, leaving some space uncovered.  Let gesso dry.


Brush  Deep Waters metallic paint over background.  Spritz with water to thin and spread paint.  Before paint dries, remove excess with damp baby wipe.


(NOTE:  You can see how dark the paint is where the page has no gesso because it sucked the paint right into its fibers.)


Use baby wipe to pick up the Deep Waters and dab the paint through the Well Rounded stencil to add texture to the background.  You can remove some of the stenciling before the paint dries for a more muted and grungy look.  Dry well.


Do the same thing with Coral-Teal Opal Magic paint through another section of the same stencil.


I used a foam blending tool to stencil the Emerald Green Metallique paint through a different part of the stencil.


I used the Steampunk Copper Metallic paint with a foam blending tool to dab the color onto the words and dream catcher.  Using a dabbing motion adds texture to the chipboard and even gives the slight appearance of hammered metal. 


For a bit of color variation on the feathers, I dabbed the Emerald Green lightly over them.


I used the Tomboy mono adhesive (white) glue to adhere splotches of the gold foil.  This is not gold leafing.  Gold foil is applied to a clear carrier sheet, and when it touches sticky glue, the gold comes off and leaves the carrier sheet.  I used a cheap brush to apply random splotches to my background and let the glue dry.  This particular glue is perfect for this application because it drys sticky.


I used the same technique to apply the glue to my dreamcatcher.  You can see the gold is coming off the clear carrier sheet, but you can continue using it until there is nothing left on the sheet.


I also added some of the gold foil to the top of the dreamcatcher, using a new piece of the sheet for better coverage.


Next, I adhered all of my chipboard pieces to my art journal pages, as shown.  I let these dry well before continuing so I wouldn't accidentally move them around.  Then I took the journal outside to give it a good spray with a clear gloss acrylic coating.  This covered any of the sticky glue that may not have been covered with the foil, and protects the pages, as well.


Now for the addition of glitter.  I prefer to mix my glitter in a puddle of clear drying glue.  I am using Mica Delights, which is actually mica particles that resemble glitter and are about the same size.  I mixed copper and gold together for a more antiqued look.


I then picked up small blobs of the glue mixture and carefully dropped it into the openings in each feather.


Before the glue mixture dried, I picked up the tiniest amount of the sapphire mica and sprinkled gently over the glue sections.  I wanted just a hint of the blue.  I also glued dew drops to the dreamcatcher and feathers, as well as a few more colorful ones randomly on the page.


Here is a closer look at the dried glue inside the feathers.


And here are closer pictures of the two pages.


Although I added  Simple Feathers in my supply list below, I would have used them if I had been working in a bigger art journal.  My words were large enough to fill up the pages, but I wanted to point them out in case you work in a larger size and can't think of what to add to your project to make it all come together.  

Supplies Used:
GSL 10 Words
GSL Simple Feathers (not used on this journal page)
TCW 384s Mini Well Rounded stencil
Dina Wakley white gesso
Prima Art Alchemy acrylic paints
  Deep Waters Metallique
  Emerald Green Metallique
  Steampunk Copper Metallique
  Coral-Teal Opal Magic
Tombow Mono Multi Liquid Glue 
Paper Studio Clear Glue Pen
US Art Quest Mica Delights
  Gold
  Copper
  Sapphire
Robin's Nest Dew Drops
  Light Vanilla
  Multi colors
Rub-On Foiling Paper
Silicone spatula
Assorted brushes
Paper piercer tool or tooth pick
Clear Acrylic Spray Sealer (Hobby Lobby)

I love how this turned out.  I know I may sound like a broken record when I say that chipboard is fabulous to use for dimension without all the bulk, and it is a perfect addition to art journals, as well as many other uses.

I hope I've inspired you to make something with laser cut chipboard and share what you make!

Have a wonderful rest of the week!

Barbara xo

Thursday, July 26, 2018

Key to Your Soul Art Journal Page by Barbara Rankin

Hi everyone!  Today I'll be working in my art journal, and using Gypsy Soul Laser Cuts chipboard to add dimension without lots of bulk.  If you've ever wondered how to get some added dimension in your art journal, consider chipboard.  It is perfect for items like art journals and greeting cards, mini albums with thin spines, and of course, your mixed media canvas pieces.

I want to warn you that this post has lots of photos, but I believe a picture is worth a thousand words, so I hope it will be more helpful than a hinderance.


I started out with my 6"x9" Dylusions art journal and gave the pages a coat of Old Paper Distress Crackle Paint I had in my stash.  You can, of course, use regular crackle paste and color it with paint or just leave it natural.


Spread Modeling Paste through Pixels stencil with a spatula.  Let dry or use heat tool to speed drying time.


While the paste is drying, use gesso to prime chipboard pieces chosen from the Mixed Media Fragments 2 chipboard collection.  I cut some  pieces apart to piece together in the background.


Use small stamps or portions of larger stamps to make some texture on the Fragments with black archival ink.  This will not only add interest but also a bit of texture to the pieces.


Spray background with Color Bloom Glistening Waves, leaving some areas white.


Spray background with Color Bloom Lime Wedge.  Let dry.


Spray background with Color Bloom Tea Stain.  Let dry.


Spray background with Tattered Angels Frosty Nights.  Let dry.


Spray background with Color Bloom Iris.  Let dry.


Stamp damask background stamp with black archival ink.  Stamp off once before stamping onto page for a lighter image.


Prime two keys and two plates with black gesso and let dry.


Computer generate your phrase onto inexpensive printer paper and and spray it with a fixative to keep the inkjet ink from bleeding when we add more color.


Cut the phrase apart, then glue them to a piece of chipboard.  You can use cereal box chipboard from your kitchen, or you could glue several layers of cardstock together to get the added height.


Glue FragmentsKeys & Plates, and phrase pieces to journal pages, as shown.  I weighted them down while they dried.


Use a spatula or brush to spread some regular gel matte medium randomly over the background, concentrating around the fragments pieces, and then sprinkle on texture pebbles, filling in any open areas with the smaller texture sand.  Let dry,


Spray both pages the same as before.  It is really neat to see how the different pieces will take on the colors differently.  I started with the TA Frosty Nights, then CB Glistening Waves, CB Iris, CB Lime Wedge, and finally CB Tea Stain.  I dried each color layer before spraying the next color.


Next, I dry brushed Vintage Gold Metallique wax over some of the high spots on the page.


Then I added a small amount of Brushed Iron Metallique wax over the black gessoed chipboard pieces.  Next, I added the Bronze Age over them, and applied  it to the edge of the pages with my finger.


One last blast randomly with the CB Glistening Waves, and let dry.


The addition of all the sprays lightened the printed words, so I used a black Sharpie pen to go over the letters in the phrase.  It was easy and best of all, it made it look like it was hand-written rather than computer-generated.


I used a Pitt Black big brush pen to add some shading beneath some of the pieces to add dimension.


Next, I made splatters over the background by making a wash of white gesso + water and a fan brush.


I made dots with a bronze pearl paint pen to resemble brads or nail heads in the key plate holes.


Next, I added more Vintage Gold wax over the high spots.  They had gotten covered up some by the sprays, but that is why mixed media is so fun.  You can just keep adding layers and layers of the same stuff until you like the end result.  I also edged the pages with Black Soot distress ink and a blending tool.


And now, I have some close-ups of portions of the pages for you. 


Supplies Used:

GSL Mixed Media Fragments 2
GSL Keys & Plates Shape Set
White Gesso (Liquitex)
Black Gesso (Liquitex)
DecoArt Media Modeling Paste
Stencil Girl S509 Pixels Stencil (6x6)
Distress Crackle Paint (Old Paper) (or substitute any crackle paint)
Black Soot Distress Ink
Blending Tool
Dylusion 6"x9" art journal
Prima Color Bloom Spray Mists
  Glistening Waves
  Lime Wedge
  Tea Stain
  Iris
Prima Metallique Wax
  Vintage Gold
  Brushed Iron
  Bronze Age
  Mystic Turqouise
Tattered Angels Mists
  Frosty Nights
Viva Decor Bronze Pearl Paint Pen
Art-C 26885 San Serif Alphabets stamps & stencil set
Archival Black ink pad
Fast Grab Tacky Glue (Aleene's)
Golden Regular Gel (Matte)
Krylon Workable Fixatif
Black Sharpie pen
Pitt Black Big Brush Pen (Faber-Castell)

I hope you enjoyed today's project tutorial and maybe I've inspired you to get working on your art journal or other projects.  Art journaling is fun!  

Thanks so much for stopping by, and have a fun and crafty day!

Hugs,
Barbara