Showing posts with label DecoArt. Show all posts

Monday, April 15, 2019

Easter Greetings

Hi Everyone,
Jess here today.

It's almost time for the Easter bunny to hop by and leave us some candy.  We always go to my sister's house for Easter dinner so I thought I would make her a little home decor piece.

I started by using the Build  a Layout Easter Set.  The frame was painted with Deco Art Crackle Paint and then I rubbed Antiquing Cream in the cracks.  I didn't like the sheen on the paint so a layer of Collage Medium made it matte.

The largest bunny was painted with Dina Wakley's Elephant and then sanded so it looks like it's been around for a bit.  The bow tie was painted with Sky Blue and sanded as well.
The small eggs were embossed using the Tim Holtz Impresslits and 3d Embossing folders(Medallion andimpresslit, Kaleidoscope and Botanical 3D folders).  Once they were dry I painted them using Dina Wakley Turquoise and Lemon.  The Lemon Egg was toned down a bit with a layer of ELephant Paint.  The third egg was painted using Victorian Velvet Distress Paint.  Each of the eggs were sanded to reveal the raw chipboard and a layer of Walnut Stain Distress Ink finished them.


The nest is from the For the Birds set.  The base is painted with Dina Wakley Gilt and the top is painted with Distress Vintage Photo Paint.  I couldn't see much of the gold peeping through as I wanted so I added a tiny bit of gold  foil to the top layer of the nest. 

I measured how  the frame sat on one of the Super X tags and decided to bend the bottom three inches of the tag to create a base.   If you score the chipboard you can gently bend the tag until it makes a 90 degree angle.

 I covered a Super X tag with a patterned paper. Then splattered on Black Soot Distress Paint and Dina Wakley Gilt.  Behind the fame there is a piece of Tim Holtz's Worn wallpaper. The frame and wallpaper were glued directly to the tag base.  The bunny and eggs were glued down next.  The nest was attached using foam tape since the bunny and eggs were rather thick and I didn't want the nest to bend.   Distress Crayon in Hickory smoke added a grungy halo around the bunny.
Moss was glued to the entire base and then the two bunnies that are part of the banner from the Build  a Layout Easter Set. were added.  They were painted and sanded the same way as the large bunny.  Vintage flowers and some old plastic craft eggs were added to complete the base.
A tiny bouquet of vintage flowers were added to the top of the tag.

I hope you have a very Happy Easter!


Monday, April 1, 2019

Spring Cleaning

Hi Everyone,
Jess here today.

Well it's time to do some spring cleaning and that includes my desk.  I try to be a neat crafter, but my desk always ends up looking like a large bomb exploded in the general vicinity.  For today's project I used only items that were on my desk or within reach of my desk.  I will admit some of these are mop up tags, so I don't know exactly what is on there.

Adventure is out there tag-

The butterfly man background was made using Vintage Photo Oxide Spray and then I added Hickory Smoke ink through a stencil(THS091).  I shifted the stencil and added Peeled Paint Oxide Ink.  I splatted on some Black Soot Distress Paint and then stamped the flourish(CMS070) in  Ground Espresso Archival Ink.  The edges got a bit of Vintage Photo Distress Crayon for shadow.

The paper doll was inked up using Tsukineko Inks.  His buttons and watch chain were colored using gel pens.  Then got a pair of wings and  glued them to the tag.  I had a snippet of the mini provincial impresslit left so I popped that in the top corner.  Chic chat words were inked up using Peacock Feathers Distress Ink and glued down.

A snippet of the Meadow Flowers was on my desk so I added a couple layers of gesso and once that was dry I added PaperArtsy Infusions in The Sage to the stems.  I added grit paste to the flowers and used Peacock Feathers Distress Ink to color them.  There was some leftover Distress Crayon on my desk from edging the tag and I used that to dirty up the flowers.  Once that was glued down, I added detail using gel pens.

Eccentric, but very estimable gentleman-

For the eccentric, but very estimable gentleman tag I used a mop up tag that had some blues and purples on it.  I added some leftover rust from when I was rusting up bits and some Seth Apter Stamps.
The circles are from the Mixed Media Fragments 1 Small.  I rusted them using PaperArtsy's Rusting Powder and then added Verday Paint from 10 Second Studios for the oxidized brass bits.  I cut the circles into three segments and attached them to the card using glue.  I added Tim Holtz Hardware heads to make them appear to be bolted down. I added alcohol ink in Patina, Mushroom, and Coffee to the hardware heads.  Then I popped on a bit of Distress Crayon in Cracked Pistachio for a bit more dimension.

I tied a little brass heart to his wrist and glued him down.

 Clipping stickers make for really fun stories and gel pens add the final bits to this tag.

The Proprietor of Ideas-

This little guy gets stuck in all kind of things.  Today I popped him in a lightbulb from the Steampunk Lightbulb Set.  The lightbulb was painted white and then the bulb portion was given a layer of DecoArt Crackle Glaze.  Once the glaze was dry I added Distress Crayon in Black Soot and Brushed Pewter.  A thin piece of acetate was added behind the bulb and colored with mushroom alcohol ink.  The tiny crown on his head will be coming soon to the GSL cuts store(I cannot wait for you to see all of these teeny crowns).
The base of the bulb was painted with Tarnished Brass Distress Paint and then pounced with Mushroom, Latte, and Coffee Alcohol Inks. I snuck in another hardware head here and a story stick.
This tag was made by using Oxide Spray on my gel plate.  It makes such gorgeous and dreamy backgrounds.  I used a Tim stencil for the words and numbers.  I used Hickory Smoke and Black Soot Distress Ink for the coloring.  White paint is splattered all over the back, Perfect Pearl spray, and gel pens finish the background.
The main title is from the Tim Holtz Noble Gent set.  That was stamped in Black Soot Archival.  The little halo around the bulb is the same set.  I used Dina Wakley Paint in Ancient and Gilt to stamp out the halo.  Be sure to clean paint off your rubber stamps right away!   


Do you save all of your little bits to make projects with later or do you toss out the scraps?

Jess

Thursday, December 27, 2018

Cathedral Frame

Merry Christmas and Happy New Year to everyone!  I hope you all are enjoying the holidays and getting ready for the coming year.  I sure am.  As a matter of fact, this will be my last post with Gypsy Soul, unless they will have me back on occasion as a guest designer <hint>.  

I am one of those people who thinks there is always room for improvement, especially for myself.  I am always striving to learn new things, new crafts, new techniques, and more importantly, I continue to try to improve on things I feel I may already know but perhaps I have not perfected.  So, I will still be about on social media, hopefully with some new techniques and new ideas to share.  

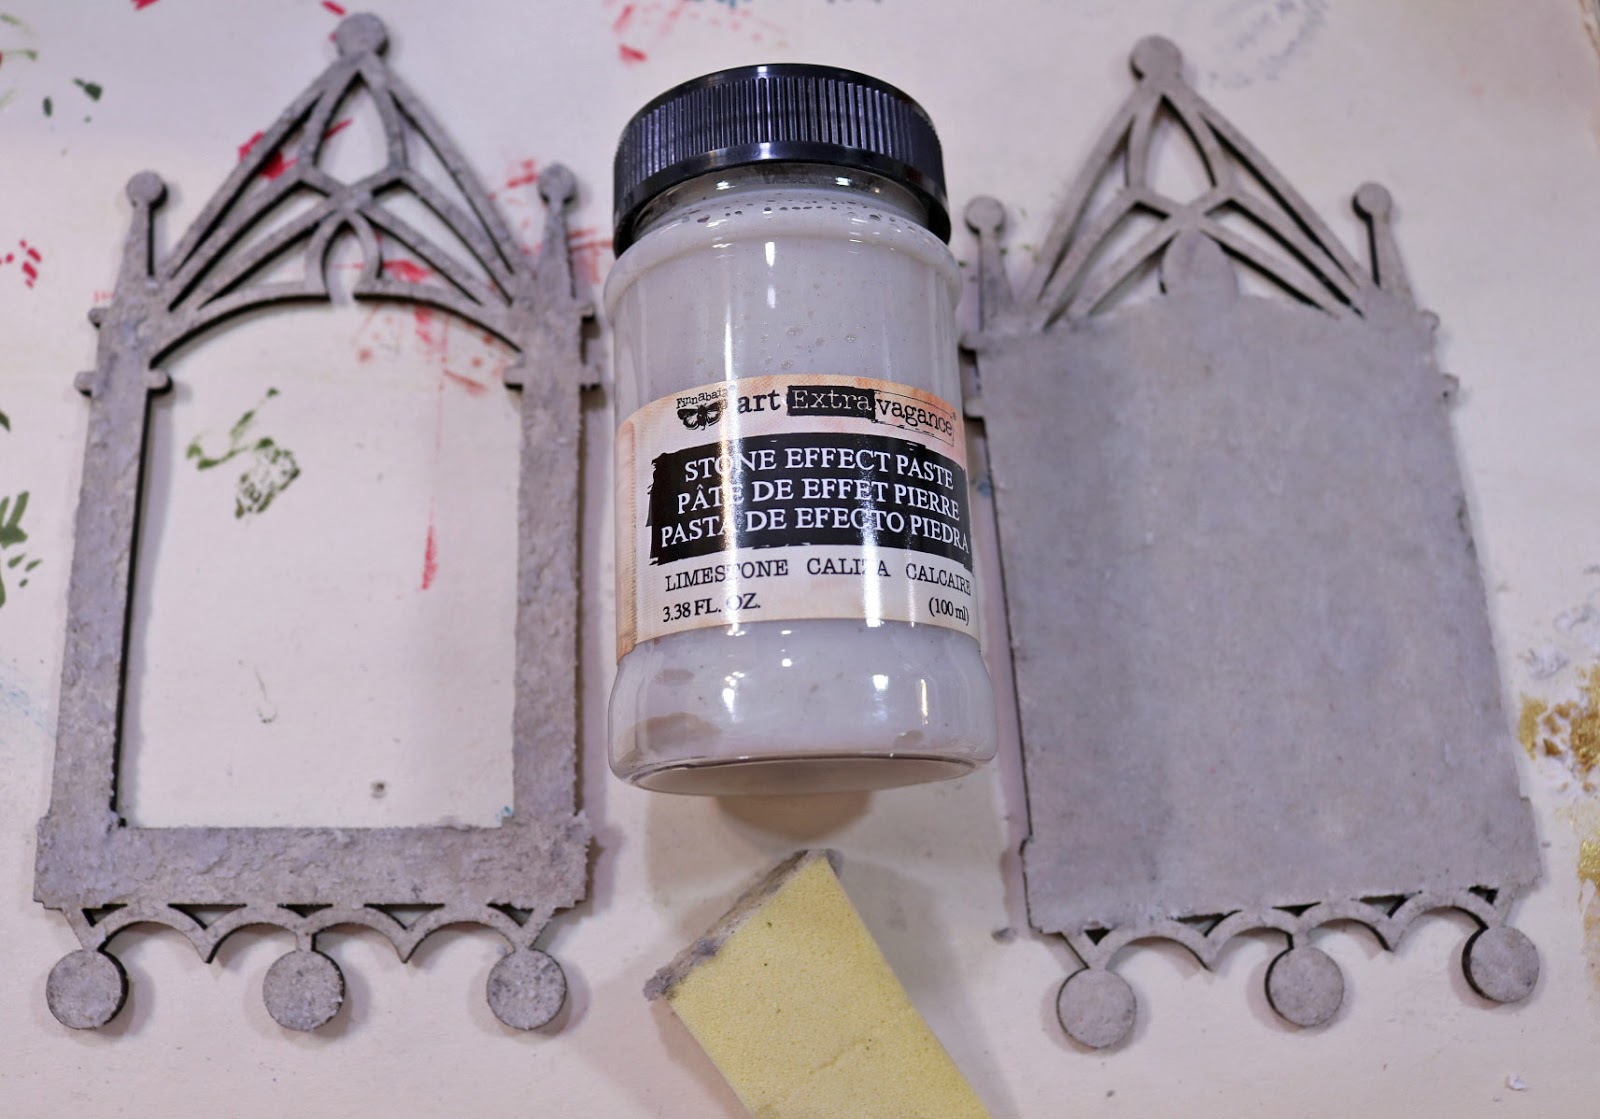
front 
back
So, let's get to today's project.  I will be using this beautiful Cathedral Frame and an image from the Medieval Triptychs collage sheet from AlphaStamps. 


I simply laid the top frame with the opening over the images on the sheet until I found the one that I liked and that fit inside the frame the best.  


Use a makeup sponge to apply a coat of the Limestone Stone Effect Paste to the front and back sides only of the frame pieces.   Set aside to dry.


Paint front and back of frame pieces with Glorious Gold acrylic paint and let dry.


Delaminate a piece of mica large enough to fit over the collage image, and another piece large enough to fit behind the opening of the top frame piece.  Glue mica  pieces with Glossy Accents or a clear drying adhesive.


Trim excess mica from open top are of frame, and around collage image.  Glue pieces to front of frame (right).  Be sure to carefully burnish the collage image down to the back piece to ensure there are no air bubbles or wrinkles.


The back frame piece (left) is ready to be glued to the front (right) piece, as shown.


Glue the frame pieces together.
To conceal the seams along the edges where the two pieces have been glued together, I used a small spatula and my finger to add a layer of the Limestone Stone Effect Paste.  Let it dry.


Paint the edges with the Glorious Gold acrylic paint and let dry.

Glue metal embellishments to the frame, as shown.


Paint the embellishments with Glorious Gold acrylic paint and let dry.


Pick up the Fire Ruby wax with a brush and lightly hit the high spots over the frame and embellishments.  


Continue doing the same on the back of the frame, as well.


Glue rhinestones to the center of each embellishment.


Supplies used:

GSL Cathedral Frame
Medieval Triptychs Collage Sheet (www.alphastamps.com)
Limestone Stone Effect Paste (Prima/Finnabair)
Fire Ruby Antique Brilliance Wax (Prima/Finnabair)
Mica pieces (USArtQuest)
Makeup sponge
Small spatula
Ranger Glossy Accents
Metal embellishments
Amber gold rhinestones

I hope you enjoyed this quick and easy project today, and be sure to come back to see all the inspirational projects from the design team.

I've enjoyed my time with Gypsy Soul Laser Cuts, and I hope you have enjoyed my projects during my time here.  Thanks so much for your support, and have a wonderful New Year!

Barbara

Thursday, December 13, 2018

Little Christmas House Shrine

Happy holidays to everyone!  I hope you are enjoying the winter weather, wherever you are!  Today, I am going to be using a couple of Gypsy Soul Laser Cuts' newest sets, the Little Folding House Shrine and the Tiny Christmas Shapes sets.  These are so cute and are sized just right to work together perfectly!

Outside with doors closed

Outside with doors open


Inside with doors opened
Make hinges by cutting two pieces of Tyvek to 2-1/2" x 3/4".  Paint both sides of the Tyvek with gold acrylic paint.  Paint both sides of the house with the gold acrylic paint.  One side (showing) only needs to be painted around the edges.  Set aside to dry.


Glue Tyvek "hinge" pieces to the three house pieces, as shown.  Leave enough space between pieces to allow the doors to open and close.  

Outside
Inside

This is a great time to use some of those paper scraps you've been saving.  These two pieces are from a Basic Grey Mistletoe & Pears paper pad.  


Run paper through Xyron 3" sticker maker.

Xyron 3" sticker maker

Cut paper just slightly smaller to fit each section, leaving a scant hint of gold edge.  Adhere to each panel.

Inside

Outside

Apply triangle paper pieces to the roof top, as shown, on each side, using the opposing prints.

Inside
Outside
Outside when closed in front
Add a strip of the gold Dresden border along the edge where the two papers meet, as shown.

Inside

Outside
Outside when closed in front
Cut two of the tiny scalloped shingles in half and paint with white acrylic paint or white gesso.  Let them dry, then glue to the top portion of the roof, as shown.

Outside when closed in front
Outside view on back
Fill in both sides of the roof top with the snow writer snow, as shown.

Outside when closed on front
Paint each of the pieces with acrylic paint, as shown.


Glue a small piece of mica to the back of the window frame.  Use the Snow Writer to add snow to the window frame and the green tree. (NOTE:  I added a wash of Burnt Umber acrylic paint to the window shutters to age them.)


I found a little white button in my stash, so I stamped "25" on it with black permanent ink, then ran a piece of red floss thorugh the button and tied it off.


Glue it to the top portion of the roof on the outside of the house, as well as the painted chipboard pieces, as shown.

Inside
I cut a printed word "NOEL" from one of the papers in the pad and glued that to the roof portion of the outside of the house.  Glue remaining chipboard pieces, as shown.  (NOTE: I glued a tiny strip of chipboard beneath the shutters, close to the window, so that I could angle them up and outward from the house.  This is optional, of course).

Outside
I have included a few more close-ups of the painted chipboard pieces for you.


Supplies Used:

GSLTiny Shingles Sampler
GSL Little Folding House Shrine (contact store)
GSL Tiny Christmas Shapes (contact store)
GSL Gingerbread House Mini Tall (window &  shutters)
2 strips Tyvek (2-1/2" x 3/4")
DecoArt Glorious Gold Metallic paint
DecoArt Americana Lamp Black acrylic paint
DecoArt Media Fluid Acrylics
  Diarylide Yellow
  Hansa Yellow Light
  Primary Magenta
  Translucent White
  Cadmium Red Hue
  Burnt Umber
  Sap Green
DecoArt Snow Writer
Basic Grey Mistletoe & Pears paper pad 
Xyron 3" sticker maker
Gold German Dresden border
Liquitex white gesso
Mica Pieces
Alphabet/Numbers stamp set
Black archival ink pad
White button
Red floss


Thanks for stopping by, and have a very Merry Christmas!!!

Barbara