Showing posts with label cobblestone. Show all posts

Saturday, June 20, 2020

Hogsmeade Inspired Book Nook

Happy Saturday, everyone! Connie here with my interpretation of a beloved spot from the Harry Potter universe in the form of a book nook. Lots of Gypsy Soul Laser Cut pieces were used in this project, including the new GSL Book Nook Box Extra Large. Let me take you through how it was made.
Let's start with the left side wall, which houses the Three Broomsticks Tavern and Inn as well as a cute little shop of my own invention called The Owlery. All of the interior walls are papered with Recollections Brick Wall scrapbook paper. The door to the tavern is made from a GSL Rustic Door 1 to 24 which was painted with acrylic paint and given a thumbtack door knob. The vine of GSL Laser Cut Miniature Ivy next to the door is available over at Alpha Stamps.
The Owlery door is made from one of the GSL Ornamental Birdcages Shape Set with a few of the bits trimmed off before painting in order to make it more door-shaped. I found an owl image that fit perfectly in the center opening.
The door was backed with a wood grained paper and I added a little sign.
The inn sign was made from a GSL Mini Crest Sign. It comes with a key to hang it from that I set aside to use in another project. The broomsticks were made from burlap strings wrapped around a painted skewer.
Each window was made from a GSL Mini House Shadowbox 2, GSL Window Four Panel Square and GSL Square Shingles Half Scale. The window pane is a bit of parchment glued behind the the painted window frame. I painted the shingles dark blue, cut them into sections, glued them to the roof of the shadowbox then trimmed them to fit once the glue was dry.
The floral accent bit is molded paper clay.
The back wall houses my favorite Hogsmeade shop – Honeydukes! The shop display is made from GSL Rectangular Bay Window Half Scale, available over at Alpha Stamps. What I love about the Extra Large Book Nook is this bay window fits just perfectly inside.
The bay window assembles easily with a bit of tacky glue.
I had fun filling the window with giant polymer clay lollipops, jarred candy made from layering microbeads, poly clay molded owls and my favorite, a display box of Bertie Bott's Every Flavour Beans made from polymer clay.
Here's a closeup of the right side wall, which houses Madame Puddifoot's tea shop. The window above the shop's pink door houses a tiny bird's nest. 
The door is made from a GSL 4 Panel Door 1 to 24. Here are all of the sections laid out prior to assembly. The door casing was painted white, the door itself a pale pink. I used an upholstery nail head for the doorknob. 
Here's the beautiful tea shop window made from a GSL Ornate Double Window and painted in the same white/pale pink combo as the door. I glued the window on popsicle sticks to give it a three dimensional element. 
I also wanted the upper window to have a three dimensional element so built it from a GSL Simple House Ornament and tongue depressors cut to fit it's circumference and glued in place.
Once the glue dried, I used a GSL Small Cobblestone stencil and texture paste to give a stone facade to the window. I used this same technique on the tavern's windows. Once the paste was dried, the stones were painted and the roof was shingled. I used a GSL Gothic Window Overlay over parchment for the actual window.
A bird's nest was made by gluing spiraled burlap threads. I added a few tiny feathers and some poly clay eggs to finish the look. 
The street was made from a full size GSL Cobblestone stencil and more texture paste. It was important to figure out the entire layout of this project before starting it. I knew where to mask off spots for the Honeydukes window and Madame Puddifoot's wooden steps before texturing the street. 
In this photo you can see I added windows above Honeydukes. I used GSL Windows with Shutters 1 to 24. I set the shutters aside for a future project.
Something pretty exciting for me was the addition of LED lights. I used a chip light kit that was extremely easy to assemble and I love the outcome!
An action shot.
 Thanks for stopping by!

GSL Products Used

Other Supplies Used
Tacky glue
Acrylic paint
LED chip light kit
Recollections Brick Wall paper
Wood grain paper
Parchment
Burlap
Printed images
Polymer clay
Microbeads
Miniature glass bottles
Upholstery nail
Thumbtack
Popsicle sticks and tongue depressors
Skewer
Texture paste


Friday, March 20, 2020

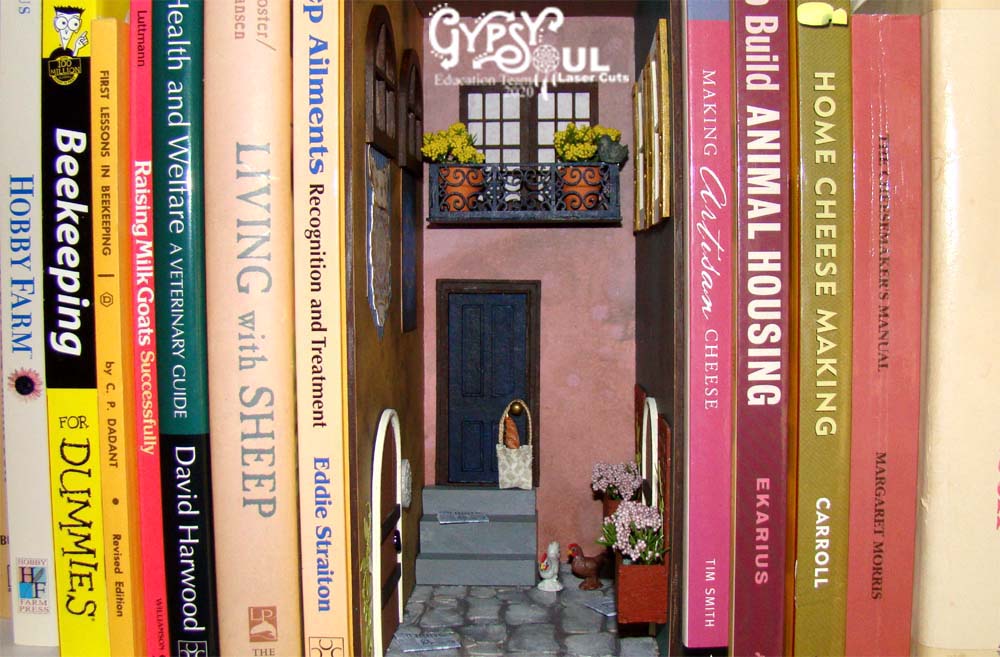
European Alley Book Nook

Hey, everyone! Connie here with a project that uses a brand new piece from Gypsy Soul Laser Cuts – a GSL Book Nook Box Large .
The nook is very simple to assemble with tacky glue, it's basically an open front box. Since it's just 4 inches wide when assembled, I decorated all of the surfaces before gluing it together, starting with the walls. I chose some lovely muted Idea-Ology papers from Tim Holtz. 
For the street, I knew I wanted to play with one of the GSL Cobblestone stencils. Before using it, I sprayed both sides with spray shellac. I was very careful not to stencil over the assembly tabs so I blocked those with painter's tape. I also knew I would have a set of wooden stairs at the back of the alley so blocked off the spot those would be glued down as well. 
I used Tim Holtz Matte Texture Paste for the stones. This was my first time using both a stencil and texture paste and I found it super easy.
And satisfying! I just lifted the stencil and painter's tape off while the paste was still wet, ran the stencil under water and it's ready for my next cobblestone project.  I let this dry overnight then painted the stones.
The ceiling was covered with a neutral paper. The stairs were made from one inch wooden blocks and lengths of wooden dowels glued together. 
The GSL Windows with Shutters 1 to 24 come with shutters whose sections are easily assembled with tacky glue.
The GSL 4 Panel Door 1 to 24 is assembled in a similar fashion.  It also comes with a door jamb.
I painted the shutters in a mustard yellow and the window in an off white. I glued a piece of tissue paper behind the windows and added a corgi saying hi.
The GSL Planter Box with Trellis 1 to 24 assembled easily. I added a small section of dry foam to hold the tiny blossoms. I painted a few sections of GSL Laser Cut Miniature Ivy available over at Alpha Stamps.
So cute when everything is assembled!
Here are the wall sections finished and ready for assembly. I used a GSL Rustic Door 1 to 24 on this wall as well as a bit of the miniature ivy. The medallion is molded bit of paper clay. There is a kitty asleep in one of the GSL Decorative Windows 1 to 12 and some pretty banners hanging from them. The one on the right is the EU flag.
The back wall has two more of the 1 to 24 windows as well as a Balcony 1:24 Scale. Someone left a gift hanging from the doorknob, a bag of wine and bread.
The right wall got the corgi windows, trellis boxes and another one of the rustic doors.
Here's how I made those rustic doorknobs. I took paper fasteners and painted them with black nail polish. Once dry, I cut the fastener head off and glued it in place. 
The bag was sewn from a scrap of fabric. The handle is made from braided embroidery thread.
So cute, I can't wait to make another!
An action shot (can you tell we're farmers...)?  Thanks for stopping by.

GSL Products Used

Balcony 1:24 Scale

Other Supplies Used
Tacky glue
Acrylic paint
Tim Holtz Idea-Ology papers
Spray shellac
Painter's tape
Tim Holtz matte Texture Paste
Paperclay
Printed images
Dry foam
Plastic flowers
Miniature resin wine bottle
Fabric scrap
Embroidery thread

Wednesday, May 29, 2019

Shamrock Chapel

There is a beautiful little church I visited while in Ireland, St. Finbarr's Oratory at Gougane Barra. A wee chapel situated on a bit of a jetty on a lake.


Looking at the Mausoleum Kit in my stash I was inspired by my memories of this place to create a miniature chapel of my own.


For the exterior stone texture I've used drywall compound and the Cobblestone stencil.

Tip: coat your stencil with boating wax to seal it and make it reusable!


I quite like the roof of this piece and the wee turrets that flank the two sides. For the saintly statues I simply painted some miniature figures used for railway models grey and popped them inside. That fancy it at the front peak is the top bit of a chipboard key from the Keys & Plates Shape Set


The windows are a stained glass image that I downloaded then printed onto a transparency sheet. Rather than cutting out individual windows, there is a piece that covers the whole windowed area. It's much easier and less fiddly if no one is going to be peeking inside.


And that spikey Gothic trim to the roof? I deconstructed (aka chopped up) a Gothic Border to add some vertical interest.


You can follow the process I went through making this piece with THIS video walk-though.  And here is the supply list of all the bits you'll need to create your own version.


Other supplies needed for this project:
Stained glass pattern printed on transparency
Acrylic paint
Drywall compound
Glue
Cross charm
Railway figures


Thursday, September 1, 2016

Facebook Challenge for September by Dianna

Hi everyone, Dianna here with a new Project for Gypsy Soul Laser Cuts Monthly Challenge.  The first of each month there is a new challenge. This month's challenge is a dimensional challenge! You can submit a new project that has anything that is dimensional - 2d or 3d.

All you have to do is become a member of the Facebook Craft Group and submit your entry on the Facebook Craft Group page.  The winning entry will receive a $10.00 gift certificate to Gypsy Soul Laser Cuts.

I was so excited to assemble Gypsy Soul Laser Cuts - Dice Tower (Coming Soon).  The Tower is the ultimate for gamers Just drop the dice in the top of the tower and they drop down to the bottom.  No chasing dice that dropped off the table - see below video.


First I go through a dry assembly, then I paint and glued. The base color is a Deco Art Light Grey.


I cut up Gypsy Soul Laser Cuts - Cobblestone and Brick Wall and used them as a stencil. I used Deco Art Dimensional Effects to create the Cobblestone and Bricks on the tower.  I used the drop off from the cobblestone around the base of the "tray".  I painted the brick and cobblestone with Deco Art's Grey Acrylic Paints.  I used scrap moss from another project.  


Please check out the video below:


Items Used
Dice Tower - Coming Soon
   Brick Wall   

Other Items
Deco Art