Showing posts with label windows with shutters. Show all posts

Wednesday, October 27, 2021

Squeaky Shutters-A Peek-a-Boo Project


 It's no secret that Halloween is my favorite holiday. I also am a closeted Scooby Doo fanatic, it is still one of my favorite cartoons. I loved the Mystery Machine, the creepy locations the gang went to, the Scooby Snacks, the unveiling of the monsters true identity-these are the inspirations for this artwork.  

1.  Gather Supplies

2.   Cut a Piece of Bookboard the Size of Open Window.

3.  Trace and Cut out a Piece of Halloween Cardstock of Your Choosing.

4.  Glue Halloween Cardstock to Bookboard with Weldbond.

5.  Use Rubber Roller Brayer to Randomly add Layer of Cosmic Shimmer Lava Paste to Both Side Of Gypsy Soul Laser Cuts-Window with Shutters.

6.  Cure with heating Tool.

7.  Color Gypsy Soul Laser Cuts-Creepy Corners-1 and  Haunted House from Gypsy Soul Laser Cuts-Trading Coin Covers-Halloween With Oil Pastels.

8.  Add Blue Opal Magic Mica Powder with a Paintbrush to the Cobweb Corner

9.  Glue all Pieces Together with Weldbond.

10.                Once Fully Dry  Add a Layer of One Step Crackle Finish to Open Window Part of Artwork.

11.                Once Dry Fill In Cracks with Colored Pencils.

12.                Seal with Matter Varnish and Allow to Dry Fully.

Some Final Thoughts.

Excerpt From "the House With Nobody In It" -Joyce Kilmer

"Whenever I walk to Suffern along the Erie Track, I go by a poor old farmhouse, with its shingles broken... I have never seen a haunted house, but I hear there are such things: That they hold the talk of spirits, their mirth and sorrowings, I know this house isn't haunted, and I wish it were, I do. For it wouldn't be so lonely if it had a ghost or two."


"When owls, bats and ghost are seen. It must be time for Halloween."

"Scooby Doo taught us that the real monsters are humans..and if that isn't deep I don't know what is."

Supplies: Gypsy Soul Laser Cuts-Window with Shutters, Gypsy Soul Laser Cuts-Creepy Corners-1, Gypsy Soul Laser Cuts-Trading Coin Covers-Halloween, Halloween Cardstock, Pen Scissors, Weldbond, Bookboard, Cosmic Shimmer Lava Paste, Rubber Roller Brayer, Heating Tool, Oil Pastels, Blue Opal Magic Mica Powder, Paintbrush, Matte Varnish, One Step Crackle Finish, Color Pencils,

I cannot wait to see your interpretation of this project. Share it on the Gypsy Soul Laser Cuts Craft Group Page on Facebook. I would love to see what new creations you are working on!


Friday, March 20, 2020

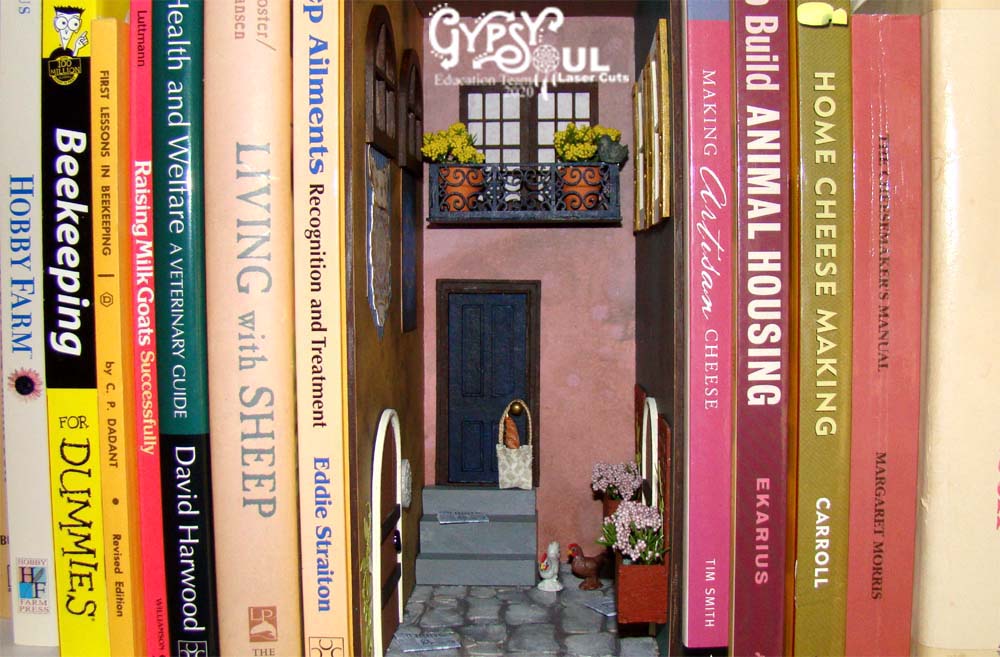
European Alley Book Nook

Hey, everyone! Connie here with a project that uses a brand new piece from Gypsy Soul Laser Cuts – a GSL Book Nook Box Large .
The nook is very simple to assemble with tacky glue, it's basically an open front box. Since it's just 4 inches wide when assembled, I decorated all of the surfaces before gluing it together, starting with the walls. I chose some lovely muted Idea-Ology papers from Tim Holtz. 
For the street, I knew I wanted to play with one of the GSL Cobblestone stencils. Before using it, I sprayed both sides with spray shellac. I was very careful not to stencil over the assembly tabs so I blocked those with painter's tape. I also knew I would have a set of wooden stairs at the back of the alley so blocked off the spot those would be glued down as well. 
I used Tim Holtz Matte Texture Paste for the stones. This was my first time using both a stencil and texture paste and I found it super easy.
And satisfying! I just lifted the stencil and painter's tape off while the paste was still wet, ran the stencil under water and it's ready for my next cobblestone project.  I let this dry overnight then painted the stones.
The ceiling was covered with a neutral paper. The stairs were made from one inch wooden blocks and lengths of wooden dowels glued together. 
The GSL Windows with Shutters 1 to 24 come with shutters whose sections are easily assembled with tacky glue.
The GSL 4 Panel Door 1 to 24 is assembled in a similar fashion.  It also comes with a door jamb.
I painted the shutters in a mustard yellow and the window in an off white. I glued a piece of tissue paper behind the windows and added a corgi saying hi.
The GSL Planter Box with Trellis 1 to 24 assembled easily. I added a small section of dry foam to hold the tiny blossoms. I painted a few sections of GSL Laser Cut Miniature Ivy available over at Alpha Stamps.
So cute when everything is assembled!
Here are the wall sections finished and ready for assembly. I used a GSL Rustic Door 1 to 24 on this wall as well as a bit of the miniature ivy. The medallion is molded bit of paper clay. There is a kitty asleep in one of the GSL Decorative Windows 1 to 12 and some pretty banners hanging from them. The one on the right is the EU flag.
The back wall has two more of the 1 to 24 windows as well as a Balcony 1:24 Scale. Someone left a gift hanging from the doorknob, a bag of wine and bread.
The right wall got the corgi windows, trellis boxes and another one of the rustic doors.
Here's how I made those rustic doorknobs. I took paper fasteners and painted them with black nail polish. Once dry, I cut the fastener head off and glued it in place. 
The bag was sewn from a scrap of fabric. The handle is made from braided embroidery thread.
So cute, I can't wait to make another!
An action shot (can you tell we're farmers...)?  Thanks for stopping by.

GSL Products Used

Balcony 1:24 Scale

Other Supplies Used
Tacky glue
Acrylic paint
Tim Holtz Idea-Ology papers
Spray shellac
Painter's tape
Tim Holtz matte Texture Paste
Paperclay
Printed images
Dry foam
Plastic flowers
Miniature resin wine bottle
Fabric scrap
Embroidery thread

Saturday, December 28, 2019

Shuttered Soul by Betsy Skagen


With holiday crafting put away for the season, I am able to refocus on mixed media art.

I am a classic over-thinker when it comes to art. Okay, truth be told, I might just be a classic over-thinker when it comes to everything--but today we are focusing on art. In creating this piece I pushed myself not to meticulously plan every detail and just go with the flow. 
The driving force behind this piece was Gypsy Soul's Window with Shutters. First I covered the shutters with black ink. Then I applied a coat of embossing ink, added Rocky Road embossing powder and activated with a heat gun. 

Setting that aside, I created my background paper by layer after layer of acrylic paint, spray ink, ink pads, paint pens, washi tape and stamped images to cold press watercolor paper. 

Next I took a collage image from a magazine and layered it behind the window. I then adhered the window shutter to the background paper. 

I then adhered a couple of my favorite rusty found objects to the page. 


To create the frame, I added grit paste to the edge of a piece of chipboard that I cut slightly larger than my background page. After it was dry, I painted it with black acrylic paint and then sealed with a matte polyurethane spray. 

After the frame was dry, I adhered the background page to it and my project was complete. 
That was it! Projects are definitely easier when I don't overthink them! 

My wish for all of you is that you each enjoy a holiday season filled with loved ones, warmth, good food and good feelings. 

Love to all, Betsy

Great Stuff

Distressed black soot ink
Embossing ink
Seth Apter's Rocky Road Baked Texture Embossing Powder
Cold press watercolor paper
Acrylic paint
Washi tape
Black ink
Spray inks
Paint pens
Rubber stamps
Found objects
Chipboard
Beacon Adhesive Fabri-Tac
Lock-Tite
Grit paste