
Showing posts with label 4 Panel Door. Show all posts

Friday, March 20, 2020

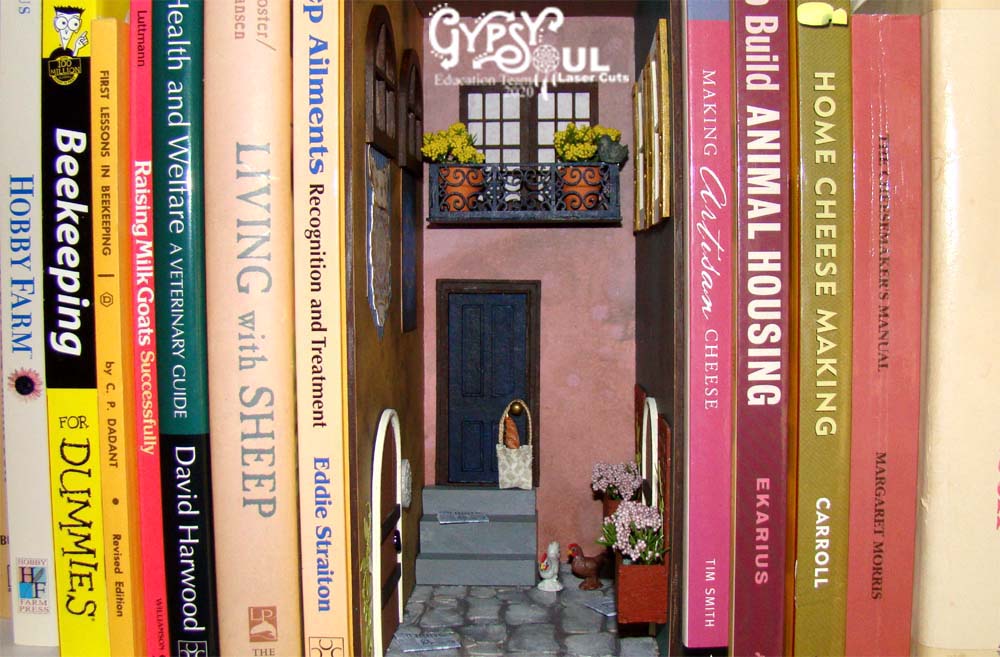
European Alley Book Nook

Hey, everyone! Connie here with a project that uses a brand new piece from Gypsy Soul Laser Cuts – a GSL Book Nook Box Large .
The nook is very simple to assemble with tacky glue, it's basically an open front box. Since it's just 4 inches wide when assembled, I decorated all of the surfaces before gluing it together, starting with the walls. I chose some lovely muted Idea-Ology papers from Tim Holtz. 
For the street, I knew I wanted to play with one of the GSL Cobblestone stencils. Before using it, I sprayed both sides with spray shellac. I was very careful not to stencil over the assembly tabs so I blocked those with painter's tape. I also knew I would have a set of wooden stairs at the back of the alley so blocked off the spot those would be glued down as well. 
I used Tim Holtz Matte Texture Paste for the stones. This was my first time using both a stencil and texture paste and I found it super easy.
And satisfying! I just lifted the stencil and painter's tape off while the paste was still wet, ran the stencil under water and it's ready for my next cobblestone project.  I let this dry overnight then painted the stones.
The ceiling was covered with a neutral paper. The stairs were made from one inch wooden blocks and lengths of wooden dowels glued together. 
The GSL Windows with Shutters 1 to 24 come with shutters whose sections are easily assembled with tacky glue.
The GSL 4 Panel Door 1 to 24 is assembled in a similar fashion.  It also comes with a door jamb.
I painted the shutters in a mustard yellow and the window in an off white. I glued a piece of tissue paper behind the windows and added a corgi saying hi.
The GSL Planter Box with Trellis 1 to 24 assembled easily. I added a small section of dry foam to hold the tiny blossoms. I painted a few sections of GSL Laser Cut Miniature Ivy available over at Alpha Stamps.
So cute when everything is assembled!
Here are the wall sections finished and ready for assembly. I used a GSL Rustic Door 1 to 24 on this wall as well as a bit of the miniature ivy. The medallion is molded bit of paper clay. There is a kitty asleep in one of the GSL Decorative Windows 1 to 12 and some pretty banners hanging from them. The one on the right is the EU flag.
The back wall has two more of the 1 to 24 windows as well as a Balcony 1:24 Scale. Someone left a gift hanging from the doorknob, a bag of wine and bread.
The right wall got the corgi windows, trellis boxes and another one of the rustic doors.
Here's how I made those rustic doorknobs. I took paper fasteners and painted them with black nail polish. Once dry, I cut the fastener head off and glued it in place. 
The bag was sewn from a scrap of fabric. The handle is made from braided embroidery thread.
So cute, I can't wait to make another!
An action shot (can you tell we're farmers...)?  Thanks for stopping by.
GSL Products Used

Balcony 1:24 Scale

Other Supplies Used
Tacky glue
Acrylic paint
Tim Holtz Idea-Ology papers
Spray shellac
Painter's tape
Tim Holtz matte Texture Paste
Paperclay
Printed images
Dry foam
Plastic flowers
Miniature resin wine bottle
Fabric scrap
Embroidery thread

Saturday, February 23, 2019

She's Got a Ticket to Ride by Betsy Skagen

What does your creative process look like? For me, some vintage Silver Star tickets sitting on my desk reminded me of the old Beatles song. That inspired me to search through my stash to find the perfect saucy woman.

A lingerie model from a 1940s magazine and several elements from Gypsy Soul, including a silver star,  set me on the path to create this mixed media / altered art wagon.


Tutorial: How to Create a Retro Mixed Media Wagon.

Begin by covering a shallow box with black gesso.
On cold press watercolor paper prepare a multi-layered mixed media background using acrylic paints, dry brushes, stencils, inks and other mixed media tools. 
Use an embossing ink pen and a stencil to create the rocket cone. Add Deep Sea Baked Texture and activate with heat gun.
Cut your newly created mixed media paper to fit the inside of your box. Score where it will fold and make corner slices so you can create the box shape. Below I am showing the messy back side ( I am never a tidy crafter!) of the mixed media water color paper so you can see how I scored the paper and cut the corners.
After making sure your paper fits inside the box, Fold the paper into a rectangle, add glue and let dry.
Use paint or a marker to color the edge of your paper so that you won't have a glaring white edge.
Depending on the size of your box, you may want to trim the wheel axels so that they don't overwhelm your project.
Then cover all of the chipboard pieces--Ticket StripsStars String AlongsWheels, stars from the Celestial Shape Sets and a rectangle from the Four Panel Door with black gesso. When dry, paint the stars with metallic silver paint.

Select a paper straw that will fit through the axel and wheel holes and four washers that also fit. Paint the straw with black gesso. When dry cut the straw to fit the axel base.
Attach black Tyvek to the axels so you can strengthen the bond between the alexs and the box. I just love black Tyvek. You can use it for so many purposes such as creating incredibly strong folding hinges on books and journals. I used to color white Tyvek envelopes with a black marker until I found that I could purchase a black version of it.
Ink the Star String Along with embossing ink, cover with silver embossing powder and use a heat gun to activate it.

Punch a hole in the top of your mixed media paper box and thread the star through it. Cement the star in place with strong adhesive tape.
Adhere your mixed media paper box inside the cardboard box.

Using a strong glue like Beacon Fabrfi-Tac, adhere the axels to the bottom of the box. Slide the straw pieces through the axel, add the wheels and glue the stars from the Celestial Shape sets onto the straws. Add the chipboard rectangle to the front of the box to create a handle or carriage coupling.
Fussy cut a vintage lingerie model, adhere to black cardstock and cut around the image. Use a metallic silver paint pen to paint her shoes silver.

Tear one end of the tickets and the chipboard ticket strip. Distress the edges of vintage tickets with black ink. Adhere the tickets to the chipboard strip, then adhere the woman to the ticket strip.
Next add foam adhesive squares to the back of the woman and tickets to add depth to the project. Because I didn't have any thicker adhesive foam on hand ( and was too lazy to go to the store), I stacked three adhesive squares together to give extra dimension. Line up the tickets with the embossed arrows to create a rocket. Adhere the woman and tickets to the inside back of your box.
Use a printer or typewriter to create your title piece. Cut into a rectangle, ink the edges with black ink and adhere to a black cardstock background.

Cut a rectangle of clear acetate, score in half and adhere to the back of your title piece to make an invisible stand. Adhere inside the carriage box.
Apply metallic silver paint to a foam blending tool and stencil assorted graphics to the side and back of your carriage.
Add black Dresden trim.
Your Ticket to Ride Carriage is now complete! I hope you were able to find a little inspiration or knowledge from this tutorial. Have a great weekend! -Betsy 

Great Stuff

Chipboard Ticket Strips
Moon & Stars String Alongs
Wheels
Stars from 2 Celestial Shape Sets
Rectangle from Four Panel Door
Cardboard box
Vintage tickets
Vintage ad
Black Tyvek
Deep Sea Baked Texture Embossing Powder
Silver embossing powder
Embossing ink pen
Black ink pad
Assorted stencils
Foam blending tool
Foam adhesive squares
Black Dresden trim
Clear acetate
Printer or typewriter
Paper straw
4 washers
Cold press watercolor paper
Black cardstock
White cardstock
Black gesso
Acrylic paints
Metallic silver paint pen
Beacon Fabri-Tac
Beacon Zip Dry

Friday, February 24, 2017

The Library of Mister Bartholomew Pendragon

Goodmorrow crafters, Jess here for the final installment of my miniature piece this month! If you'll recall, earlier this months post, I thought it would turn out to be a set, but I loved how it was turning out so much, I just had to glue the bits and bobs into place. It has become "The Library of Mister Bartholomew Pendragon". Let me give you the walk through:


The full Deep Open Front Box, containing the miniature scene.


Stacks of research Mister Bartholomew Pendragon has accumulated on various fantasy creatures.


Specifically, the "Pixie" stack of papers.


Mister Bartholomew Pendragon himself, framed atop his chair.


Scrolls hidden amongst the books.


The stairs leading up to the aging door. He's out exploring and finding new species of creatures he just can't be bothered to repaint the door.


His collection of exotic bats in shadow boxes.


He hopes to one day have a large stack of research on Dragons, as well. For now, this is all he's accumulated.


He's got a special interest in Nymphs. Some say, his wife was once a Nymph in the forests of Hanover, but this is just whispers amongst other explorers.


Ancient scrolls on learning to speak with various faerie species.


The pride of his collection will always be his books.


A closer view of the door.


Candles lead the way of the stairs. Worries of fire hazards tend to not bother him.

Thanks for joining me for this months miniature making - check back next month for more miniatures!

GSLC Materials


Alpha Stamps Materials