Showing posts with label Baked Texture. Show all posts

Saturday, December 28, 2019

Shuttered Soul by Betsy Skagen


With holiday crafting put away for the season, I am able to refocus on mixed media art.

I am a classic over-thinker when it comes to art. Okay, truth be told, I might just be a classic over-thinker when it comes to everything--but today we are focusing on art. In creating this piece I pushed myself not to meticulously plan every detail and just go with the flow. 
The driving force behind this piece was Gypsy Soul's Window with Shutters. First I covered the shutters with black ink. Then I applied a coat of embossing ink, added Rocky Road embossing powder and activated with a heat gun. 

Setting that aside, I created my background paper by layer after layer of acrylic paint, spray ink, ink pads, paint pens, washi tape and stamped images to cold press watercolor paper. 

Next I took a collage image from a magazine and layered it behind the window. I then adhered the window shutter to the background paper. 

I then adhered a couple of my favorite rusty found objects to the page. 


To create the frame, I added grit paste to the edge of a piece of chipboard that I cut slightly larger than my background page. After it was dry, I painted it with black acrylic paint and then sealed with a matte polyurethane spray. 

After the frame was dry, I adhered the background page to it and my project was complete. 
That was it! Projects are definitely easier when I don't overthink them! 

My wish for all of you is that you each enjoy a holiday season filled with loved ones, warmth, good food and good feelings. 

Love to all, Betsy

Great Stuff

Distressed black soot ink
Embossing ink
Seth Apter's Rocky Road Baked Texture Embossing Powder
Cold press watercolor paper
Acrylic paint
Washi tape
Black ink
Spray inks
Paint pens
Rubber stamps
Found objects
Chipboard
Beacon Adhesive Fabri-Tac
Lock-Tite
Grit paste

Monday, April 2, 2018

Hip, hip, hooray for birthdays!

Hi Everyone,
Jess here today with a crown fit for a rusty queen.


I don't want to admit it, but I have a rather big birthday coming up.  I thought maybe having a crown would ease the pain a bit.  I'm not a frilly girl.  I'm a grungy girl and my crown needs to fit me. 

I started by covering my crown with tons of vintage paper.  I used old dictionary pages, sheet music, catalog pages, shorthand practice sheets, and more.  I used collage medium to adhere it to the crown and once it was dry I cut it down.   
I then added lots of Distress Stains and Inks in blues, greens, and browns.  Once the base colors were down I went back with Distress crayons to highlight edges.  

To make the fancy front piece I used  Baked Texture embossing powders.  I glued on the front piece and let it sit overnight. 
I had this cool old door plate that I adhered to the crown using brads.  
I added an old bingo number to the center of the door plate. 
I added metal flowers, with a bingo marker I colored using Distress Oxides and Baked Texture powders, to each side of the crown.
The inside of the crown is lined with graph paper.  You can see here I attached the band using tiny staples.  
This is the back of the band.  
This was really simple to make and you could really use this crown in so many ways.  I hope you enjoyed my grungy take! 


Wednesday, March 21, 2018

Good Friday Triptych

Hi everyone, Ann here today sharing a special piece that I created.
I can't quite believe that Easter is almost here. I know that many people celebrate in various ways; my family is very traditional. We attend religious services during holy week, including the sacred triduum. One of the most powerful services, for me, is on Good Friday. I have created this triptych to honor the sacrifice that was made on that day.


I began with Gypsy Soul Laser Cuts arch top triptych. This consists of 6 pieces, 3 solid backs and 3 decorative open fronts. I want the piece to have the look of an antique icon; many of the ones I have seen are gilded with undertones of red.
In order to achieve this look, I first paint the pieces with Distress Paint in candied apple.
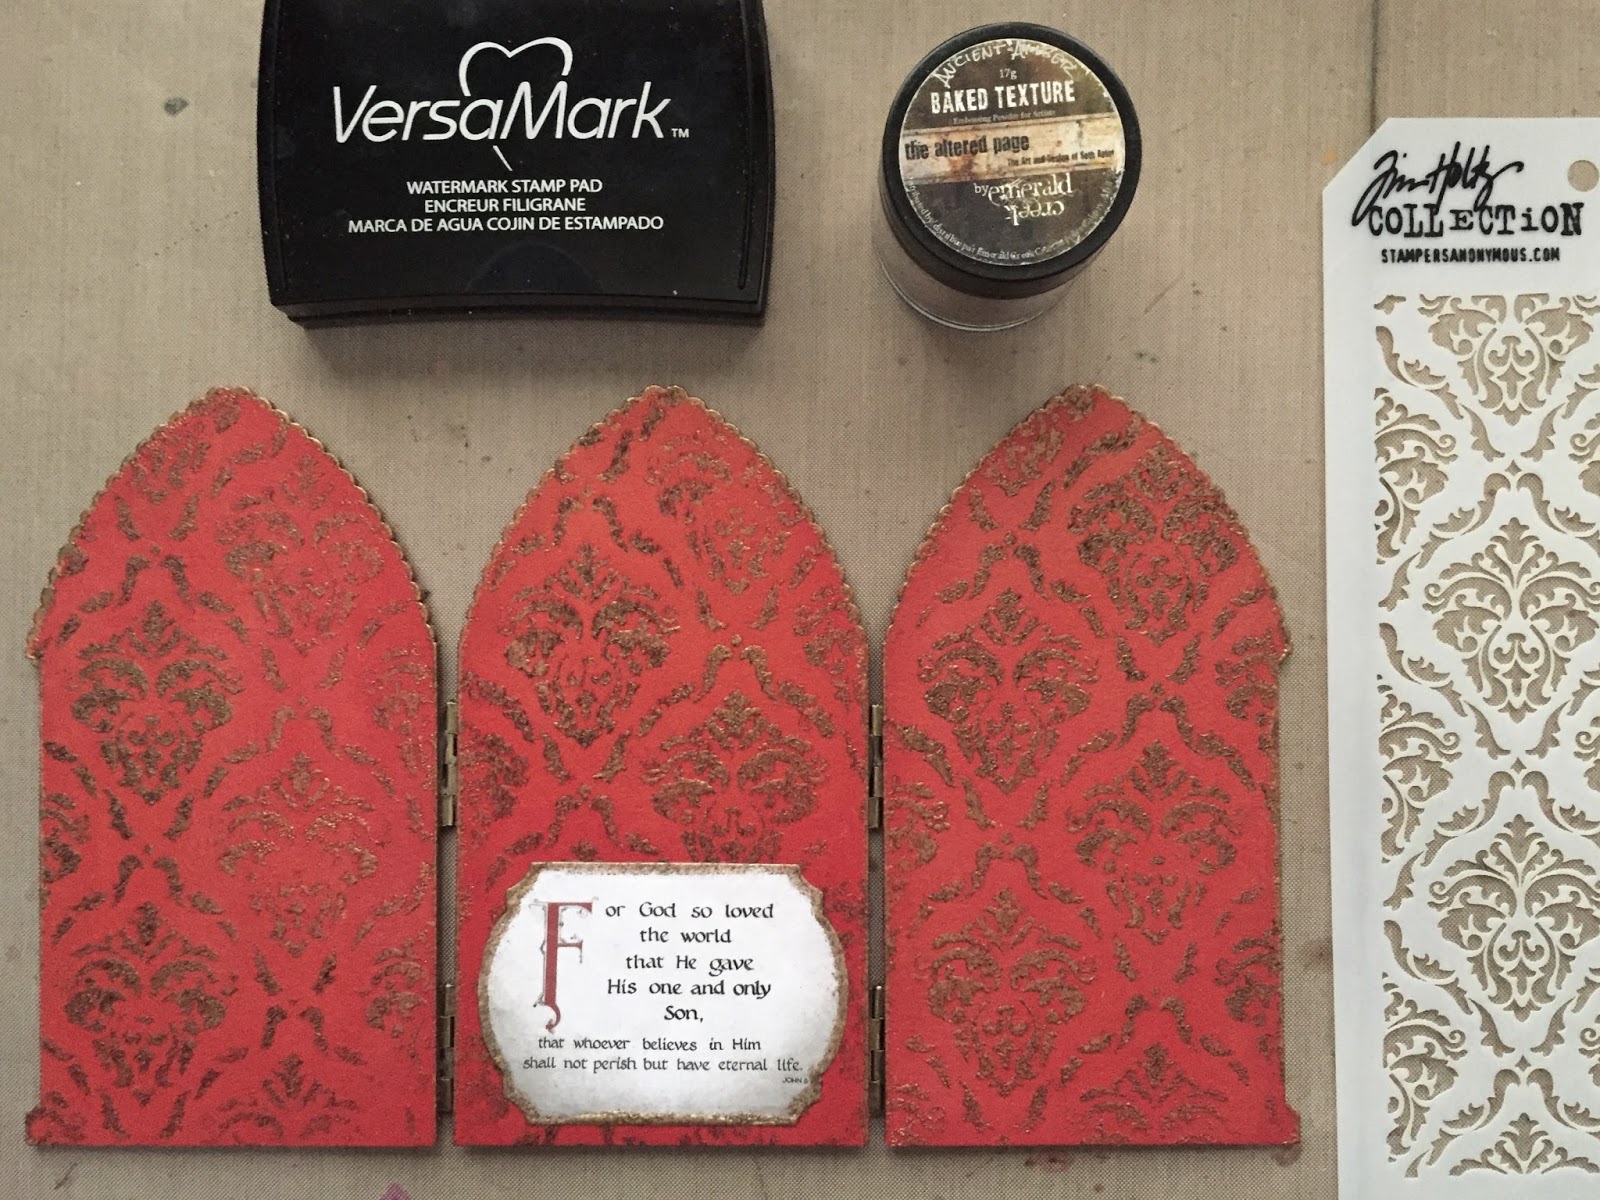
Once the paint is dry, I coat the front panels with embossing ink and sprinkle with ancient amber Baked Texture embossing powder. Baked Texture is a collaboration between artist, Seth Apter and Emerald Creek Craft Supplies, and I love the finishes it creates. I use a heat gun to melt the powder.
I search the internet to find the perfect image to put into my triptych. I download The Crucifixion with the virgin, Saint John, Saint Jerome, and Saint Mary Magdalene from museum.org. The image is perfect for my project and also free of copyrights.
 
I print the image three times and cut each section to fit on its respective panel. The right and left side images are slightly narrower than their openings. I extend each side image by painting along the right and left edges with Distress Paint in tarnished brass and set aside to dry. While this is drying, I align and attach hinges to the three panels. Although the hinges have mini screws that can be used for attachment, these will be sandwiched between the front and back panels so I use collage medium to hold them in place. I allow the adhesive to dry completely.

I would like the back sides  of the triptych to look aged and somewhat decorative. Using a Stampers Anonymous Tim Holtz gothic stencil, I apply embossing ink through the stencil onto the painted back side and sprinkle with more Ancient Amber Baked Texture and heat emboss to the desired finish. This same procedure is completed on each of the three panels. I die cut a bible verse and edge the piece with the Ancient Amber as well. This is adhered to the bottom area of the middle panel and allowed to dry overnight. 
 Each image adhered to their respective panels is coated with a generous  layer of Distress Collage Medium Crazing. When dry, this creates a crackled appearance typical of an old painting. 
The last step is adhering the top frames to each panel. I use collage medium on the underside of each frame and put it into place. Each frame is weighted down to ensure it remains flat until it is completely dry. 
Once dry, the triptych is ready for display.


Wishing everyone a blessed Easter!
 May the coming spring inspire you to create something wonderful! 
~Ann

Gypsy Soul Laser Cuts used:

Monday, March 5, 2018

Steampunk Goddess

Hi Everyone,
Jess here today with a super fun project.  
I am not a steampunk girl.  It's not really in my wheelhouse.  I dabble here and there, but when I saw this Steampunk Cage Dressform I knew I had to make something with it.  Honestly, it was super easy to make, so today's tutorial will be super short.

Cover your base using Seth Apter's new Baked Texture Embossing Powders.  The base layer here is Rocky Road.  The different patches of color are from Dirty Sand, Chunky Rust, and Patina Oxide. 
Here's another shot.
It's gorgeous and you don't have to prep the chipboard before applying the powder.  I just slapped on the embossing ink and went to town.  The secret to the layering is really just heating up the base layer(in this case the ROcky Road) and sprinkling on the color you want to add.
The dress form was covered with a thin layer of gesso and then I added Distress Oxide Ink in Cracked Pistachio. 
I covered that with Ancient Amber Embossing powder and added gears.   The wings are covered with the same ink and then embossed using Vintage Beeswax and sprinkled with Patina Oxide and Deep Sea embossing powders.  
Her back has a key to wind her up.  
I colored a vintage chandelier crystal using Alcohol Ink in Mushroom and hung it from the center of the gear to complete the piece.  
Where the pieces joined together I used black paint to hide the raw chipboard. 


I hope you like her! 


Friday, March 2, 2018

Free to Fly Folding House Shrine

Hello and happy Friday!! It's Jennalee here today with a variation on the Folding House Shrine. I had pulled out the house shrine a couple weeks ago to make but at the time my vision for the piece was not working the way I had envisioned. For some reason, I thought it was supposed to be a box. So my original plan was out. So there sat the Folding House Shrine. Then inspiration struck!! Instead of using the original chipboard "hinges" I decided to use ruler pieces.


I started by coloring the 3 house pieces with Vintage Photo Distress Ink. I colored both front and back. 


While I had my ink out I added a bit of color to Tim Holtz Idea-ology Ruler Pieces. I cut one Ruler Piece down to size to fit the shrine pieces. 


I covered the front of the house pieces with vintage shorthand text. I cut to size and ran thru my Xyron. I applied the collage elements to my background pieces at this point. 


Once the backgrounds are adhered to the house pieces. I heat embossed all 3 pieces using Seth Apter's new Baked Texture in Vintage Beeswax. I used a Versamark pad to coat the background and then apply the powder. I did one layer. This picture shows the before (on bottom) and after of the paper. Once the piece has cooled add some depth and detail using Tim Holtz Distress Crayons. 


The wings are printed on dictionary text with a layer of Distress Crazing Medium. Once the Crazing Medium air dried I added some depth to the crazing with Vintage Photo Distress Ink and Tarnished Brass Distress Crayon. Not shown here I added a gold heat embossed edge all the way around each wing. 


The center panel of my shrine features an Idea-ology key that I colored with Vintage Photo Distress Crayon. I added a few drops of Seth Apter's Baked Texture Patina Oxide. I wrapped the key with a length of Tim Holtz Craft Thread dyed with Twisted Citron Distress Oxide. 


I then measured out my holes on each of my house pieces and punched the holes with a drill punch. 


To attach the Ruler Pieces to the Folding House Shrine pieces I cut a 16 inch length of  20 gauge craft wire in Antique Brass. Start on the left and work across. Begin by threading wire up from back about 3-4 inches and wrapping a messy spiral. Once knot is desired size wrap around Ruler Piece making sure your wrap is tight enough to hold the Ruler Piece. Be sure to leave 3-4 inches for a messy knot on the next panel. Wrap wire the same way for the remaining holes. 


Attach the key to the middle panel using a strong hold glue. 


I adhered the wings at the base leaving them loose enough to have a flutter effect. I then cut a length of black sewing thread and rolled between my hands to get a messy look. Using an embossing dabber add a random bit of embossing ink and sprinkle on some gold embossing powder and heat set. While the powder was still hot I used  tweezers to apply the thread in the powder. I then added a bit more embossing ink and another sprinkle of gold powder and heat set. 


To finish off the back of my piece I tried out a new technique Eileen Hull shared a couple weeks ago. Using a sponge apply matte medium to an embossing folder and insert paper. I used a brayer to roll the folder to transfer the medium to my paper. I then applied my foiling. Set aside to dry. Once dry peel away foil sheet. 


I really love all the different textures and mediums I was able to incorporate into this piece. The finished project is a perfect size for displaying on a shelf. Thanks for stopping by and spending a few minutes with me today. I hope you have a weekend full of creative inspiration!! Happy Creating ~ Jennalee