Showing posts with label Build A Layout Lovebirds. Show all posts

Monday, September 26, 2016

Welcome to the Nuthouse - Fall Canvas by Lynne

Hello there and happy fall! So far we're having gorgeous weather here in Southwestern Ontario after a hot and stick summer. In honour of this gorgeousness, I decided to create a canvas with some warm fall colours and one of my favourite little creatures!

I dry-embossed the chipboard leaves using a leaf-themed Darice embossing folder by lining them up as closely as possible with similar-sized leaves on the folder to get the lines in the right places. The pumpkins were covered with corrugated cardboard. The heart was dry-embossed.


I attached some bits of crumpled tissue paper and pieces of burlap and cheesecloth for texture as well as some mesh ribbon and corrugated cardboard. I  added some stenciling with texture paste then primed everything with gesso before painting it with gold acrylic paint.


I then used Colourarte Silks and Twinkling H20s to add some splashes of warm colour here and there.
I finally figured out how I  wanted to add texture to the cute little squirrel (after trying a couple techniques that provided somewhat less than stellar results....hey that happens to all of us right??) I combined texture paste with microbeads and spread it with my finger for a rough texture. When it was dry I painted it gold.

I then sprayed the canvas with a variety of mists and added some brown ink on the letters as well as on the edge of the squirrel. I  attached a couple metal and wooden embellishments to finish it off. This little project will suit my house perfectly for fall decor, not only because I love squirrels, but because my home is definitely a bit of a nuthouse....and that's just the way I like it! Wishing you a happy and at least mildly nutty week!

GYPSY SOUL ITEMS USED

OTHER ITEMS USED
gold acrylic paint
gesso
Twinkling H20s and Silks by ColourArte
mists by Tattered Angels
Mister Huey's
Recollections
Heidi Swapp
Prima static stencil 6x6

Sunday, February 14, 2016

Happy Valentines Day "Love You" Layout


Hello Friends!  Happy Valentines Day to all!  Hope your day is filled with love and romance!  Today I'm sharing a layout that I created with Gypsy Soul Laser Cuts Build A Layout: Lovebirds.
Build A LAyout Lovebirds
This fun pieces can be used on one layout or used on two or three projects!  Today I used some of the pieces on a layout of a wedding that I attended a few years back.  To alter the pieces  used a simple technique giving them a two shaded effect.  I used my chalk inks and simply shaded the top halves in red and the bottom in pink.  It's as simple as rubbing your inks on the chipboard pieces until you reach the colors you want. 
I hope you enjoyed my project and be sure to check out Gypsy Soul Laser Cuts for many different Build A Layout chipboard sets. 

Thanks for stopping by Gypsy Souls Laser Cuts today and Happy Valentines Day!!

Debbie

Gypsy Soul Laser Cuts products used:

Sunday, February 7, 2016

Stand Up Love Sentiment by Dianna

Hi everyone, Dianna here with Gypsy Soul Laser Cuts - Stand Up Sentiments - Love.  I used the colors for the February Facebook Challenge - Pink, White and Silver.  

I painted the love sentiment white.  I then had Gina cut out the Love lettering from Yours Truly paper line. I glued pink paper first then off set the grey paper. I embossed the grey paper with silver and white embossing powder.  I then used a pink distressed ink on both the pink and grey paper.  


I painted the large heart from Build a layout Lovebirds white then colored it pink with a Copic Marker.  I applied glossy accents to the heart and sprinkled white and silver beads.  I cut out the man and women from Authentique - Crush -Cache.  The dress was blue and I colored it pink.  I painted the gears from the Gears Borders and Corners Miniatures white and used Stickles on the gears.  I placed grey pearls and rhinestones in the center of the gears.  


I painted the lovebirds white and colored the birds grey with Copic Markers.  I cut one side of the heart vine and colored it white and pink.  


I wanted the back of the Love to be pretty also so, I painted the Heart of Gears white and then colored it pink.  I used Stickles on the heart and placed grey pearls in the middle of the gears. 

Thank you for looking! 

Items Used
Gypsy Soul Laser Cuts

Other Items 
Authentique- Crush - Cache
Echo Park Paper


Saturday, February 6, 2016

XO Wall Kit

Hello to my fellow crafty creators out there. Shanna here with a new creation to share, for your inspiration. 


I got this amazing wall kit last year but never got the chance to create with it. Now it is that time of year and I decided to create a little holiday decor. 


I painted the love birds with black chalk paint. The X's and O's and heart boarder got a coat of gesso so it would pop off the reddish background. 


There are tons of goodies in the Valentine's Day section of the store so grab some chippies and create with us! Also, make sure to check out Pam's project on the blog today!!


Items Used:

Wednesday, February 3, 2016

"Love Never Dies" by Trish


Not everyone is enamored of Valentine's Day. So, for those of you with a great antipathy to the chubby purveyor of love, Cupid; here is my tongue-in-cheek diorama for you:


Have fun reading through the steps. There is also a supply list at the end.


I chose this sturdy and versatile ATC Shrine- Wrought Iron from Gypsy Soul Laser Cuts.  I needed to see if my parts would fit.  I had a plastic skeleton left from Halloween decorations that fit just right...well, minus two limbs.  


 Here is the shrine in exploded view:


  I decided to use black gesso on each piece.


  Everything gets a second coat.


  Now for some texture! The inside back panel gets fiber paste. I just kept thinking about rotting clothing, etc...


  And the side panels...this modeling paste is considerably stiffer and spreads on nicely.


  You can see the texture in this closer view:


  Let's not forget the gate door. I barely scraped the paste in places.


  While this dries, lets back foil the Love sign.


  It looks lovely :)


  While we are at it, let's make a foil back for the Wings.


 Here it is under the wings:


 Now the wings need some treatment. I put a light coat of glaze over the wings to hold the soft glitter.


 While the wings dry let's see how the box shrine will look. Remember to keep the product away from the tab areas. I want it to fit.  The gesso did make the fit a little snugger. Didn't have to force it at all.


 It looked so beautiful, I had to take a closer look:


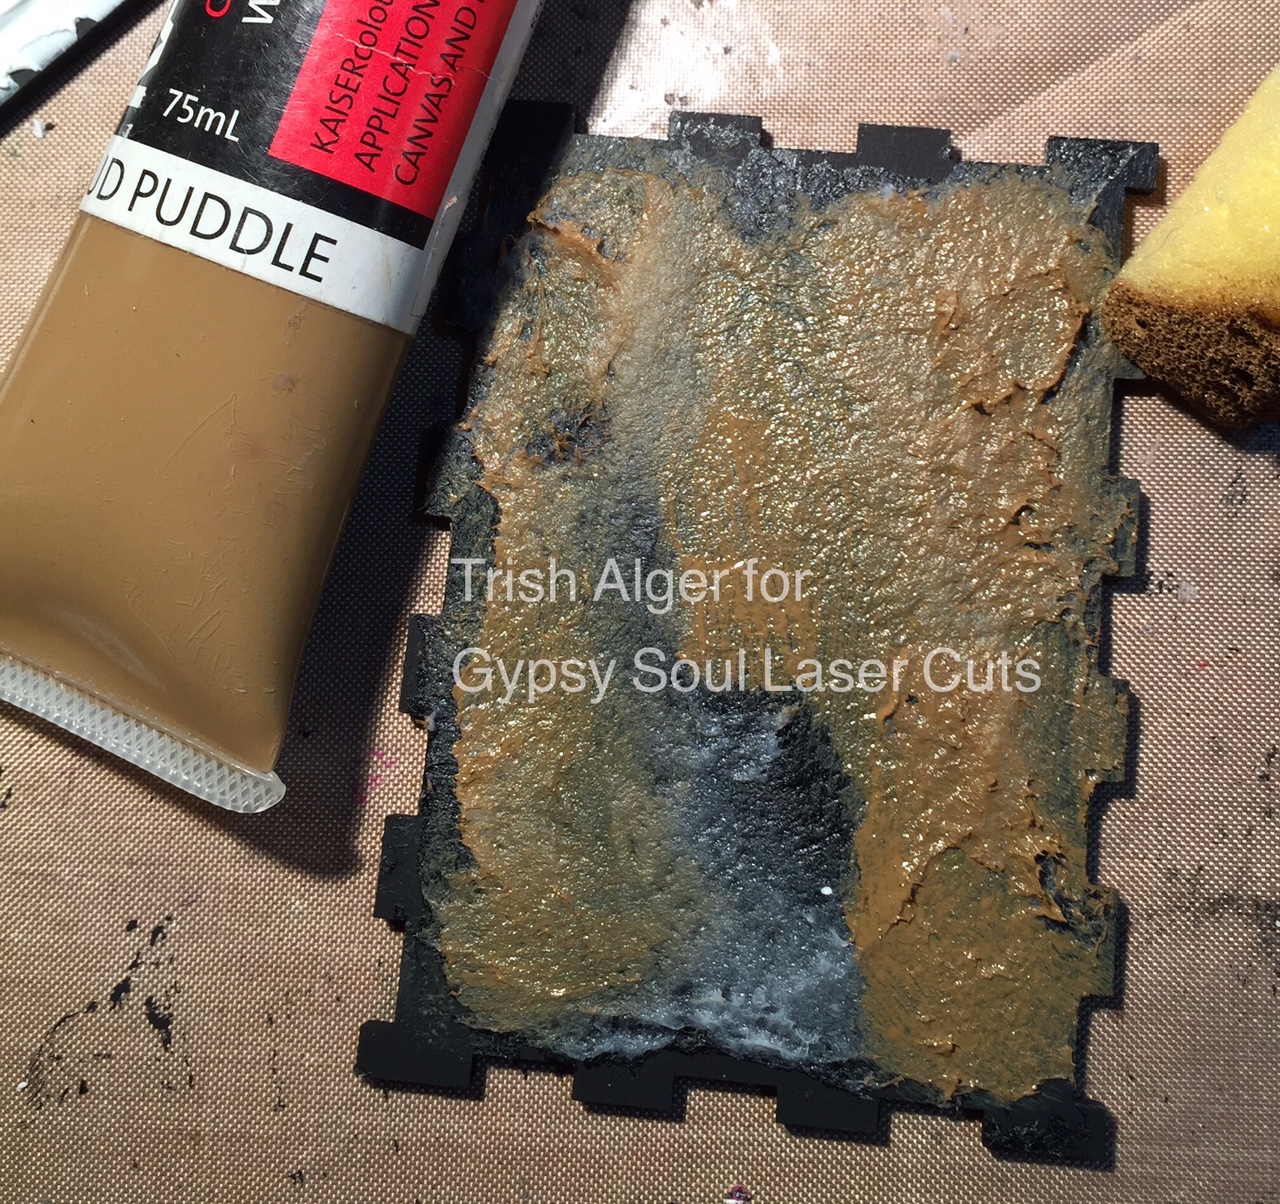
 Now for my creepy, crypt patina. I used four separate colors to achieve what I was after.


 The back panel with fiber paste gets the treatment first.


 Use the these four colors in this order--Mud Puddle, Terra Cotta, Raw Sienna, then Navy Blue.


The sides and gate as well.


 You can see the contrast in the texture as black gesso is carefully sponged on in places:


 I added an antique varnish when the four layers were dried.


 Let's not forget the wrought iron gate!


 We are making some progress. I made sure to keep the plugs in through the entire process. (The panels with the plugs hold the gate). 


 Let's attach the sign to the Victorian Corner


 Here it is together with the sign attached. I mixed together a few more paints to add a lighter moss color sponged on the outside a few places:


 My shrine resident (AKA Mr. Skeleton), needed to pledge his undying (Haha) devotion with a boing-boing heart. Here's the Scalloped Heart: 


  Add a spring inside a broken rib cage:


 My love of glitter glue is evident in the heart eyes and the border around the scalloped heart. My crypt resident needs to be attached to the bottom panel.  I know it looks bad...


  Then the wings and red foil backing. I'm really starting to feel bad about this guy.


  Let's put the last panel in and add some glue gun cobwebs.


 Here is your shrine to a humorous, macabre Valentine's Day.


 I had so much fun creating my fun: Love Never Dies.


I'd love to hear if you make something similar. Please leave a message on the blog. 


Ciao for now,

-Trish


Here is my ingredient list:
Build A Layout Lovebirds - the Love Sign & Scalloped Heart
 
Other Products Used:
Kaisercraft--
-- Mud Puddle, Terra Cotta, Raw Sienna, & Navy Blue, Cool Grey, Grass Green.  
Jaquard
--Lumiere, Crimson
Martha Stewart
--Black
AlteredPages.com
--Darice Red Foil Tape
Eclectic Products
--E6000
Faber Castell
--Glaze
Martha Stewart
--Tinsel Glitter, Crystal
Delta Creamcoat
--Instant Age Varnish
Liquitex
--Black Gesso
--Blended Fibers
--Modeling Paste
Ranger
--Stickles, red