Showing posts with label China Cabinet. Show all posts

Saturday, October 17, 2020

Halloween Cabinet

Happy Saturday, everyone! Connie here with a Halloween version of one of my absolute favorite projects to work with – a miniature display cabinet made from a GSL China Cabinet 1 to 12. It was fun finding and making spooky little objects to put in the display. Let me show you how it was done.

Here are the cabinet pieces laid out. The cabinet also comes with upper and lower doors but I wanted this to be an open cabinet so I set those aside for some future use.

Once it was assembled with tacky glue, I painted the walls and exterior with black acrylic paint.

For the back interior wall, I used two different papers – an orange dot from DCWV and Graphic 45's An Eerie Tale floral which I fussy cut for the middle shelf.

To make the stand up ghosts I cut apart a scrapbook border I had in my stash and glued them to small wood blocks that were painted white.

I had a Haunted Mansion Madame Leota miniature game that a friend made me and I wanted to include, which gave me the idea of making a Madame Leota crystal ball. It's made from a Idea-Ology snowglobe, a printed image and some teal roving.

I embossed the word 'Boo!' from the GSL Spooky Shape Set and glued it in place. I added a few printed heads in jars, a trick or treat bucket, a doll's eye and a vial of poison made from a Christmas light bulb dipped in red paint and set inside a mini glass bottle.

Madame Leota was joined by a Hagen-Renaker porcelain frog and a plastic spider web. That darling GSL Miniature Ouija Board is available over at Alpha Stamps.

Those little ghosts went in one of the bottom cubbies, along with the Madame Leota game and a miniature skull.

The cabinet was finished with a bat sticker from Jolee's Boutique 3D Halloween Embellishments - Animal Skeletons.

Thanks for stopping by!

GSL Products Used

China Cabinet 1 to 12

Spooky Shape Set

Miniature Ouija Board


Other Supplies Used

Tacky glue

Acrylic paint

Graphic 45's An Eerie Tale

Glittery orange dot paper from DCWV

Printed images

Jolee's Boutique 3D Halloween Embellishments - Animal Skeletons

Ghost scrapbook border

Wood blocks

Miniature snow globe

Miniature skull

Roving


Saturday, July 4, 2020

China Cabinet - 2020 Version

Happy Saturday, everyone! When I first started working on one of the lovely GSL China Cabinets I thought I would display a tiny tea set I recently received that's begging for a display case. I had a look at our full sized china cabinet for inspiration and noticed it's now next to the wire racks we had to add to our dining room to hold extra supplies since we are now only shopping once a month and our kitchen has very little storage (my kingdom for a pantry!). I decided to change the focus of my little tea set display case to reflect the year 2020 has been so far.

Here are the cabinet pieces all laid out. It's very easy to construct. The cabinet also has upper and lower doors that I laid aside for a future project. I wanted the storage spaces to be wide open for this one.
Here it is after assembly with a bit of tacky glue.
I chose a dark brown acrylic paint and a red patterned paper from Graphic 45's Floral Shoppe collection for the rear wall. I painted some miniature wooden ball finials for the cabinet's feet. I always use Q-tips to hold them while I paint them, it also makes them easy to set aside to dry.
Here's an interim staging of the cabinet in it's original intent. Having abandoned that idea, I started messing around with miniature printables and supplies from my stash.
The top shelf holds an extra stash of flour and sugar in small glass jars. The sugar is fine glitter, the flour is, well, flour. The canned goods are from a vintage Barbie kitchen set that my daughters abandoned long ago and I refused to toss. Below them are mini printable supplies, some disinfectant wipes made from polymer clay and a tiny roll of toilet paper. Everyone I know is snacking lately so I included a few bags of chips.
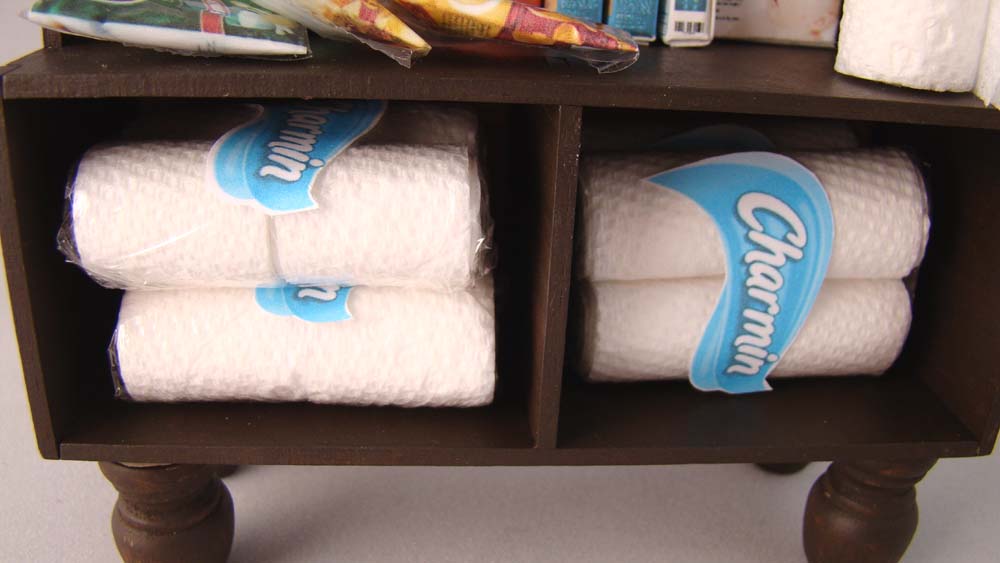
The lower cabinet holds a hoarder's stash of toilet paper.
I made the individual rolls from strips of paper towel wrapped around a core of rolled up gray cardstock. I made 17 rolls total for this project while skyping with a crafty friend.
One last detail is the carved medallion detail I paced top center of the cabinet. It's molded from paper clay and painted to match the wood.
Thanks for stopping by! 
GSL Products Used

Other Supplies Used
Tacky glue
Acrylic paint
Graphic 45 Floral Shoppe collection
Miniature wooden ball finials
Gray cardstock
Printables
Miniatures
Polymer clay
Paper clay
Paper towel


Wednesday, August 16, 2017

Master Detective Curio Cabinet by Sandy Trefger Part Two


Hello again, Sandy here with Part Two of the tutorial on assembling my Master Detective Curio Cabinet with the hidden box on the back that you can see above.  The original kit for the cabinet is on the left and the add on box kit is on the right.  It is 3 inches deep and holds a very good sized folio album.  It is attached with hinges and closed with a metal latch.

In the August 2nd blog post here on Gypsy Soul Laser Cuts, I shared how I put my cabinet together with cardstock structure hinges.  I did find that the added paper made it a bit harder for the doors to swing open and closed and required a bit of sanding in the end and it also added bulk to the cabinet where the drawers go in and out.  On my next one, I will be assembling with just glue and painting the edges black.  You might want to consider that for yours as well.  However, for this next tutorial segment on assembling and adding the box to the back, I did use the structure hinges.

Supplies Used:
  • Gypsy Soul Laser Cuts China Cabinet # B4A
  • Gypsy Soul Laser Cuts Bonus Box for the #B4A China Cabinet - Custom Item, Contact the Store
  • Black 12 x12 Cardstock
  • 12" Trimmer
  • 12" Score Board and Bone Folder
  • Art Glitter Designer Glue (White Glue)
  • 3-in-1 Glue
  • Glossy Accents
  • Black Masking Tape
  • 3/8" Scor-tape
  • Clear Transparency Sheets 
  • Black Ink and Foam Applicator
  • Halloween embellishments
  • Assorted Ribbons-4 to 6 different colors and designs
  • Basic Grey Magnet Snaps, small
  • Metal hinges - 2 small and 2 mediuim
  • Metal Latch - 1
  • Small Brads and Large Brads
  • Eyelets
  • Assorted charms & chains
  • Prima Flower
  • Steampunk bottles and other embellishments
  • Tim Holtz Mini Bottles
  • Assorted Miniature Items
  • Tim Holtz Door Knob (for decorative item inside cabinet)
  • Fall Leaves and Mini Pumpkin Floral Pick

Let's get started!

Step 1:  Layout out your chipboard pieces for the box as shown.  Make sure to use a damp cloth or baby wipe to clean the laser residue from the edges.


Step 2:  Apply glue to the notches of the sides and ends and bring  them up to form the box as shown below.  Allow the glue to dry well.


Step 3:If you are using the black cardstock structure hinges to finish the edges of your box, cut several from 12x12 sheets as shown.They will need to be 12" long x 1" wide, scored on the 1" side at 1/2".  You will measure the box and cut the lengths to fit as needed.


Step 4:  Apply glue or scor-tape to one side of the hinges on each 1/2" section.  And attach a hinge to all the edges as shown on the inside and outside of the box.  If you do not want to use structure hinges and you have assembled/glued the box together well, you can choose to paint all the seams and edges black.


When finished attaching the structure hinges, your box will look like the photo below or all the black hinge areas will be painted black if you went with that option.


Step 5:  Pattern the outside of your box and carefully line it up with the curio cabinet.  Use a ruler and marker to mark the placement holes for your hinges.


Step 6:  Drill or punch the holes that you marked and use Glossy Accents plus brads to attach the  hinges to the box and the cabinet.  Carefully open up the prongs on the inside of both the box and cabinet. Make sure they are tight and use a bit of Glossy Accents to secure if needed.  You will add two hinges on the same side.  Also use a marker to mark the holes for the latch on the other side. Drill or punch holes and attach the same way by adding Glossy Accents and brads.  When looking at the front of the cabinet, I put the hinges on the left side and the latch on the right side.


Step 7:  Once the hinges  and latch are securely on the box and cabinet, you can go ahead and pattern the back of the cabinet and the inside of the box.  If you haven't already, you will also want to pattern the back of the box on the outside.


The curio cabinet with the secret storage compartment is now completed.  When you open it up from the back, you have a 3 inch space to create a custom album to store inside. Make sure that you don't create an album that is too thick as you do want your cabinet and storage box to close up properly.

The photo below shows the curio cabinet with the back opened up and a glimpse of the album I created for Graphic 45 and added to the inside.


Finish up your cabinet by adding decorative elements to the inside such as small bottles, skulls, miniature items, photos, clocks, mirrors, etc.  On the knobs of the doors you can hang chains, padlocks, a sign, metal key and other charms.  On the top, add a junk bow with floral pieces and if desired like mine, a spooky skeleton.


I hope you've enjoyed my two part tutorial to create a unique decorative piece with Gypsy Soul Laser Cuts kits. Check back here September 6th for another project from me with a tutorial.  I'd love for you to visit my blog/website for more of my crafty projects at  www.sandytrefger.blogspot.com

Happy Crafting!
~Sandy


Wednesday, August 2, 2017

Master Detective Curio Cabinet by Sandy Trefger Part One

Hello, Sandy here with a fun project for you!  I've created this fabulous Master Detective Curio Cabinet filled with all of Sherlock Holmes' "collectibles" that he uses to solve a case. I've created this out of the Gypsy Soul Laser Cuts China Cabinet kit which measures 14 inches tall x 10 inches wide and Graphic 45's Master Detective paper collection. I've also added a bonus secret compartment on the back that will hold a very large folio album.  


I've got a ton of step-by-step photos to share with you on how I put my China Cabinet kit together and turned it into a mysterious Curio Cabinet for Sherlock Holmes.  In order to not overwhelm you, I'm splitting up this tutorial into two parts.  Today is Part One and I will share Part Two on August 16th.  So grab a comfy chair and your favorite drink and let's get started!

Supplies Used:
  • Gypsy Soul Laser Cuts China Cabinet # B4A
  • Gypsy Soul Laser Cuts Bonus Box for the #B4A China Cabinet - Custom Item, Contact the Store
  • Black 12 x12 Cardstock
  • 12" Trimmer
  • 12" Score Board and Bone Folder
  • Art Glitter Designer Glue (White Glue)
  • 3-in-1 Glue
  • Glossy Accents
  • Black Masking Tape
  • 3/8" Scor-tape
  • Clear Transparency Sheets 
  • Black Ink and Foam Applicator
  • Halloween embellishments
  • Assorted Ribbons-4 to 6 different colors and designs
  • Basic Grey Magnet Snaps, small
  • Metal hinges - 2 small and 2 mediuim
  • Metal Latch - 1
  • Small Brads and Large Brads
  • Eyelets
  • Assorted charms & chains
  • Prima Flower
  • Steampunk bottles and other embellishments
  • Tim Holtz Mini Bottles
  • Assorted Miniature Items
  • Tim Holtz Door Knob (for decorative item inside cabinet)
  • Fall Leaves and Mini Pumpkin Floral Pick
See photo below for ideas of different items you can add into your curio cabinet.


Step 1:  Open up your China Cabinet kit and use a baby wipe or damp cloth to wipe off the edges to remove black laser residue.  The kit does not come with labeled pieces but it is pretty self explanatory so lay out your pieces to get an idea of how it goes together.  You can glue your cabinet together by using the pre-cut slots and paint all the edges black or you can do as I did and cut 12" x 1" (score 1" side at 1/2") structure and finishing hinges out of black cardstock.


Step 2:  When assembling (either method--glue only or structure hinges) apply white glue into the slots as shown in this photo.

Step 3:  Put the sides on to the back section and hold to allow the glue to set.  You might want to use a bit of masking tape or construction tape to hold the sections together as the glue dries as shown in the second photo below.


Step 4:  Continue to glue the shelves and drawer sections into the cabinet.  Use tape to hold the sections together while the glue dries.


Step 5:  Before attaching the top section of the cabinet on, measure and cut structure hinges and attach to the inside as shown.  You will want to glue in a hinge into each seam joint of the cabinet.  


Step 6:  Next, attach the top section of the cabinet with glue and secure with a structure hinge.


Step 7:  On the back of the cabinet, apply a bit of glue into each notch as shown. You might want to use black masking tape to cover each section on the back after you've added the glue.


Step 8:  Continue to glue a structure hinge into each seam line of the cabinet until all have been added.


Step 9:  For the structure hinges on the drawer section of the cabinet, Measure and cut the hinges the length of the drawer section and attach the inner side of the hinge down, Use scissors to cut into the hinge where the shelf is and then attach the remaining side.


Step 10:  For the sides of the top "shelf" (the widest shelf at the very top), Measure the sides and cut a structure hinge to fit.  Where the shelf meets the side of the cabinet, cut a slot in the hinge and attach it down as shown.  This will wrap that end piece of the shelf.


Step 11: Measure and cut hinges to finish the front edges of each shelf.  For the one on the drawer section, you will use scissors to cut each section for the underside and attach down.  Burnish well as you do not want the paper to come up when you insert the drawers later.


Step 12:  Apply finishing hinges to the back edges of the cabinet.


The next photo shows you how to again cut the hinge on one side to make it fit around a shelf when finishing the outer edge of the cabinet.


Step 13:  Continue finishing all the edges of the cabinet by adding hinges as shown.


This is another photo showing you how to miter cut for a shelf when adding a finishing hinge.


Step 14:  You will also finish the outer edges of the drawer section of the cabinet.


Miter cut the hinge on one side to go around each drawer divider.

 Cut a line for the outer edge as shown.


 Attach down, finishing the corner as shown and burnish well.

 Continue to wrap all the sections of the drawer dividers--top, sides and bottom.


Miter cut on the corners of the drawers as needed to finish the edges.


Step 15:  To eliminate paper bulk which might hinder the drawers from sliding in and out of the cabinet, Use black acrylic paint and paint the inside sections as shown.


Step 16:  While the paint in the drawer sections dry, Cut one 12" length of hinge as shown by making "v" cuts with your scissors on each 1/2" side up to the fold line.  Important--do not cut the fold line!


Step 17:  Open up the hinge and add glue to one side as shown.  Attach it to the curve piece on the top of the cabinet.  


Step 18:  Assemble the drawers with glue only.  Adding cardstock hinges to the drawers will add too much bulk and cause the drawers to not slide in and out.  Use plenty of glue in the notches and hold the sections with your hands or masking tape until dry.


Note: You have two options for the fronts of your drawers.  If you do not want to add knobs, you can use the ends with the thumb notches as the front.  However, if you do want knobs, you will use the ends with the pre-punched knob hole as the front.  For my curio cabinet, I decided to turn the drawers around and add knobs.


 Step 19:  Paint the outside of the drawers black as you do not want to add any patterned paper to the sides of the drawers.  Make sure to paint the edges of the front and back black as well and the edges on the inside of the drawers.  You will also paint your window frames black on both sides and on the edges as shown. Allow to dry.


 Step 20:  Attach scor-tape along the window frames on one side of each as shown.

 Step 21:  Cut two pieces of clear transparency sheets to fit the windows, Peel off the tape backing and carefully attach the transparency sheets to create "glass" for the windows.


Step 22:   Measure and cut strips of patterned paper to cover the outer frame of each window on one side only.

 Attach the widest strips on first.

Then miter cut the narrow strips as shown and attach down on to the sides and over the wider patterned paper strips.


Step 23:  Use a pencil and the sides of your cabinet to trace patterned paper to cover the sides.  Cut out with scissors and ink the edges if desired with black ink and a foam applicator.


 Glue to the sides of the cabinet.


Step 24:  Place the hinges on the windows, mark the holes and punch out.  Attach with small brads and Glossy Accents.  Make sure your hinge folds up on the patterned side which is the front of the windows.


Step 25:  Place the windows on the front of your cabinet with it lying down flat.  Line them up straight, mark the holes for the hinges to attach to the cabinet.  If you  have a drill and a small drill bit, you can use that to drill the holes into the cabinet.

Attach the hinges with small brads and glossy accents.  Allow to dry.


Step 26: Open up the windows and open up the prongs of the brads and make sure to press them down flat and keep them tight to hold the hinges in place.  Add a bit of glossy accents to the brad prongs.  Allow to dry.


Step 27:  While the hinges and brad prongs dry, create two door pulls out of two large brads and two eyelets.

You will insert the brad into the eyelet as shown with the shank of the eyelet toward the head of the brad.

Step 28:  Punch a hole into each inner frame of the windows in the middle right over the shelf.  Insert the assembled brad and eyelet with both on the outside and open up the prongs on the inside, turn the prongs so they do not stick out of the frame section.  Use glossy accents to secure the door pulls you attached and the brad prongs.  Allow to dry.


Step 29:  Measure and cut patterned paper to cover the inside of the cabinet, the shelves, the front and back of the drawers (do not put patterned paper on the outer bottom or sides of the drawers).  If you want to add drawer knobs, add those before patterning the inside of the drawers. Also do not pattern the inside sides of the cabinet until the bonus box is attached in Part Two.   Use a pencil to trace the shape of the top of the cabinet and cut two patterned papers to cover that section front and back.   


That's it for today!

Check back here on the blog on August 16 when I will continue the tutorial for assembling and adding the box to the back of the cabinet.  This will create a secret hiding place for a large folio album that I'm designing for Graphic 45.  I will also share how I decorated and finished my curio cabinet.

This cabinet is so much fun to create and looks fabulous.  For those of you in Texas and surrounding states, I will be teaching a class to create this project at Flossie Scrapper in Joshua, Texas in September. In class, we will assemble an unfinished cabinet and folio album so that attendees can pattern it in any paper collection of their choice.

Thank you so much for following along with me today and check back on the 16th for Part Two.  For more of my crafty projects and information about classes, visit my blog/website at:  www.sandytrefger.blogspot.com

Happy Crafting!
Sandy