

Sorry, not sorry for that little earworm. But it perfectly describes this extensive album I made. Designed to hold photos or other scrapbook mementos, it offers page after page of surprise pockets, flaps, folds and hidden pages.
Because this book is so big, I am just going to give you an overview of it in today's post. Then, in later posts, I will provide tutorials on how to make the book.


Pages 1 & 2
The front and back of the book are deceptively simple. But that changes as soon as you open the cover and discover what is inside. The inside flap has a diamond background and clip to hold large photos or documents. Page 2 has a fold-out mechanism, inside of which is a place for a small photo and journal notes. Grape vines serve as the clasp for the fold-out.


Pages 3 & 4
Pages 3 and 4 feature a magnetized fold-out and three corner pockets with insert cards.
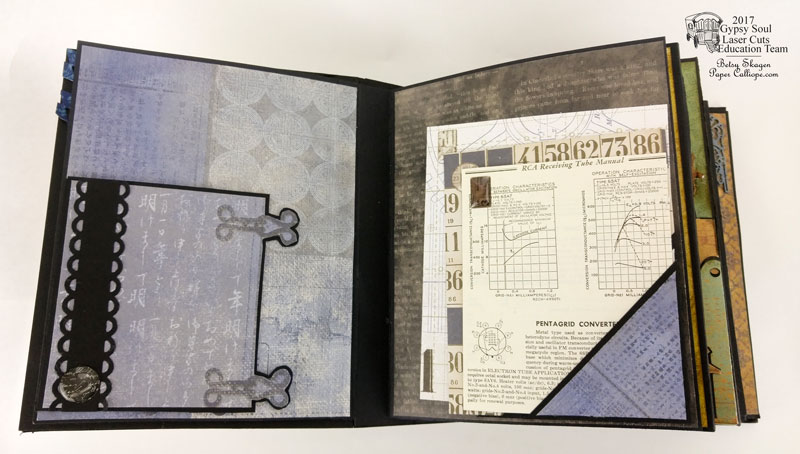
In the photo below, the fold-out is open. Because of the hidden magnet, it easily snaps shut again with a click.

Page 4 has three diagonal pockets to hold cards, where you can add photos or mementos.

The cards have fun designs on both sides to provide optimal scrapbook space.

Pages 5 & 6
Page 5 features decorative stars and a Waterfall Flip Book and Page 6 features a frame that you can slip a photo into.

The Waterfall Flip Book is held closed with a magnetized latch. When you open it, you get eight pages on which you can add photos or other items.


Pages 7 & 8
Pages 7 and 8 features a vintage clip, two creative pockets and many cards for photos.

You can open the clip to add additional materials and add a photo to the card.


Page 7 also offers a surprise as it opens up to reveal two more pages.

One of these pages has a file folder you can open and place a photo inside.

The other page features a diamond textured flap with hidden magnet that folds down and offers more storage or journal space.

Pages 9 & 10
I love the color combinations on Pages 9 & 10.

Page 9 features two cards held in place by a magnetized flap that exactly matches the flowers behind it.

Page 10 has a Journey Tag and a four-fold fold-out that offers plenty of space for photos or journal notes.


Pages 11 & 12
Page 11 provides a side pocket with two inserts offering plenty of room for large photos.


Untie the cute star on Page 12 and discover a space for a tiny memento or photo.

Page 11 folds out to reveal two more pages.
 You can slide a photo into the frame.


Pages 13 & 14
At first I thought Pages 9 & 10 were my favorites, but Pages 13 & 14 are right up there too. And of course I know of a couple more pages coming up that I am terribly fond of as well. So let's just say that I really like how Pages 13 & 14 turned out.

Page 13 has a magnetized flap that folds up, revealing the cute photo card inserts below.

The number strip is also a magnetized flap that opens. With all of Page 13 and both sides of the two photo cards, there is plenty of room for your scrapbook photos and mementos.


On Page 14 you can pull out a tag from inside the Doodle Frame.

You can also open the magnetized flap.

Pages 15 & 16
Pages 15 & 16 make me happy because they are so bright and cheerful.

Page 15 features a pocket trimmed with Art Deco lace.

Inside the pocket is a cheerful card ready for a personal touch.

On Page 16, you can lift the magnetized flap to release the card and see that the flap perfectly matches the paper beneath it.

Pages 17 & 18
I cannot tell a lie. Pages 17 & 18 are doozies. In reality, Pages 17 & 18 total at least 12 pages. This set of pages is definitely a contender for the favorites status.
Pages 17 begins with a corner pocket and a magnetized flap holding a card insert in place. Accented by Art Deco Corners, Page 18 is left blank for you to add large photos or other items.


Both Pages 17 & 18 open up to reveal four more pages.

On the left is a slanted pocket with a card insert. I love the Raised Typewriter Keys.


The next page to the right and the page on the far right are completely open for large photos. However, the third page, holds more surprises.

Lift the magnetized flap to discover a card with a frame ready for a photo insert.

Then lift the entire card upward to discover an Adventure with more layers and pockets below.


Each layer of the fold-outs are magnetized so that everything easily returns to its proper place

Pages 19 & 20
Pages 19 & 20 offer plenty of inserts for photos and mementos.

Page 19 has a vertical pocket with a narrow insert.

Page 20 has two layered side pockets with cards that ascend in size.


It is hard to capture with photography the magnitude of this album or how the flaps and folds seem almost endless. I hope today's post gives you a little sense of the project. I want to credit my friend Tristan Robin Blakeman who first gave me the idea for such an album and Shelly Geigle's YouTube tutorials, where I learned some of the construction techniques.
In my next blog post, I will actually take you thorough how to make this album. So please stay tuned!
Good Stuff
Deco stars
Black chipboard
Black cardstock
Lots and Lots of assorted cardstock from many manufacturers
Acrylic paint
Brown ink
Assorted embellishments
Looks amazing!
ReplyDeleteReally great job planning so many pockets and extra places for photos; a really fun book!
ReplyDelete