Showing posts with label Skeleton Shape Set. Show all posts

Saturday, August 24, 2019

Hanging around by Betsy Skagen

So many elements go into this mixed media piece--layered background paper, mica stained glass windows, National Geographic background paper, an old dictionary page and even a tiny little noose.

To begin making this piece, give your Gypsy Soul chipboard elements a basic coating of acrylic paint--white for the skeleton and ivory for one of the arched window frames. Apply black ink to the edges of the skeleton.
Once the paint has dried, use a black pen to make crackle marks on your painted window. The picture below shows the start of t his process.
Rub black ink all over the second window frame and the tree.
Take a sheet of mica and peel it so you have a thin layer. Coat it with embossing ink and then sprinkle translucent embossing powders on it and activate with heat gun. This will create your stained glass. Cut out the mica to fit the window slots and glue to the back of your painted window frame.

Make a tiny noose from twine and place it around the skeleton's head. Draw spooky eyes onto another background paper. I used a CitraSolv treated National Geographic page.

Glue the free end of the noose to the black window frame, then glue the painted window frame with mica windows onto the black window frame. Adhere the entire set to your spooky eye background page.
Next begin layering the pieces: glue the window set to the tree and glue onto decorative paper. Adhere all of that to the vintage dictionary page.
Create a background page by dry brushing layer upon layer of acrylic paint onto it.
Trim down the dictionary page, distress the edges with brown ink and use matte medium to adhere the whole thing to your painted background paper. 
Ink the edges of the background paper with black ink. Then apply embossing ink to the edges and cover with Black Magic embossing powder. Activate with heat gun.

The black embossing powder adds a nice frame to your piece and it is now ready for "hanging" in your home.

Happy Saturday! -Betsy


Great Stuff
Skeleton Shape Set
Arched Window Frames
Tree 1
Mica sheet
Embossing ink
Seth Apter Translucent Baked Powders
Eileen Hull Black Magic Baking Powder
Cold press watercolor paper
Stamperia Paper
Vintage dictionary page
National Geographic CitraSolve page
Black ink
Black pen
Acrylic paints

Tuesday, August 8, 2017

Love Potion by Susan Killam

Hello folks!  Today on the Gypsy Soul Laser Cuts blog I share a lighter version of my year 'round skeleton obsession.  Our friend here is in love and offers you a little magic love potion... don't mind the tombstones over there.  His love lasts an eternity.


I started out with the GSL products I needed to paint/finish with wet stuff.  I cut the tree with a paper cutter.


I knew the skellie would hold something, so I snipped the connector piece at the ribs and left the shoulder bone attached.  Later I reinforced the shoulder bone with a spot of clear glue on the back.


With my typical finger painting style, I covered all the chipboard with white gesso.


I wasn't sure how the tombstones would look at the end, so I started with the general color I was hoping for... The silver was covered over with a Golden micaceous iron oxide later, then I used a tiny bit of white acrylic paint on my finger tip for a weathered marble look.  It worked out even though it doesn't really look like weathered marble.  :)


I finger-dabbed white acrylic paint on the skeleton, then used a tiny brush with a super-watered-down brown to age him.  I painted one small section at a time, waited a beat or two then dabbed the excess of with a paper towel.


I covered the love potion "label" on the paper with Diamond Glaze and let it sit over night.  I'll be honest that I don't love this product since it's prone to air bubbles and is much thinner than Ranger Glossy Accents.  I'm working my way to the bottom of the bottle because I can't bring myself to throw it away.

The love potion paper and the various edges were cut out and glued in with Glue n Seal.  I used a scrap piece of wood for the base, and screwed it in.  (I'm moving away from just gluing these types of parts together; you don't have to!)


Here's a look at the finished GSL skeleton, creepy tree, and tombstones.  The piles of excess chipboard and the paper-covered pile of chipboard next to the skeleton are going to be used behind the pieces to create a 3D effect.


The tree was glued in then I layered the tombstones and "ground fog".  I used regular white glue for each of these layers.


The skelly boost was glued on the back, then I added him to the tin along with his party hat!  The shoulder reinforcement glue is visible in this photo also.  It was just a little bit, but it made me feel better.


Ta da!  It's party time!


Here's a look at the back. I will probably add more silver tinsel around the edges.


Thanks for your visit today!

Cheers,
Susan

GSL supplies used
Creepy Tree 5 Inch #D127D
Skeleton Shape Set D136S
Tiny Tombstones C55S

Other Supplies Used
3x5 tin
Scrap wood
Fancy Pants "Oct 31" paper
Cheese cloth
White gesso
Golden & Liquitex acrylic paints
Golden Micaceous Iron Oxide
Stickles glitter glue
Crafter's Pick white glue
Ranger Glue n Seal


Wednesday, September 28, 2016

Day of the Dead Frame by Lora


Hello everyone! Lora here with my last project for Gypsy Soul Laser Cuts as a guest designer. It has been a boat load of fun and I want to thank Gina for letting me play!

This weeks piece is all about the very cool Victorian Frame and Easel that I've transformed into a Halloween-ish Day of the Dead frame. I love all the bright colors on the skulls made of sugar and a hundred other medium nowadays to celebrate the holiday and I wanted to paint my version of them on the frame.
It really lends itself to this style of painting with all it's pierced swirls and curlicues.


This project is really straight forward....just the frame and some paint. I mostly used Ceramcoat Matte Acrylic Paints. The first thing was to prime everything in a coat of gesso, and then I painted the back piece of the frame orange.


Everything else got a good coat of black and I gave it a lot of time to dry completely. Like about fifteen minutes, because that's a long time for me. Maybe in dog years it's about an hour and a half.


After that, it was mostly painting around the edges of the pierce work, emphasizing the shapes. I used mostly bright shades of green and purple with a little red and accents of white to make things pop.


This guy was hanging around on my work table and wanted to get into the pictures....


For the easel that the frame is resting on I drew (in pencil) the repeated flower design that is in the center of each side of the frame and painted it green to match the frame. I added some dots and a couple of curlicues that help tie both pieces together.

I really like that you can turn the frame long-ways to fit a different shape picture. I plan on using this frame to show off my business card at my market table this Halloween.


SUPPLIES from GSLCuts

Additional Supplies
Ceramcoat Matte Acrylic Paint
Gesso
Golden Black acrylic paint

Wednesday, September 21, 2016

Halloween Mobile by GDT Lora


I prefer flying pumpkins. Because a) they look ridiculous and b) they look ridiculously cute. And lastly, those flying monkeys always scared the terwillikers out of me and seeing as how this piece walks on the lighter side of Halloween, flying pumpkins fit right in. Lora here again in my third installment as guest designer for Gypsy Soul Laser Cuts. This time around I chose to mess with the Mobile Birds set but instead of using the pretty birds,  I decided to dangle GSLCuts Skeleton Shape Set on it and put a Halloween twist on the whole thing.
 https://blogger.googleusercontent.com/img/b/R29vZ2xl/AVvXsEjVsCJy8_vsrqdS0k9_0WB8_t5fvkGMz6xTZ-jUVHQKBiDyHdYoB3ksBVTtBua8xPl0Jklo998tB2x7hsBSgXSTRd6E6LqHBva5ZAIhGz1ZMgN5j1ssSCWh3_RrJN532M9_jdGfj9tp5Eo/s1600/Mobile30.jpg

A challenge to photograph, those elusive, pesky skeletons just did not want to cooperate, but I did get them in the end!

https://blogger.googleusercontent.com/img/b/R29vZ2xl/AVvXsEgwNEawqZ6bBVYT-B7UYCx2TJpBlauQJ0cUgEcwqPGNMh9Rtol-aHJsroCreig4e727gnuQ-nLNDVPTOQSGnY752PHoosRtCAVGxoUSPi9_EDsxFIyoVFrF4JVaZgfM6mVRYxmFklr_iZ8/s1600/Mobile34.jpg


 A close shot of the little witch and her flying pumpkin minions.

https://blogger.googleusercontent.com/img/b/R29vZ2xl/AVvXsEiHuMFpopBB5Mrw2AEYBRzjRuNNi8_wnQ7OjrcpIeaUVww17FQ6-2RKSDKVho23e7ul8OUEBSGnfjHjiBF7SU77IS5I2KnI1hAa1dCqJjAsk1zcdqyOVlDcqnFF0AsDQAXzapIrWMy1FhU/s1600/Mobile31.jpg
I used little seed pods that look like pumpkins, painted a bright orange. You can get them HERE.
The cute little wings are GSLCuts Bat Wings Miniatures.

Here are a few how-to's for making this mobile....

I primered the mobile pieces and skeletons first. I find that gesso gives the matte medium and paints something toothy to stick to and I only need to use one coat of paint and a thin layer of matte medium on each piece.

https://blogger.googleusercontent.com/img/b/R29vZ2xl/AVvXsEgimLuo6LzskCLVj_XfsPhRYSy44vLsisFlawo_53QU7at5YOLq6EZaifVNwRnJCljDsozm_nHXeYF910iBE0y1qbPXtMiisICPQrWsgrIQvAZbK736-eZ8RdgEj1_j25GOUOcjvJQl388/s1600/Mobile4.jpg

https://blogger.googleusercontent.com/img/b/R29vZ2xl/AVvXsEjTyB8gjX_YulgAGcQkNbXHQCtNmJSKVSV-mA2-kmPNYAPQwaA5wZqLbtve1sz4M6Do0dpxKjYAsQ3c6EFP6tkCGjOX9RwYIg4TvXQBvEb4tFeKJqLLnX793Z85x9iCTfGt03StMWiQMvA/s1600/Mobile5.jpg
A lick of paint on the skeletons and paper on the Mobile pieces and they're ready to go.
 https://blogger.googleusercontent.com/img/b/R29vZ2xl/AVvXsEgbVCCzIEVIcc3Y2S554vNGZ9zz_Lo3oKPLFTaBslQW1_rEorjZ_Wzdl7pGTpfZ92GX0qrXnBpcO99628ayxRucsArQzlP_luULHz63FsSnRqAEmIpdDaDaGvWjTIxq_JN7ap_rHzNEIDI/s1600/Mobile8.jpg

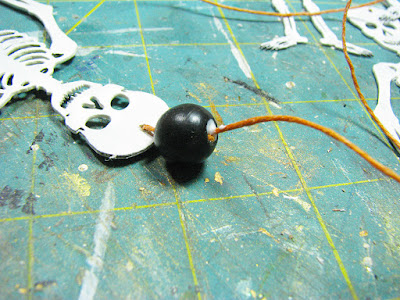
I cut five pieces of orange linen twine about 10-inches long. I made holes in the top center of each skeletons forehead, pulled the orange linen twine through the hole and threaded a wooden bead (which I painted black) through the twine making sure the loose end was also inside the bead, and squirted some glue into the bead hole and let it dry. After they dry you can add beads and doodads like I did to mine to fancy the skellies up. It makes them happy.

Whilst they were drying, I used a black permanent marker on the bat wings. It's easier to do this before you pop those babies out of the cardboard...saves your finger tips from getting black and having the check out lady at the grocery store ask you if you have zombie rot.
No kidding.

https://blogger.googleusercontent.com/img/b/R29vZ2xl/AVvXsEijyEvaNHCwQsPU9rZ4EVbSVionEQVZ1oVsdKdU9UkKOpysVkxANtzQDtS7z9-6VziHPaLaTdz2ZlmoAWc5_lb8YeChVc_aDFghmhfBhmdfT2JiTByAUHoaVBsJJmwPpyZKBPUxfV0P0RM/s1600/Mobile7.jpg
I also dabbed some glue in the center of each pumpkin pod and stuck a piece of twine in there to dry.
 https://blogger.googleusercontent.com/img/b/R29vZ2xl/AVvXsEhJc4k2pLiLKIWnXWFXboodSsXAHoYabmEXAHnC8kzR3a8DddaRlMDzRs4PeZxpwtBSm138LUMx29M_xYYzyxCh3uau4PheuwicVyhStOYDTrjDXgAYF6qkbv_G16umzUawnluUtMrZ89w/s1600/Mobile6.jpg
After I popped the wings free I cut little tabs of black paper and glued them on the wings, leaving half of the tab free to glue on the pumpkin. I then glued the wings on to the pumpkins, let them dry and then painted the pumpkin orange as well as the part of the tab that attaches the wings to the pumpkin, making the tabs 'invisible' and therefore making the wings appear to be growing out of the pumpkins.
This wordiness has happened because in my creative frenzy (hehe) I forgot to take pictures of this part of the process.

After all was safely dry and doodads and such were added to twine and the mobile itself was embellished with bits and bobs, all was put together. The results were pretty fun!

https://blogger.googleusercontent.com/img/b/R29vZ2xl/AVvXsEjyBtKRz1mjbvur0TjASo3VXc98uxU790QUOBGq9Tt7HWtw0mySUnwc_UEwNkCX4Lbl1QKp3LGR1ESXMdwRWpSrACFtgU0f90bWsZmjI4yhYWGsH4v3xb3d4j2Jaa3IkzplatOAUOv9ioY/s1600/Mobile33.jpg

GYPSY SOUL LASER CUTS SUPPLY LIST

Additional Supplies
Brass Stamping
Orange Linen Twine
Acrylic Paint
Matte Medium
Wooden Beads

Thank you for visiting!