Showing posts with label Treasure Chest. Show all posts

Wednesday, August 15, 2018

sunken treasure

As  the summer days grow shorter and preparations begin for the return to school, I often find myself contemplating the ocean. Maybe its the ebb and flow of the currents or perhaps just the peaceful lull it can induce. Regardless of the reason, whenever my thoughts drift to this wondrous aspect of nature, I often times envision the great depths where ships have gone to lie and sunken treasures abound. This is my inspiration for today's piece. 
I begin with the Gypsy Soul Laser Cuts treasure chest. This heavyweight chipboard piece arrives flat in 16 pieces. I always find it easiest to arrange all the pieces as if I would be assembling it. This allows me to easily identify what areas will be exposed and which will be concealed, it also allows me to generate ideas on which finishes might work best.
I want the treasure chest to be finished on both the inside as well as the outside. I plan to finish the inner sides of the pieces before it is assembled, this is most easily completed using paints. I paint the inner sides of all the pieces that will be exposed with distress paint creating a look that will closely mimic the exterior finish I am planning to use. 
Next, I assemble the pieces to form the basic body of the treasure chest. Using a multi purpose adhesive, I glue along the edges and insert the tabs. This piece is fairly simple to put together, each piece has interlocking components and when constructed, it forms a rectangular box. The lid has an additional rim that is attached on the inside. I am undecided on how I will finish the external strapping slats, so these are painted along with the interiors and then set aside for later.
The exterior of the treasure chest is covered with embossed wood grain paper that has been painted to look like real wood. I am awed by the incredibly realistic look of this new 3D folder. In order to achieve a finish that might appear on an old sunken chest, I emboss pieces of watercolor paper and color them with vintage photo spray stain and a bit of water (to move the stain around) then allow to air dry. Once dry, I coat the pieces with vintage collage medium. When this has completely dried, I paint a layer of walnut stain distress paint on the pieces and wipe mostly off with a damp cloth. This layer is dried with a heat gun. I color areas with black soot distress crayon and rub around with a wet finger to get the pigment into the crevices. I am really pleased with the result.
These "wood" papers are cut to fit each exterior side of the treasure chest. I adhere them with collage medium in matte vintage finish. I also cover the top of the lid with this paper. After covering the sides, I realize that the embossed paper is fairly thick and affects the wood strapping pieces. I decide to modify the chest a bit. I cut the bottom strap in half lengthwise and apply the exterior finish paper. This wraps the chest on the front and both sides. The top strap is also only used on the front and sides. I use the remaining pieces as blocking inside the chest when I attach my hinges.
Once all of the exterior papers are applied, I install two hinges at the back of the lid. The small antique brass hinges have tiny screws that are easily attached by poking a hole and simply screwing into the chipboard. A latching mechanism is installed on the front of the lid to keep it closed.
With the added hardware, the box can be be displayed in an open position, if desired.
I love how the treasure chest looks even before I begin to embellish it to become a sunken treasure chest. This piece could be used in so many different ways, even as a simple keepsake box.
Now that the base of my project is complete, I set to making all of the pieces to create an undersea scene. I use multiple greenery dies and cut pieces to mimic sea grass, coral and kelp. All of these pieces are colored with distress inks. The coral pieces are colored with distress oxide and when dry, I coat them with a layer of glue and sprinkle with clear rock candy glitter. This gives it a bit of texture and sparkle. When I create my embellishments, I always like to make a lot more than I believe I will need. This gives me more flexibility in placement, and whatever is left over I simply keep for future projects. I also put together a couple of mermaids from some favorite stamp sets. The mermaids are colored with distress inks, and copic markers then embellished with pieces of the die cuts and small shells. I also add some finish to a few resin blanks that will complete my scene.
The die cut pieces are adhered to the treasure chest with a multi purpose adhesive and allowed to dry.
Lastly, I add some vintage jewelry to "spill" out of the treasure chest, and arrange the two mermaids. I prop open the chest with a golden edged shell and miscellaneous
relics and pearls adorn the scene.
I hope that you enjoy these final weeks of summer, and perhaps this sunken treasure has inspired you to create something. We always love seeing your ideas come to life and invite you to join and share on the Gypsy Soul Laser Cuts Craft Group on Facebook.  
Thanks so much for stopping by today.
~Ann


Gypsy Soul Laser Cuts used:

Tuesday, May 2, 2017

Pink Flower Treasure Chest

Hi folks, Lora here today with a pretty Spring Flower Box. A friend of mine asked me for a little box that she could store things in on her desk at work....something springy and girly that would cheer her up on long days spent at her desk. Her favorite color is pink, so I went with that, and here is what I came up with!
She is a rather elegant person, so I worked under the premise that 'Less is more' and didn't get too fussy, but hopefully, I achieved the necessary girlyness.
 I began with the Treasure Chest....
I glued the basic box together and then glued that on to the base.
While the glue was still wet, I used a Q-Tip to wipe off any excess glue inside and out. Everything fits better when I do this and you'd be surprised at how a lump of glue shows up after you paint over it!
I gave the structure a good coat of gesso and set it aside to dry.
I wanted to use the pretty flower images I found on some napkins, so I peeled the napkin apart. Usually napkins are three-ply, so make sure you get them all apart or your image will not be glued on properly and will peel off.
I used matte medium, first on the box, attaching the napkin and making sure there were no air bubbles, and then put a coat on the napkin. Then I let it dry without fussing with it. Otherwise, it can tear or slide off the box and you'll be smooshing it back into place or having to start over.
Not that I have ever done that.
After it dries, tear away the excess napkin toward the inside of the box. Then using a piece of sandpaper, and the same 'inside' technique, sand off the rough edges.
While I was waiting for things to dry, I gave the rest of the treasure chest pieces a coat of gesso, let that dry and after sanding the napkins, gave the whole piece a nice coat of white acrylic paint, including the inside and the bottom of the chest.
I have some pretty little beads I found, rummaging around in a second hand shop, that I have been slowly using up. I got scads of them and they are great because they are a little flat and easy to glue. Pearls would work as well and if you want to get really snazzy you could use flat back crystals or beads. I glued these around parts of the chest, making a pretty border.
I added a cute little knob on the top and at the last minute, glued a flower on it. I like how pretty and whimsical it looks! A couple of brass findings in the top corners of the lid and a few of those little beads glued around  the base of the knob and I think I'm done.
An elegant and feminine box for an elegant and pretty gal!

GSLcuts Supplies:

Additional supplies:
Gesso
Acrylic Paint
Beads
Knob
Silk Flower
Brass findings (little flowers)
Don't forget the napkins!

Thank you for visiting!

Thursday, April 27, 2017

Black Dragon Treasure Chest

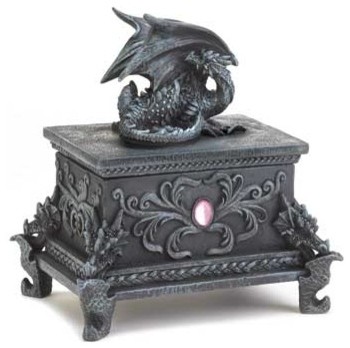
Hi everyone!  Barbara here on the Gypsy Soul Laser Cuts blog today.  I love this Treasure Chest, and had so many ideas running through my head.  I finally settled on an oriental theme.

And here is my finished Black Dragon Treasure Chest   I'm on the lookout for some small but really cool feet for it.  Until then it will go without feet, but it still looks pretty good, nonetheless.


This was my inspiration piece:

Black Dragon Treasure Box


1.  Assemble bottom of chest.  Set aside to dry.

bottom of chest pieces


2.  Assemble top.  Adhere glue to center cut out piece only...

top pieces


... and lay border and center cut-out rectangular piece on top of solid piece, using the border to help center the cut out rectangular piece.


Remove border.


Flip top over and put glue on border...


... and adhere to top, as shown.  Set aside to dry.


3.  Turn bottom of chest over and add glue.

Bottom of chest with slightly larger chipboard piece (left)


Center and glue bottom of chest to slightly larger chipboard piece, as shown.  Set aside to dry.


4.  Place box top on box to check fit.


Glue chipboard strips around box bottom and top edges, as shown.  Remove top to make sure the pieces are tight up against the top edge.  Add clips to hold in place, if needed.


5.  While bottom is drying, start painting the lid and two dragons with black chalk  paint.  Paint both sides of the top as well as the two dragons.  Set aside to dry.


6.  Paint box bottom with the black chalk paint, inside and out.  Set aside to dry.


7. Mark the center of two pieces from the Punch Elements Deco set by drawing a pencil line from the points shown in the photo.  Punch hole where the "X" crosses and use that as a template to mark the second piece.  Paint the two pieces with the black chalk paint, as well as the corresponding circles.  Don't punch holes in the circle pieces because they are going to be used behind the elements to level them when we glue them down.


8.  Dry brush all pieces with Cascade chalk paint, or any color that looks like a blue patina. 

Remove most of paint from stencil brush onto paper towel
before dry brushing pieces 


9.  Glue black lace around top and bottom of the box bottom.


10.  Dry brush the lace with Cascade chalk paint, or whatever you used to dry brush your box.


11.  Glue a second circle to the painted one.  Insert butterfly embroidered fabric brad through deco element and add two brass pieces to each side, as shown.


Find the center of the box side and glue the double thick circle to the box.


This will give you a level area to glue the deco element.  You may need to clamp in place while it dries.


12.  Glue two dragons onto top, as shown.  Let pieces dry before handling.  A quick grab tacky glue works well at keeping the dragons upright while drying.


13.  Add more metal embellishments to the sides and top, as shown.  


Supplies Used:

GSL Treasure Chest
GSL Dragons Shape Set
GSL Punch Elements Deco
Chalk Paint (Black, Cascade)
Metal embellishments
Black lace
Butterfly embroidered fabric brad (Paper Studio)
Assorted Brushes
Quick Grab Tacky Glue
Stencil brush
Assorted paint brushes

I hope you enjoyed my project today.  If you see something online that inspires you, why not give it a try to emulate it, as I have done with this Black Dragon inspired chest.  Gypsy Soul Laser Cuts has a huge line of chipboard for you to work with, so go check it out and see what catches your fancy!!!

Thanks so much for stopping by, and always take time to play!

Barbara