Showing posts with label Flowers. Show all posts

Monday, June 29, 2020

An Elegant Something-or-other

Last month when I made this Mermaid Silhouette Luminary, I had an extra frosted vase that demanded a little attention.


I grabbed a few supplies and ended up creating something very pretty and elegant in no time at all.


I simply painted pieces from the Mini Birds & Nests Shape SetScribble Frame Leaves, and a sentiment from the Word Tags Travel set, with a healthy layer of white acrylic paint. Then I added three white paper flowers.


Self adhesive foam squares provide a bit of depth to the layering of the different elements.


Now, I've called this a 'something-or-other' because you could use this as a candle holder, vase, center piece, and I'm sure a slew of other things. I think they'd be super pretty for weddings or showers, christenings, or even as a hostess gift. And while I love the all-white look, you could totally change this up to match your colour scheme.


Here's what you'll need to recreate this look:
• Mini Birds & Nests Shape Set
• Scribble Frame Leaves
• Word Tags Travel (coming soon)
• prepared glass vase
• paper flowers
• self adhesive foam squares
• glue

Note: if you'd like to see the vase being frosted, pop over to HERE to see last months tutorial

Monday, May 27, 2019

Spring Lantern

Hello this is Yolie with today's project. It's late May and in Southern California, we are still getting rain. Spring made an appearance with the Super Bloom, but then quickly disappeared. The plan was to make a Summer Lantern, but I'm still in the mood for Spring. I used the Lantern Cage Style and added a faux patina with lots of blooms.


To create the faux patina, I first painted all the pieces, front and back with metallic copper and allowed the paint to completely dry.
I then painted the pieces with black chalkboard paint and before the paint dried, wiped it off with a paper towel.
Next, I painted the pieces with aqua drift and again, before the paint dried, wiped it off with a paper towel.


I then assembled the Lantern using a bit of Beacon Power-Tac adhesives to secure it in place. 

I added pretty blooms and a couple of resin butterflies.


Here's a closeup of the beautiful faux patina. I added the butterfly as doorknob to easily open the lantern door and turn on the LED tea light.

Hoping Summer is delayed so I can enjoy the Spring Lantern a little longer.
Thank you so much for visiting today and enjoy your week.
Supply List:
Lantern Cage Style No. C41C
Plaid Crafts paints: Black Chalkboard, Metallic Copper, Aqua Drift
Beacon Power-Tac adhesive
Flowers
Resin butterflies
LED tea light

Monday, May 6, 2019

Vintage Confidential

Hello this is Yolie with today's project. I used Stained Glass Fergus frame and Leafy Swirls and Buds, both will be coming to the shop soon.

Do you ever purchase a paper collection in duplicates? I sure do! Especially Graphic 45. So in love with G45's Communique designs. I used it on the card I am sharing today.


At the moment I don't have access to all my fun paints so I used an airbrush to "paint" the Stained Glass Fergus frame. I used a Sharpie adapter and airbrushed the frame with black for full coverage. I used a brown Sharpie on the Leafy Swirls with light airbrushing in black.

The flowers were a bit creamy so I took the brown Sharpie and airbrushed them for a more antique look.
Before adhering the paper, I also airbrushed the edges in brown for a vintage vibe.

Everything on the card got airbrushed. Excluding the typist. I wanted her to pop so I masked her off before airbrushing the edges.

I added a bit of jute on the tag and used pop dots to adhere to the frame and finished it off with bronze matte sequins.

I hope you enjoyed my vintage card and thank you for visiting.

Supply List:
Leafy Swirls and Buds D83L Coming soon
Stained Glass Frame Fergus D83G Coming soon
Graphic 45 Communique
Glue gun
Tape runner
Airbrush
Markers
Flowers
Pop dots
Twine
Sequins

Monday, January 14, 2019

Woodland Fairy Crown

Hello this is Yolie with my first Gypsy Soul Laser Cuts project. Today I am sharing my version of a woodland Fairy crown using GSLC's Crown.


I prepared the Crown pieces with Golden Gesso and allowed to dry.

Next, I generously added White Crackle Texture Paste. Lots of peeks and valleys as I wanted large crackles and smaller ones too. The thick peeks will result larger crackles while the thinner valleys smaller. Allow to dry, no heat gun. It took about 45 minutes to completely dry.

While I waited for the Crackle Paste to dry, I prepared the intricate scroll piece with Copper Kettle Metallic Lustre. I applied it carefully as to not bend any of the scrolls. Once it dried, I took a cotton cloth to polish.

Now that the Crackle Paste dried, I used Alfalfa acrylic paint. I covered the piece completely and before it dried, I took a paper towel to remove the paint allowing paint into the cracks.

Here I used Dark Brown with a bit of black to cool the color. Using the same method mentioned above, I painted just a few spots and then quickly removed the paint with a paper towel.

Finally, I embellished the crown with gems, pearls, stones, flowers, crystals, gold glass glitter and flowers. I adhered the embellishments with a hot glue and Heavy Body Gel.

Here's a closeup of the gorgeous flowers sprinkled with gold glass glitter.
Thank you for visiting today and I hope you enjoyed my version of a Woodland Fairy Crown.

Supply List:
Gypsy Soul Laser Cut Crown Item H2CR1
Gesso White
Texture Paste White Crackle
Acrylic Paints, Alfalfa, Dark Brown, Black
Metallic Lustre Copper Kettle
Flowers
Gems
Glass Glitter
Hot Glue
Heavy Body Gel
Paint brushes
Spatula


Sunday, August 26, 2018

Sweet lavender and chipboard


It's Teresa here sharing a sweet gift set I did with some of my favorite papers from 49th and Market.  I love the business card holder we have and I thought with the papers being printed with these super gorgeous flowers I could create a simple yet beautiful holder for her cards. 


I also had extra lavender papers that I used to make a cute card with the "Circle Doily Set".  This set has lots of pieces that you can stack or use separately for lots of cards to give away.  I painted mine with white chalk paint in thin layers until I got it nice and opaque.  I added a little bit of a sheer lavender ribbon across the middle and also a matching bow with roses.  The glittery white letters are from my stash. 


And here is just a closeup of the business card box and the flowers.  You could add more dimension by cutting out a second layer of flowers and adhering them to the others with 3D Foam dots.  Anyway you make it, you will have a wonderful gift for any of your friends or family :)

Thanks for stopping by for a little chipboard inspiration!!

Teresa

Supplies:

GSLC
Circle Doily Set

49th and Market papers
Adhesive by Scrapbook Adhesive by 3L


Sunday, July 22, 2018

Chase your dreams...


It's so nice that you stopped over today to see my newest card I made to share.  We have some brand new background stamps coming in 6 new styles so one of these beauties was the inspiration for my card today.  They work amazing with inks and I have yet to try them with paints yet but I bet they would be great on fabrics too or wood.  Be sure and keep and eye open for the release because you are going to love working with them...

 I started my card with a simple ivory base and just matted each of the squares with matching paper for the flowers i used.  And then I added the birdcage and the leaf sprays that I inked up to match the paper and the gold ink.  I had lots of little flowers and things that matched from my stash and if you ever don't you can always ink them with a dauber or spray them to match.  Getting messy is my favorite thing to do :)


Here is a closeup of the design of the foam stamp.  It's about 3x3 and fits perfect on a 6x6 card.  Or you can cut them down to customize it for a different size or a box.  How fun would that be?


And here is a closeup of the adorable little birdcage and the flowers. I used a neat embossing powder from Stampendous that had flakes of gold in it so that it came out looking like metal. And... I love how all the chippies give it such a wonderful 3D effect and it's great to be able to customize everything to be your favorite colors and styles.  You can probably tell one of mine is aqua and ivory. 

Thank you for stopping by today and be sure and check the store for all the new things 
this month.... we have lots to share so be sure and check back soon!

Supplies:

GSLC Foam Stamp Set--- Coming Soon!!
GSLC Leaves and Flourishes Set


Sunday, May 13, 2018

Happy Mother's Day from all of us at GSLC


So let me start by saying Happy Mother's Day to all you mom's out there and all of us at GSLC and we hope that you have a wonderful day today spent with your kids and family and maybe even get in a little crafty time to make something fun with them.

Today my project is something you can make as a gift or something to decorate for your own house.  We have an beautiful chipboard set called "the Flower Cart".  I thought about doing this alot of ways.  You could even put wood paper on to make it look more rustic or paint it in shades of brown to look like a weathered piece of wood but i wanted mine to be a neutral color so that i can change the flowers out if i wanted or even add a plant inside.  

So first i glued it all together and let it dry and then i painted the whole thing white with acrylic paint (2 coats) and let it dry again.  Then i took some texture paste in white and found a pretty wall paper stencil and added the design it to all the sides of the cart and let it dry.  Then i went over the whole thing again with white chalk paint.  


One of my favorite parts of this adorable little cart are these cute little wheels with all those pretty details in them.  I painted them white to match and when they were dry i hot glued them onto the sides and then added those cute little brads in the center of each of them.  For the flowers i bought some pretty aqua ones at my local hobby store and used a piece of styrofoam to hold them inside of the cart.  I added 2 aqua colored netted bows and tucked them inside the flowers to fill the space.  And it's all done!!  Now i can put it somewhere to add color in my house or give it to a special person in my life.  It was really super easy to make too.

Hope you liked this adorable Flower cart and be sure and check out the store for lots of new things to get a little crafty!!  

Happy Mother's Day.... Teresa

Supplies:


White Acrylic paint, texture paste in white, stencil, palette spreader, paint brush, hot glue gun, flowers


Thursday, March 29, 2018

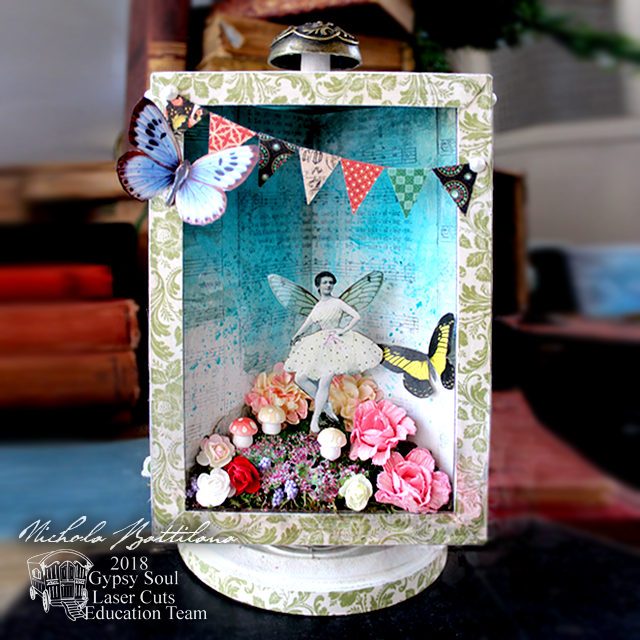
Floral Fairy Dimensional Diorama

I've had my eye on the Dimensional Diorama for a while and finally got my hands dirty and made a pretty something with it.

Floral Fairy Dimensional Diorama - gslcuts.com Nichola Battilana

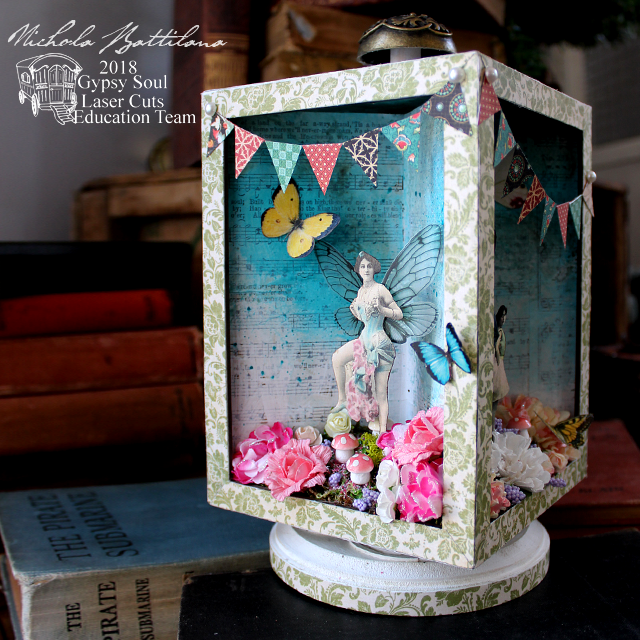
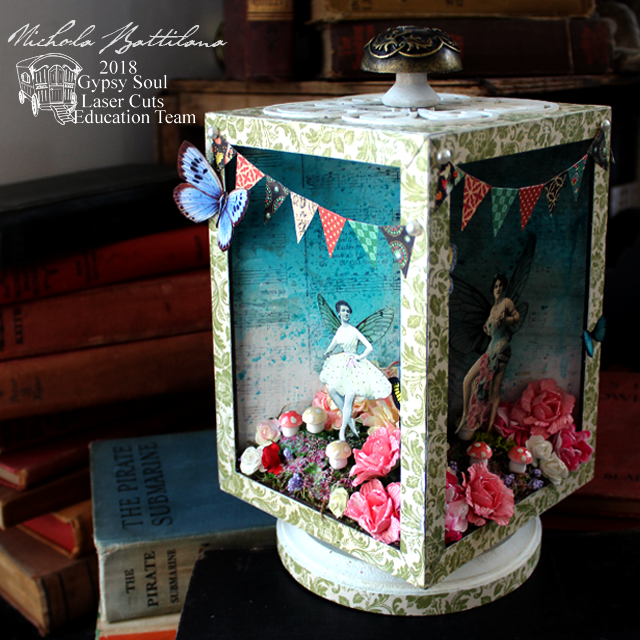
This diorama box frame sits on a spinner to show off 4 different segments. I had thought about creating a diorama dedicated to each of the seasons... but it's far too spring-like to think back to winter.

Floral Fairy Dimensional Diorama - gslcuts.com Nichola Battilana

I've forgotten about snow and Autumn leaves and instead filled each section with moss, flowers, butterflies and pretty paper fairies.

Floral Fairy Dimensional Diorama - gslcuts.com Nichola Battilana

Inside I've used pages from damaged hymnals and the exterior is decorated with Graphic 45's Once Upon a Springtime collection.

Floral Fairy Dimensional Diorama - gslcuts.com Nichola Battilana

I've added a simple wooden plaque as a base for the lazy susan mechanism (which comes with the diorama box).

Floral Fairy Dimensional Diorama - gslcuts.com Nichola Battilana

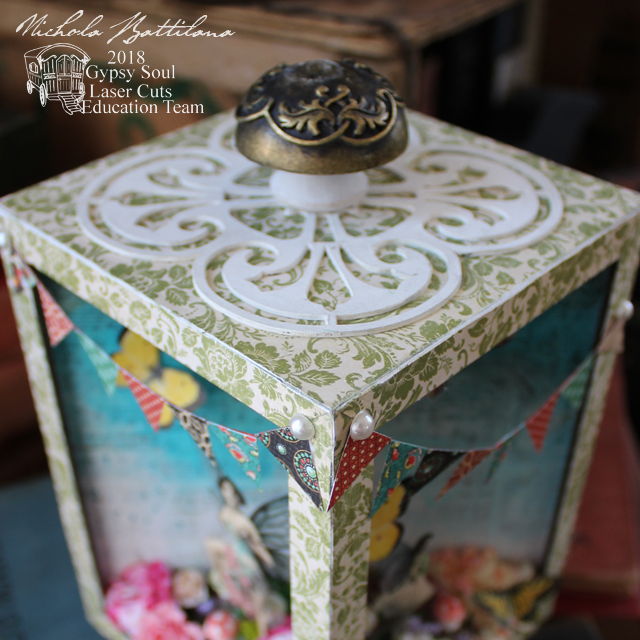
On top of the box I've added Tudor Rose Singles and created a handle with a wooden spool and a large staples door knob from Graphic 45. Final touches include a little handmade bunting and flat back pearls.
Floral Fairy Dimensional Diorama - gslcuts.com Nichola Battilana

If you'd like to create your own version of this project I have a video walk through with some tips and hints you might find helpful.

And here are all the bits you'll need!

Dimensional DioramaTudor Rose Singles 

Decorative papers (I've used Graphic 45 papers)
Paper flowers
English Fairy Garden Collage Sheet
Fairy Wings Collage Sheet
Moss
Wooden plaque
Flatback pearls (or other embellishments)
Florist Oasis
Vintage Images (I downloaded them free from thegraphicsfairy.com)
Glue
Acrylic Paint
Wooden toothpics or stir sticks


Sunday, January 28, 2018

Be Mine Valentine's Day Wallhanging


Hi it's Teresa here on this gorgeous Sunday and I have a fun and simple Valentines make with you today.  I used the "Hearts Wallhanging Chipboard set" but I used it a different way instead of hanging all the hearts seperate I just overlapped each of the pieces on top of each other.  Now you can hang it up anywhere in your house to decorate and then you have a second one to make to give to a friend.


So to make it I started with some cute Valentine papers that I had and traced around all the edges of the chipboard pieces and then hand cut them to fit. You can use a nail file to soften the edges and then chalk around them to add more dimension.  For the striped paper I traced around the larger pink heart and then added an extra inch or so and then cut that out so that it added colors to shadow the pink heart.  The doily was just one I had from my stash.  

After all the pieces are dry you can glue them all together and put a book on them to keep it flat.


Then I added some liquid pearls around the edges and pretty flowers and ribbons to hang from the center.  For the wire that hangs I just punched 2 holes with a crop-a-dile and twisted white wire from the floral section of your local craft store.  This is a great project to use for left overs and you could easily use it to hang on your door this year!!  Hope you like it.  Have  an amazing day!!

Supplies:

Valentines paper
Flowers
Bias Ribbons
Liquid Pearls
Scissors
Adhesive

Sunday, October 8, 2017

Fall in Love Page


Hi Everyone... today I am sharing a fall page I made with one of my favorite chippie assortements called "Cottage Windows Large".  I love these because they are perfect for pages and mini books and the are great to make that perfect picture you have really stand out.  There are 3 in the set and each of them is different and for mine I chose the simple cutout top to put my picture in.  

My papers are by Prima and are from a new fall line they have ,so it was perfect to do my daughters wedding pages with since she got married in October last year.  Yep-- i am still working on them :)


I also used lots of flowers to create a pretty border at the bottom of my page and let all the magic from the chipboard and the papers do the rest.  I love when you find something really special and it works out better than you planned and goes together really easy.  This one is going into a frame for the wall.

And sorry I didn't do much of a tutorial ... next time for sure!
Thanks so much for stopping over...

Supply List:


Prima flowers- assorted
Border Die: Becca Feeken 
gingerbread chalk ink
Stencil and sand gesso
adhesives, scissors, paper trimmer 


Sunday, July 30, 2017

"Best Friend" altered photo frame

Hi there! Lynne here with a wooden picture frame from Dollar Tree that I altered with some great Gypsy Soul pieces and a little stencilling, mist and this 'n that!


I started by priming the frame with antique white acrylic paint, then figuring out which chipboard pieces and other embellishments I wanted to use and their placement. I then primed them with the same paint.


I added some stencilling with texture paste, then attached all the embellishments-I used white glue for the chipboard and hot glue for the flowers. I also added some drywall tape and one more coat of paint over the whole thing.


Before misting, I spongepainted the whole surface (including the embellishments)with white and light blue acrylic paints for some background variation.

Misting is fun! I just sprayed with pretty much every shade of blue I could find in my stash, adding a little more colour in some areas, until I was happy with the effect. I added turquoise microbeads to the heart and clear ones to the wings, and attached the large clear embellishments with hot glue. The quote banner was fussy-cut from patterned paper (unfortunately I'm not sure what line it's from) and popped up with dimensional Glue Dots.


The frame came without glass, so I just cut a piece of clear acrylic packaging to put over my photo, a "selfie" which I took about a year ago on my bestie's balcony. Thanks so much for stopping by; I hope you too have a fabulous best friend in your life like I do!

GYPSY SOUL ITEMS USED

Steampunk Shape Set 
Five petal flowers with flourishes-coming soon
Valentine shape set

OTHER ITEMS USED

acrylic paint
glimmer mists
Crafter's Workshop and Prima stencils
texture paste
drywall tape microbeads
white glue, hot glue gun and Glue Dots