Friday, May 29, 2020

Mermaid Silhouette Luminary

The weather has been absolutely glorious here and my pool is all glistening ripples. I'm going to be taking advantage and become a total mermaid this summer. I created a little something to encourage my sea maiden ambitions.


I've used an simple, straight sided vase as a base for my luminary. You could absolutely use a jar for but this was inexpensive ($2) and the was no mucking around to fit your hand inside. 

I've used a spray to frost the glass and tinted it with washes of acrylic paint. You can see my process by visiting THIS video walkthrough.


I've placed two figures from the Mermaids Shape Set inside my vase. The firgures in this set are quite sizable, so if you're working with small jars I'd recommend considering the Mermaids Miniatures instead.


I've added shells. cheesecloth, and unraveled twine at the base of my luminary, as well as a Word Tag. There's some wired glass baubles that poke out here and there and look wonderfully like bubbles.


For a seaweed effect, I've used snips of the Leafy Swirl cutouts.

You could add an led candle inside the vase, or a string of lights, but I think it looks rather pretty just sitting in front of a bright window... especially one that overlooks the pool and reminds me to jump in, make a splash and mermaid my heart out!

Here are all the bits I've used for this project:
Word Tag - Travel (coming soon)
Leafy Swirl Cutouts
• Rustoleum Frosted Glass spray
• glass vase
• acrylic paint
• sea shells
• cheesecloth
• twine
• wired glass baubles
• glue

And HERE is where you can find out how to put all the bits together.

Thursday, May 28, 2020

The Secret Garden - Part 1


Good Morning! The sun is shining and it's a beautiful spring morning.  It reminds me of one of my favorite Graphic 45 paper lines, Secret Garden, so I've started working on this project using that paper.  It's divided into two parts because I'm recovering from a total knee replacement and not working very fast.  Part 2 will be posted in a couple of weeks.

Did you ever have your own secret garden?  A place where you felt totally safe and at peace?


These are the main pieces of the gazebo.  From Gypsy Soul Laser cuts coming soon.


The connecting pieces, top, bottom and one side piece.


There is a mini album that slides into the gazebo.


I used Gilder's Paste African Bronze because it has an interesting combination of green and gold and will be a nice background for all of the flowers that will be on the gazebo and the mini album.  I tried to apply it with this applicator that I've had for a long time.  It didn't work, so I just applied it with a regular applicator.


This is the constructed gazebo. There's only one side piece so the mini album will slide inside it.


This is the gazebo with the mini album inside.


More to come in two weeks.


A Very Important Tea Party!

Hello again,

It's Elle here and today I have a secret project for you that is inspired by Alice in Wonderland!

I used the Hidden Drawer Book Box for this project although I've kind of given the game away now by telling you that!  I started by painting all of it white a coat of white gesso and used the same technique I used on the previous "book" to make it look like it had pages. This is done using texture paste and you can see more about that in the link above.


I also used these Alice in Wonderland scrapbook papers from Stamperia.  These are the eight inch size.

I chose the papers I wanted to use for the back and front "covers" of my book and what I wanted to go inside.

Then I started painting the inside of the box using some bright Aquamarine Fresco Chalk Paint.

While all the paint was drying, I started enhancing the colours on my papers using Polychromos pencils.  This is something I like to do to give the papers a personal touch and change some of the colours or highlight others.  This step is optional.


No photo for this step, no idea what happened, I think the camera ate it!  Glue the papers to the front, back and "spine" of your book and give them a few coats of Ultra Matte Varnish for protection.


Now that the outside is taken care of, it was time to finish off the inside.  I added scraps from the papers to the inside of the box to cover the top and bottom and then added more paint this time (appropriately) in Lawn just to make sure everything was covered.

Measure (twice) and cut (once) the papers for the inside.  I am using the Tea Party paper of course and cut it to fit.  You can do this step in several ways, you can fit it to the sides and bottom exactly and crease it into the corners and edges, or you can cut it to fit on a curve like I did here.  


You can see it better in this closeup view.  The paper is glued to the centre back and then to the side edges, allowing it to curve in the inside.


Once everything is dry inside and out, I slide my hidden Tea Party back inside my Book. Here's how it looks when it is open.


And when it is closed.  Alice and the Cheshire Cat on one side and the White Rabbit on the other.


You could use this little secret box to fill it with sweets or your favourite tea bags to gift to a friend!


Hope you enjoyed this secret Tea Party reveal.   Thanks for reading!            

Elle             


PROJECT RECIPE:

Hidden Drawer Book Box - D165C
White gesso
Texture Paste
Stamperia AIW papers
PVA glue
Polychromos
Paperartsy Fresco paints
Decoart Ultra Matte Varnish

Wednesday, May 27, 2020

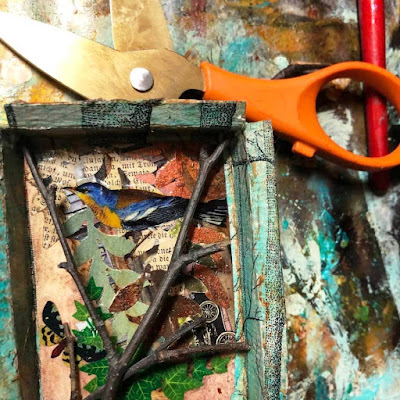
Bird Crèche-A Peek-a-Boo-Project

As you know from my previous posts, I am a lover of birds and nature. One of my favorite artist who does amazing birds is Charles Harper, I own several of his artbooks. I also collect Lefton Bird Planters. I am continuing with my Crèche Theme and this time making one inspired by these things, enjoy!
 
1.  Take apart GSLC Little Niche Starburst and dry brush with Acrylic Paints in Blue and Green Hues.
 
 
2.  Using Matte Varnish Gel Medium add a Decorative Napkin of your Choosing making sure to separate the Three plies before attaching.
 
3.  Glue Original Collage artwork into center of back portion of niche using Weldbond. Press and weight into place using what you prefer.
4.  Use Transparent Iron Oxide to add a patina to your piece.
5.  Fold and secure back portion of niche allowing to dry with metal clamps. Add a random branch of your choosing securing ends with Weldbond to hold securely into place.
 6.  Work on front portion of GSLC Starburst Niche using Colored pencils to add details and magazine picture to add a mosaic effect.
7.  For final details I used a toothpick to add Lumiere Paint of Blue, Copper, Halo Blue Gold and a Fine Tip Paint Applicator with High Flow Black Acrylic Paint in it.
 
 8.  Once satisfied with the effect attach the front of the GSLC Starburst Niche to the back portion once again holding into place with metal clamps.
 9.  Once fully dry add the GSLC Clip to back of it  for easy hanging if this is your preference.
 
 
 Some Final Thoughts.
C. S. Lewis “It may be hard for an egg to turn into a bird: it would be a jolly slight harder for it to learn to fly while remaining an egg, we are like eggs at present. And you cannot go on indefinitely being just and ordinary, decent egg. We must be hatched or go bad.”
Victor Hugo “Be as a bird perched on a frail branch that she feels bending beneath her, still she sings away all the same, knowing she has wings.”
Richard Le Gallienne “I meant to do my work today, but a brown bird sang in the apple tree, and a butterfly flitted across the field. And all the leaves were calling me.”
My mother’s favorite bird was Jenny Wren a beautiful little brown bird, whenever I see them I know my momma still is thinking of me even though we are now apart.
Supplies: Gypsy Soul Laser Cuts-Little Niche Sun Burst , Original Collage Artwork, Acrylic Paints in Blue and Green Hues, Iron Oxide,  Metal Clips, Matte Varnish Gel Medium, Decorative Napkin of your Choosing,  Paintbrush, Weldbond, Random Branch, Scissors, Colored Pencils, Magazine Picture for Making a Mosaic, Toothpicks, Lumiere Paint Blue, Copper, Halo Blue Gold, Fine Tip Paint Applicator with High Flow Black Acrylic Paint in it,
I cannot wait to see your interpretation of this project. Share it on the Gypsy Soul Laser Cuts Craft Group Page on Facebook. I would love to see what new creations you are working on!

Tuesday, May 26, 2020

enchanted

Maybe it's the wonderful explosion of colorful flowers brought forth with the arrival of spring,
or perhaps it's simply the warmer weather which allows for extended time outdoors; but it has me dreaming of the whimsical world of fairies.
Today I am on the Gypsy Soul Laser Cuts blog sharing "enchanted", a mixed media panel/book cover. I envision this piece being hung in a young child's room and then later being converted for use as a cover for a memory book.
I begin with a 9x12 canvas art panel, and layout the chipboard pieces to create a scene. The fairy door Mary is the largest of the pieces, so I begin by situating the door along the bottom to the left side. This door will be set into a tree. Beside the tree, some mushrooms from the mushrooms shape set, will sit among grass and create the perfect perch for the fairies.
Once all of pieces are selected, I sketch an outline for what will become the tree trunk. Texture paste through a stencil creates the wood grain/bark effect. Be sure to trace the door outline before adding the texture paste so that the texture does not impede placement of the chipboard door frame. Allow the texture paste to dry.
Next, I paint the sky using layers of blue acrylic paint in different shades. Blades of grass will be painted along the bottom of the panel. Once I am satisfied with the sky, I paint the grassy bottom edge, as well as the brown tree bark. The painted panel is set aside to dry while I work on painting the door and mushroom pieces.
The door itself is treated the same as the tree. Stenciled texture paste creates the wood pattern, and once dry, a layer of brown paint is added. The door frame consists of two pieces, for this project I am only using the base piece, Since my door is set into a tree trunk, I decided not to use the "stone" patterned piece. Instead, I use texture paste to create a rough texture on the flat around and paint it to create the look of a knot where the bark has grown dark with age and the elements. Before the door and surround are secured into place, I add a glow to the canvas where the window opening is located using gold and coffee ICE.
The mushrooms are painted with acrylic paints to give a realistic look and the grassy base is painted to match the grassy base of the panel. A piece of gessoed and painted book page adhered to the reverse side of the mushrooms creates a solid backing for the cutouts. Once the pieces are complete, they are added to the base of the panel with collage medium. I set a weight on top to keep them flat while they dry.
Three fairies from the garden fairies medium set are coated with embossing ink, sprinkled with charred gold embossing powder and heat set. They are adhered to the panel with collage medium. Using a stencil, I emboss swirling stars around the fairies.
Die cut letters, painted in the deepest shade of the sky blues, form the word "enchanted" in the sky.  
The back side of the panel is covered with patterned scrapbook paper, to give a finished appearance.  
Thank you so much for stopping by today, I truly appreciate it.
I hope that wherever you find yourself these days, you are able to enjoy the beauty that nature is providing us during these unsettling times.
I wish you all the best, stay healthy and take care.
~Ann
 

Gypsy Soul Laser Cuts used: