Showing posts with label Tudor Rose Singles. Show all posts

Wednesday, February 27, 2019

Crazy Quilts and Woven Friends

I've always loved Crazy Quilts. I'm lucky enough to have one of my paternal grandmother's rescued from the dusty attic of our homestead. She worked in a pajama factory that also did custom upholstery, frugal like my mother she collected the scraps and made the amazing tapestry I now own. When my mother passed in November of last year a dear artist friend gave me a care package that contained one of her felted hearts, and other small paper ephemera, these are the inspirations for this project. Our lives may appear as crazy quilts to some, tattered and torn, weathered and worn best to be replaced with luxurious, expensive duvet cover, but as for me and my menagerie of friends we find comfort in oldfangled, rescued, family treasures.  
 1.  Take apart GSLC Large Tags,  GSLC Mini Tudor Rose Singles and Heart Shapes from GSLC Henna Doodles 1 Set.
2.  Paint GSLC Large Tags with black acrylic paint, allow to dry fully.
3.   Choose collected embellishments from your stash. I am using a felted heart and two paper ephemera.
4.  Choose some magazine pictures within your color palette. 
5.   Cut random shapes from magazine pictures using pinking shears or Fiskars Paper Edgers.
6.   Glue pieces onto painted tags, you are attempting to create a quilt-like pattern.
7.  Use a small paint brush  or a toothpick and white gesso to stitch your paper quilt pieces together.
8.   Use versa mark and red embossing powders or enamels to color the GSLC heart pieces. Cure with a heating tool.
9.  Use versa mark and green and blue  embossing powders or enamels to color the GSLC Mini Tudor Rose Singles. Cure with a heating tool. Some final thoughts.
11.                Choose sari ribbons to add texture behind the GSLC embossed pieces and to further the illusion of a quilted piece.
12.                Assemble securing with Weldbond and weighting down with plastic bag filled with kitty litter.

Some final thoughts: "In the Quilt of Life, friends are the stitches that hold us together" is a befitting quote for this project. Others could be: "A good friend, like an old quilt is both a treasure and a comfort.", "A friend is like a quilt designed by heart, pierced in time, sewn by hand and bound to keep you covered." and "When things are in pieces, quilt them together." There is a category of photography titled urban decay you can look up on Pinterest, I find it organically intoxicating. It is what I seek to exude in my living and in many of my art pieces.
 
  
Supplies:  Gypsy Soul Laser Cuts-Large Tags, Gypsy Soul Laser Cuts-Mini Tudor Rose Singles, Gypsy Soul Laser Cuts-Henna Doodles 1, Collected Embellishments, Scrapes of  Magazine Pictures, Black Acrylic Paint, Paint Brush, Fiskars Paper Edger Scissors, White Gesso, Small Paint Brush or Toothpick, Versa Mark, Embossing Powders or Enamels in Reds, Greens, and Blues, Heating Tool, Sari Ribbon, Weldbond
I cannot wait to see your interpretation of this project. Share it on the Gypsy Soul Laser Cuts Craft Group Page on Facebook. I would love to see what new creations you are working on!

Thursday, March 29, 2018

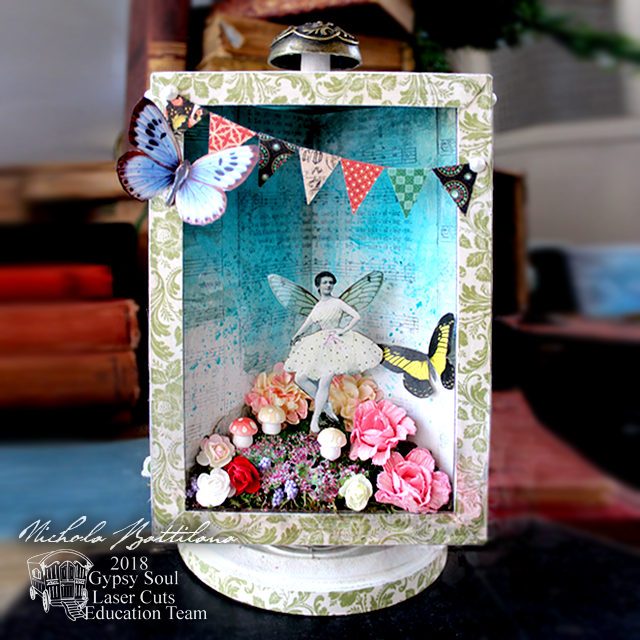
Floral Fairy Dimensional Diorama

I've had my eye on the Dimensional Diorama for a while and finally got my hands dirty and made a pretty something with it.

Floral Fairy Dimensional Diorama - gslcuts.com Nichola Battilana

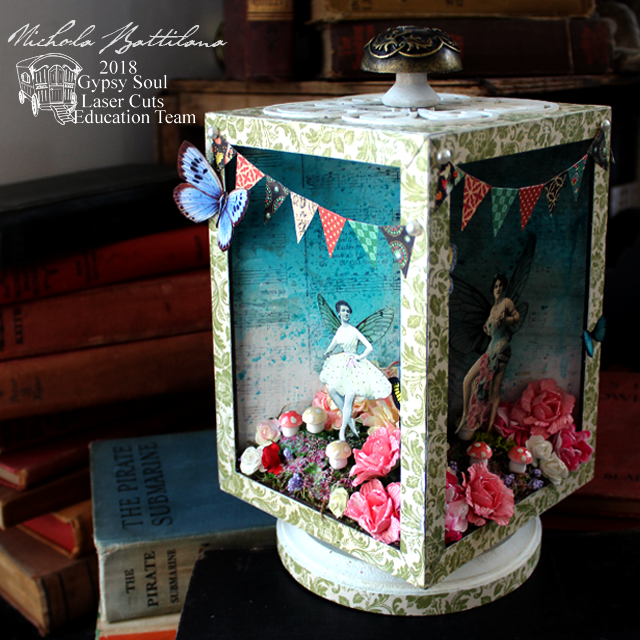
This diorama box frame sits on a spinner to show off 4 different segments. I had thought about creating a diorama dedicated to each of the seasons... but it's far too spring-like to think back to winter.

Floral Fairy Dimensional Diorama - gslcuts.com Nichola Battilana

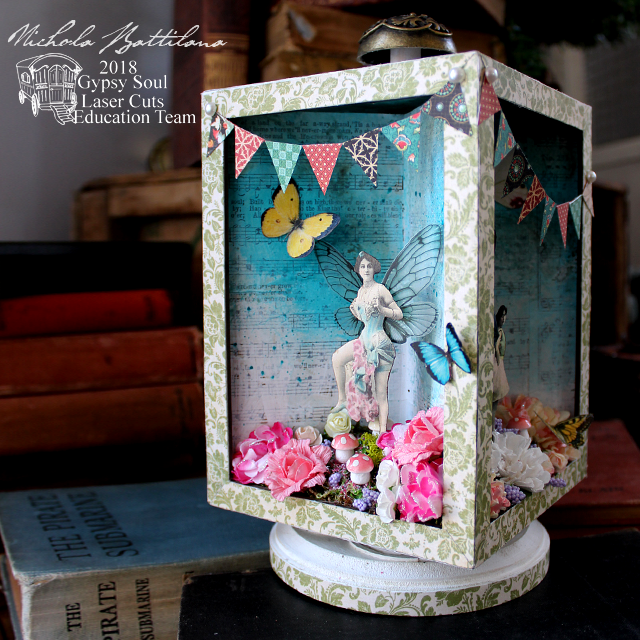
I've forgotten about snow and Autumn leaves and instead filled each section with moss, flowers, butterflies and pretty paper fairies.

Floral Fairy Dimensional Diorama - gslcuts.com Nichola Battilana

Inside I've used pages from damaged hymnals and the exterior is decorated with Graphic 45's Once Upon a Springtime collection.

Floral Fairy Dimensional Diorama - gslcuts.com Nichola Battilana

I've added a simple wooden plaque as a base for the lazy susan mechanism (which comes with the diorama box).

Floral Fairy Dimensional Diorama - gslcuts.com Nichola Battilana

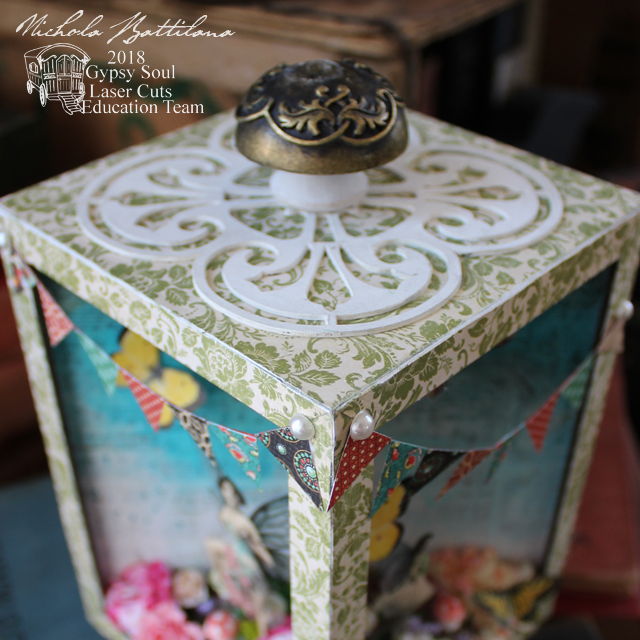
On top of the box I've added Tudor Rose Singles and created a handle with a wooden spool and a large staples door knob from Graphic 45. Final touches include a little handmade bunting and flat back pearls.
Floral Fairy Dimensional Diorama - gslcuts.com Nichola Battilana

If you'd like to create your own version of this project I have a video walk through with some tips and hints you might find helpful.

And here are all the bits you'll need!

Dimensional DioramaTudor Rose Singles 

Decorative papers (I've used Graphic 45 papers)
Paper flowers
English Fairy Garden Collage Sheet
Fairy Wings Collage Sheet
Moss
Wooden plaque
Flatback pearls (or other embellishments)
Florist Oasis
Vintage Images (I downloaded them free from thegraphicsfairy.com)
Glue
Acrylic Paint
Wooden toothpics or stir sticks


Tuesday, March 13, 2018

Travel Book with Susan

Hi folks!  It's Susan, here to share the beginning of an ongoing project.  I used to make albums often, but got away from it for a while.  At some point I decided to use mini albums blanks as board books that tell a story - like the kid's books from years gone by.  (I have a very detailed Halloween one in the works!)

Today I want to share the beginnings of a travel mini album / board book, using the GSL Cuts staggered bracket edge mini album and elements from a couple different sets.


Here's the album.  See how pages 4 and 5 are set with brackets on top and bottom?  I accidentally put bot bracelets on the bottom (see above).  No worries, though - it still works!


The first thing I did was to choose the paper for each page.  I used IOD "Gallivant" since it has a vintage travel theme.  Number the pages 1, 2, 3, etc and note which side is the front to make sure you don't accidentally flip a page while gluing the paper (like me).


I outlined the album pages onto the paper design and cut by hand.


The papers were attached using Mod Podge, and I set a heavy object on them the keep them flat while drying.


Fine and extra-fine sandpaper cleaned up the edges.


Ink and a brown pen gave the edges a vintage look.


I was recently talking with another education team member about embossing powders.  I figured this would be a good project to use them again.  First I prepped the laser cuts I wanted to use.  This travel word is from the small Chevron Words travel set. Other words in the set are journey, adventure, and destination.  I'll end up using all of them in this book.

Since I only wanted the word, I snipped off the chevron parts.  Travel was eventually embossed with browns and landed on the album front.


Next I wanted to add a little color without painting.  I used blue Prismacolor pencil and layered a little brown on top.  This was a total experiment!


Embossing ink and clear powder added, and voilà, it worked!  I added more ink and powder to the cut-out Steampunk Frame balloon basket to fill in.


This banner strip got the same blue pencil/embossing powder treatment as the balloon.  Here I'm gluing it to the front page.  From here I continued embellishing the front and first two pages.  I'll continue the project in the next few weeks!


Here is a view of the embossed balloon, compass rose, and medium size tudor rose.


Thanks for your visit today!

Cheers,
Susan

GSL Cuts Used
Bracket Edge Mini Album #D100BE
Banner Border Strips D34D
Chevron Words Travel Small C71
Steampunk Frame D20C
Compass Rose D61B
Tudor Rose Singles D6Q

Other Supplies Used
Iron Orchid Designs "Galivant"
Brown ink
Brown marker
Embossing ink
Embossing powder  - clear, fine clear, brown blend
Prismacolor pencils - Copenhagen Blue, Sepia
Mod Podge
Vintage tatting
Cheese cloth

Friday, February 16, 2018

Celebrating Friendship

Hello!! Jennalee here today with a project to commemorate my recent trip to Creativation 2018 and meeting Jess of Two Mad Dahlias in real life. Have you ever met someone online and then met in real life and you are instant best friends? Thankfully this was the case with Jess and not just because I was staying at her house for a week!!  So naturally, I needed to make a piece to celebrate this friendship. As I was digging thru my Gypsy Soul Laser Cuts stash I ran across the Tudor Rose Singles and Petal Corners Mini and my wheels started turning.


I began by prepping all my chipboard pieces. For the Petal Corners Mini I heat embossed 2 of them with Hammered Metal embossing powder. Using my finger I added some Cracked Pistachio Distress Oxide to give it an aged look. I wanted some more age and texture so added some Cracked Pistachio Distress Crayon. I left some chunky bits of crayon on the Corners. 


I cut the Tudor Rose Singles in half and then sprayed two coats of white spray paint on all the pieces. Once the paint was dry I randomly applied some Distress Crazing Medium with my finger. Once the crazing medium was dry I added some detail with Vintage Photo Distress Ink. 


For my base I used a medium Tim Holtz Etcetera Tag. I cut my background paper to size and stitched around the edge with gold thread. I  then applied the background paper to the tag using Distress Collage Medium. 


I then added a bit of detail to the top right and bottom left corners of the tag using a palette knife to spread gesso thru the Tim Holtz Layering Stencil- Floral. 


To begin my layers I started with a Tim Holtz Pocket Card. I added a small piece of ephemera and a stamped spool image from the Haberdashery stamp set. On top of this I added the Tudor Rose Singles. I used one half of the largest cut out and one half of the medium size cut out. I adhered them to the top left and bottom right of the tag using Distress Collage Medium. 


I then built up the main layer by layering this awesome photo of two vintage girls from Tim Holtz's new pack of Found Relatives on a piece of background paper from the Memorandum Paper Stash. Using a paper distress to distress the edges of the background paper and Vintage Photo Distress Ink for detail. I layered the photo and a ticket from an ephemera pack and stitched them together with my sewing machine. I then adhered the Petal Corners Mini using Distress Collage Medium. 


To finish I adhered the photo layer to the tag using foam dots. To finish off the tag reinforcer I used two pieces of floral Design Tape from the Rose set and adhered to the tag using Distress Collage Medium. 


The final touch added was this quote from a movie both Jess and I enjoy. Bonus points if you can name that movie!! 


I love the texture and chunkiness the Tudor Rose Singles add to this piece. And the added vintage detail from the Petal Corners Mini complete the photo. The best part is that I still have enough left from both sets to make another project down the road. 

Thanks so much for stopping by and spending a few minutes with me today. Happy Creating ~ Jennalee 


Tuesday, September 12, 2017

Flea Market Finds with GSL & Canvas Corp!

Hi crafty friends!  Throughout September Gypsy Soul Laser Cuts and Canvas Corp/7 Gypsies are doing a product matchup.  Fun!

For my project, I took a stroll down memory lane to a fantastic birthday weekend and flea market bonanza I spent with my GSL teamie *and* big sister Lora Mahaffey.  We're daaaangerous together.  ::nod nod::


To start, I wasn't sure what to do with the pack I received.  The big blue car was calling to me, though, and reminded me of the blue truck my sister and I loved at the flea market.  Off I went!

I was inspired by the brick wall in the 7 Gypsies Architextures Warehouse pack, but I wanted to make  a big wall on canvas board.   I used the GSL Brick Wall 2 stencil that I previously sprayed with Krylon matte finish.


Next I used Golden Light Molding Paste and a spatula to create the wall.  This molding paste is super light when dry and didn't add much of any weight to the original canvas.

To prevent stencil slippage, put a few small pieces of drafting tape (or masking tape that has been dabbed with corn starch to make it less sticky) around the back.


Apply the molding paste with a spatula or other straight edge.  Keep an eye on crevices -- you might need to go back and forth over an area for full coverage.


When fully covered, pull the stencil off and gently run your finger along the edges to clean them up a bit.  Allow to dry completely.

Stencil cleanup:  Since this is chipboard, I allowed the little bits of leftover molding paste to dry, and then flicked them off with a paintbrush.  With proper care of the stencil, I'm sure I'll be able to use it multiple times.

Here is the dried wall, ready for a coating of gesso or other paint.  I used Golden Titanium white as my base layer.


There's a lot of paint layers on this finished brick wall.  With respect to Michael deMeng, I can't give a tutorial, but if you're interested please look him up.


Now that my base is created, I started on the elements.  This is CanvasCorp's canvas and the 7 Gypsies Architextures Parchment Rub-Ons.  I received the "Build" set and cut this section off to use as transfer paper onto the canvas.  I painted the canvas with Ranger Glue 'n Seal, then carefully laid out the parchment.  I used a brayer (wow, that tool needs to be cleaned!) to flatten the parchment down.  I carefully pulled it and set the canvas aside to dry. 


I used an architectural element from GSL in the form of a Tudor Rose Singles medallion.  This comes as a package of three in graduated sizes.


I used a mixture of three different embossing powder colors - black with two browns.  I mixed them in an extra container and saved the rest for future use.


Close up, you can see random texture from the larger Distress powder embedded in the finer powder; almost like rust!


From the Canvas Corp/7 Gypsies Architextures "Junk'n" paper, I cut out the blue truck, the sign pole, and two warehouse windows.  You might be able to see that I whitewashed the sign pole and layered some of the sale signs.  The whitewashing caused the paper to curl so I used chipboard scraps across the back to give it more structure.  To finish, I added Stickles Picket Fence glitter glue.

Next to and on top of the car are Architextures thick "Crates" and "Weathered Metal Rooster" stickers.  Since I wanted the rooster to stand off the wall, I dabbed the sticky back with corn starch until it wasn't sticky, then used foam glue dots to adhere.

Since I was working with a Small World theme as well as flea market, you can see a small hoard of "smalls", or precious wee things I found on our birthday and flea market weekend.


Thanks for your visit today!  All month both our GSL team and Canvas Corp will be participating in this product matchup.  Come back to see more fun, inspiring projects!

Cheers,
Susan

GSL Products Used

Brick Wall 2 #D42D
Tudor Rose Singles #D6Q

Canvas Corp. Products Used
7 Gypsies Architextures Paper - Junk'n
7 Gypsies Architextures - Weathered Metal Rooster
7 Gypsies Architextures - Crates
7 Gypsies Architextures Parchment Rub On - Build

Other supplies used
8x10 canvas
Golden Light Molding Paste
Golden Titanium White acrylic paint
Various embossing powders
Distress Embossing Ink

#GSLCCCBMATCHUP