Showing posts with label Henna Doodles 1. Show all posts

Sunday, July 21, 2019

Love This Bicycle Greeting Card

Hey there crafty peeps and GSL fans! Ginny here to share a sweet vintagy greeting card created with gorgeous chipboard from Gypsy Soul Laser Cuts.
I am very in love with the new Daisy Frame Circle. It's got so much detail and it's the perfect size!!!
I paired it with some pretty scrolls from the Henna Doodles 1  set for a lovely layered look.
The larger chippies really help the smaller image to fill the space in the middle of the card.
I've added some pretty coordinating flowers and a silvery balloon charm for a bit of sparkle.
Cutting the patterned paper with a banner shaped die really helps to add loads of detail.
I coated the chipboard pieces with flat white acrylic paint and allowed them to dry.

The scrolly pieces were then given a coat of embossing powder then heat set for a nice sparkly finish.

~Gypsy Soul Laser Cuts~ Daisy Frame Circle, Henna Doodles.

Wishing you a happy and productive day : ) G

Wednesday, February 27, 2019

Crazy Quilts and Woven Friends

I've always loved Crazy Quilts. I'm lucky enough to have one of my paternal grandmother's rescued from the dusty attic of our homestead. She worked in a pajama factory that also did custom upholstery, frugal like my mother she collected the scraps and made the amazing tapestry I now own. When my mother passed in November of last year a dear artist friend gave me a care package that contained one of her felted hearts, and other small paper ephemera, these are the inspirations for this project. Our lives may appear as crazy quilts to some, tattered and torn, weathered and worn best to be replaced with luxurious, expensive duvet cover, but as for me and my menagerie of friends we find comfort in oldfangled, rescued, family treasures.  
 1.  Take apart GSLC Large Tags,  GSLC Mini Tudor Rose Singles and Heart Shapes from GSLC Henna Doodles 1 Set.
2.  Paint GSLC Large Tags with black acrylic paint, allow to dry fully.
3.   Choose collected embellishments from your stash. I am using a felted heart and two paper ephemera.
4.  Choose some magazine pictures within your color palette. 
5.   Cut random shapes from magazine pictures using pinking shears or Fiskars Paper Edgers.
6.   Glue pieces onto painted tags, you are attempting to create a quilt-like pattern.
7.  Use a small paint brush  or a toothpick and white gesso to stitch your paper quilt pieces together.
8.   Use versa mark and red embossing powders or enamels to color the GSLC heart pieces. Cure with a heating tool.
9.  Use versa mark and green and blue  embossing powders or enamels to color the GSLC Mini Tudor Rose Singles. Cure with a heating tool. Some final thoughts.
11.                Choose sari ribbons to add texture behind the GSLC embossed pieces and to further the illusion of a quilted piece.
12.                Assemble securing with Weldbond and weighting down with plastic bag filled with kitty litter.

Some final thoughts: "In the Quilt of Life, friends are the stitches that hold us together" is a befitting quote for this project. Others could be: "A good friend, like an old quilt is both a treasure and a comfort.", "A friend is like a quilt designed by heart, pierced in time, sewn by hand and bound to keep you covered." and "When things are in pieces, quilt them together." There is a category of photography titled urban decay you can look up on Pinterest, I find it organically intoxicating. It is what I seek to exude in my living and in many of my art pieces.
 
  
Supplies:  Gypsy Soul Laser Cuts-Large Tags, Gypsy Soul Laser Cuts-Mini Tudor Rose Singles, Gypsy Soul Laser Cuts-Henna Doodles 1, Collected Embellishments, Scrapes of  Magazine Pictures, Black Acrylic Paint, Paint Brush, Fiskars Paper Edger Scissors, White Gesso, Small Paint Brush or Toothpick, Versa Mark, Embossing Powders or Enamels in Reds, Greens, and Blues, Heating Tool, Sari Ribbon, Weldbond
I cannot wait to see your interpretation of this project. Share it on the Gypsy Soul Laser Cuts Craft Group Page on Facebook. I would love to see what new creations you are working on!

Tuesday, October 9, 2018

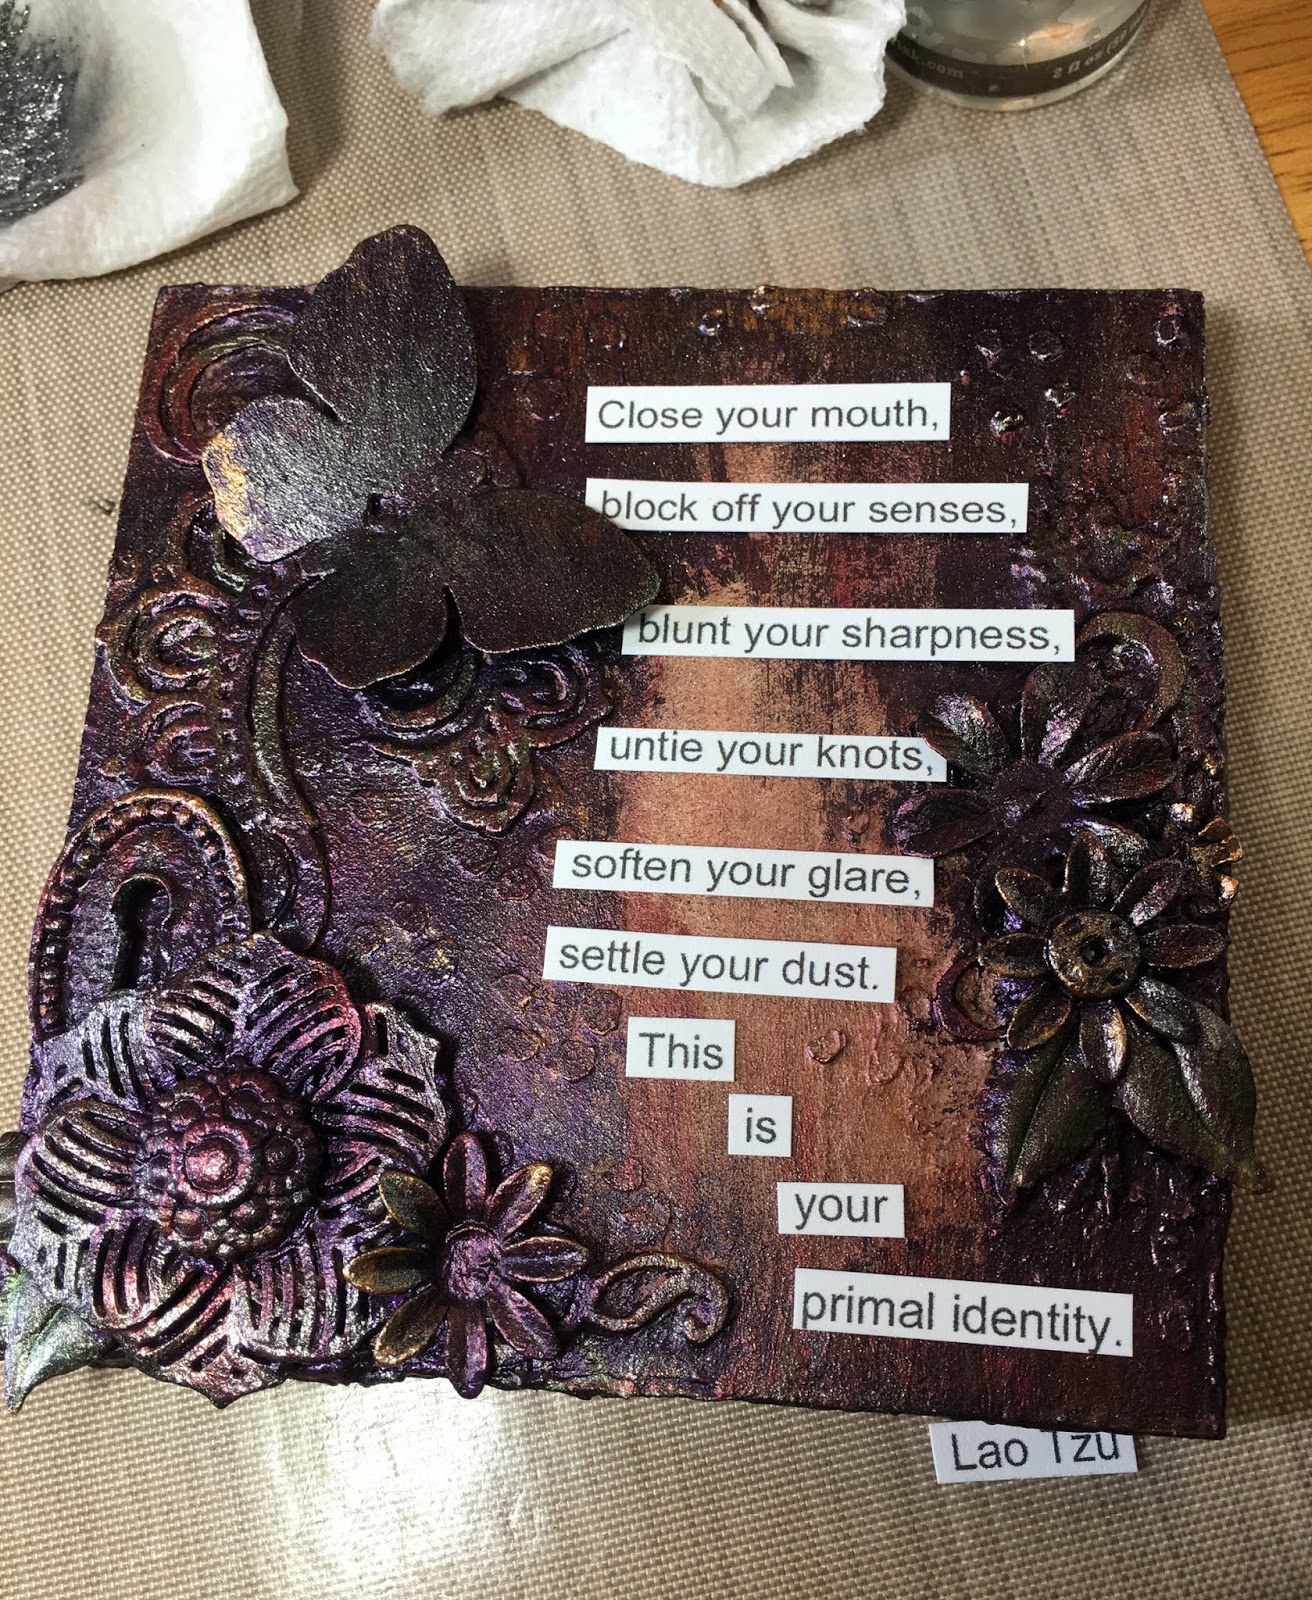
Settle Your Dust

Hello crafty friends!  It's Susan on today, with a quote from an ancient Chinese philosopher.  I can't remember what I was searching for when I found this, but it stopped me in my tracks and, well, allowed me to settle my dust.


I've fallen in love with the House Ornament Kits, and have a few extra House Ornament Bases hanging around.  Turns out, the base works well as a "canvas".

First things first, I glued the top and sides and allowed to dry.  I laid out some of the elements I wanted, as well as the Lao Tzu quote. I drew a rough circle around the text area to keep it clear of dimensional elements.


I used a stencil and Golden gel for the raised areas.


Covered with white gesso, then started building the design.


Henna Doodles 1 made a great flourish on the left, with a bit of leaf at the bottom and some of the extra parts on the right side. I adhered all the elements the same Golden regular gel.


Cover everything with gesso, especially the nooks and crannies.


To start the color layering, I used an old Tattered Angels mist, and then loads of acrylic paints as needed.


Before adhering the printed quote I set out the words one last time (notice I reprinted in a different font).


Thanks for your visit today!

Cheers,
Susan

Gypsy Soul Laser Cuts Used
House Ornaments Base #D172 HB
Henna Doodles 1 #C5J

Other Supplies Used
Golden Regular Gel
Prima flower stencil
White gesso
Metallic paints
Scrap Lace
Metal flowers, leaves, butterfly
Resin keyhole

Sunday, May 6, 2018

Beautiful Sea Maiden Large Tag

Hello there and happy Sunday friends! I'm going a bit mixed media today with a nautical inspired large tag. I dug deep in the chippies and came out with so many great pieces to layer up.
I'm all about the texture that  the layering adds.
Alternating the finishes also adds loads of detail.  Some are glittery and some are super smooth.
I'm even using them to extend the flower arrangements.
You can add a metallic look by topping off the chippies with shiny embossing powder and heat setting them...now they look like little metal charms : )
Taking advantage of gaps in the chippie layers I've added Prills and sequins for a very pulled together look.

I've selected beachy themed chippies and flourishes here to start the arrangement.  Wiping them down with a soft cloth is a great way to prepare the surfaces for their final finishes.  I've used embossing powders to maintain a super clean crisp edge.

I couldn't help myself but add a few more to the mix. Those bronze colored waves are really taking the nautical theme to another level!!!

~Gypsy Soul Laser Cuts~
Flourished Frame Elizabeth, Henna Doodles, Beach Shape Set, Seaside Decor.

Wishing everyone a happy and productive day : ) G

Friday, April 13, 2018

Gift Card envelope

Today I have taken a Gypsy Soul Laser Cuts Tag Folder Small and turned it into a fun little gift card holder with the help of some really awesome new Gypsy Soul Laser Cuts Henna Doodles 1 which I just love.


I started by covering the folder in patterned paper. Be sure to wrap the paper around the edges as otherwise you will end up with raw edges that don't look so good. Remember however that this will make the project three times as thick as the original, so I like to glue one section at a time, then wrap around the edge before adhering the next section, just to be sure you have a snug fit. I used complimentary colors for the inside and for the pockets. Tip: Adhere the paper in place before glueing the tab for the pocket. Seems obvious, but an easy mistake to make. 


I then sponged some gold gilding wax along the edges. I sponged the same gilding wax directly onto the Henna designs. This is a really easy way to add bright color fast. Just remember that it takes a little while to dry. I used a large piece on the front of the folder, and a smaller co-ordinating piece on the inside pocket front. 


I then adhered flowers and leaves over the edge. By having them touching, it creates a cohesive visual cluster, without losing any of the intricate design of the chipboard piece. I also tucked in some soft gauze mesh for texture, and added a metal corner embellishment to the front. Finally I added dimensional paint dots to the henna design for fine detail.