Showing posts with label thepaperedsoiree. Show all posts

Friday, June 21, 2019

Steampunk Seamstress

Hello and happy Friday!! It's Jennalee here today. Today I am sharing my last project as a team member with Gypsy Soul Laser Cuts. I've been with the team for 2 years and am so thankful to Gina for allowing me to be part of it all!! For my last project, I thought I would use one of my favorite chipboard pieces the Santos Doll. Although for this project I used just the cage skirt. 


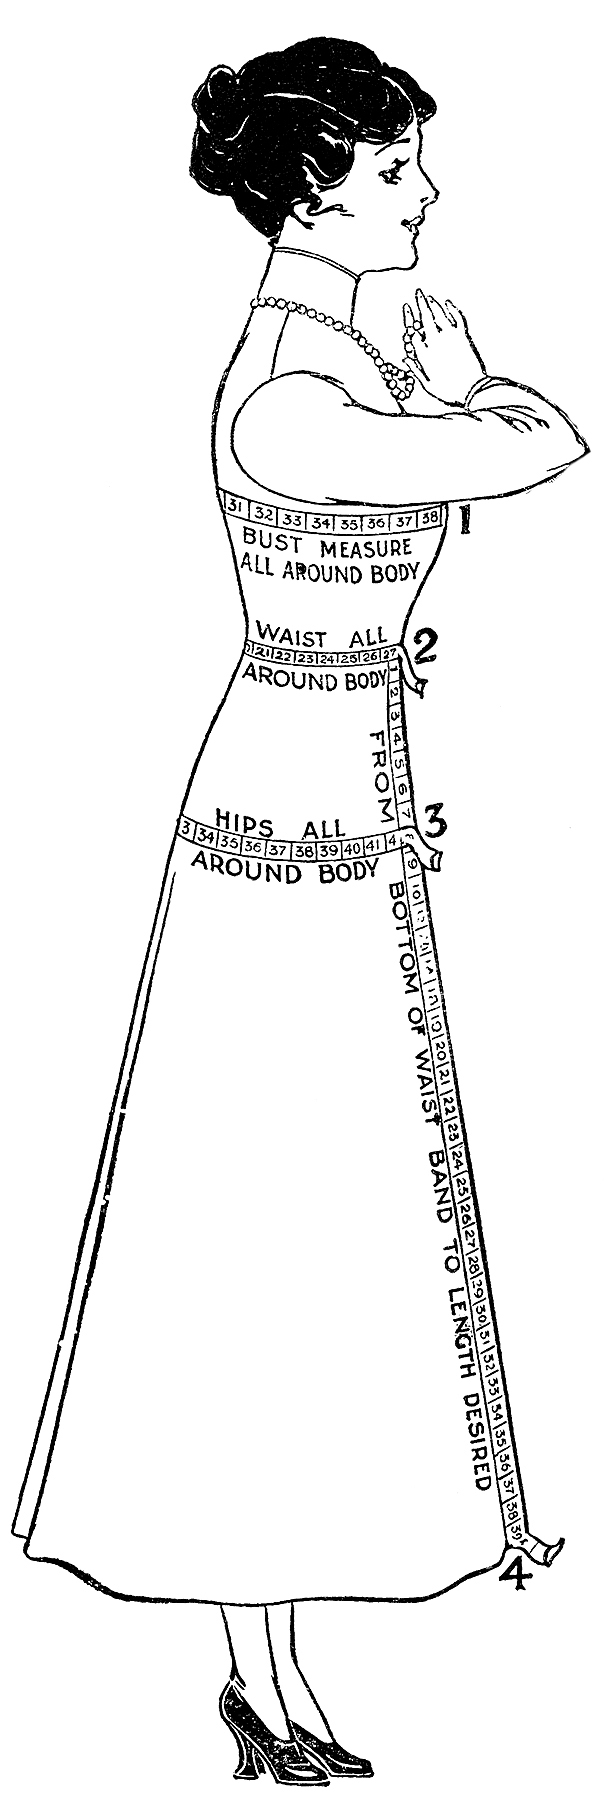
Fun Vintage Sewing Measurement Guide Mannequin Graphic!

This project was inspired by this amazing graphic from The Graphics Fairy . I instantly thought of a Steampunk Mannequin. 


I sized the mannequin down in Publisher and printed onto Ranger Sticky Back Canvas. The canvas provides the perfect texture reminiscent of a vintage dress form. I colored the image using Distress Markers. To achieve the subtle coloring I outlined around the edges and lines and then blended towards the middle with a water brush. And what Steampunk Seamstress would be complete without her wind up key? 


To add the haberdashery detail to her stash I stamped a ruler along a length of seam binding.


I tied the sash around her waist and added a pair of scissors dangling from a decorative chain. 


Of course, the cage skirt needed to be rusted. I was trying to mix a few techniques here that went awry. But instead of tossing the project I decided to embrace the extra crustiness of it. I wanted the skirt to have a more cage-like feel so dyed some skinny satin ribbon with Walnut Crystal Ink and then wrapped it around the Santos Doll


And how else would a Steampunk Seamstress get around? She needed wheels. Tim Holtz Mini Pulleys made the perfect wheels. Before attaching the Pulleys I distressed them using Mushroom Alcohol Ink. Using a Drill Punch I poked holes for the screws of the Mini Pulleys to go thru and attached them before assembling the skirt. 


The Steampunk Seamstress is ready to begin her adventures in sewing. I had a lot of fun with this project and feel it was a great way to finish my time with the team at Gypsy Soul Laser Cuts. 
Thank you for following along with me. 
Happy Creating ~ Jennalee 

Friday, June 7, 2019

The Traveler

Hello and happy Friday!! It's Jennalee here today. I had a lot of fun decorating this Hidden Drawer Book Box from Gypsy Soul Laser Cuts. When I am creating I usually have an inner dialogue going of what I want the project to be. I knew from the beginning that I wanted to do a time travel themed project. I pictured the outside of the Book Box looking vintage and inconspicuous. But when you opened it up you found a little surprise.


I began by covering the outside of my Hidden Drawer Book Box. I had a vintage timekeeping ledger in my stash. I loved the original color and was hoping to just color copy it. I printed out the entire cover onto Ranger sticky back canvas. My printer had other plans though and it printed out very dark. Not wanting to abandon my idea or waste my canvas I made it work for me. Using a blending tool and Cracked Pistachio Distress Oxide I blended the entire piece and then sprayed with a bit of instant coffee. After heat setting I sealed the cover with Distress Micro Glaze. 


I made copies of a few of the pages from the same book and covered the outside of the Hidden Drawer Book Box. 


As I was trimming pieces to size my eye fell upon A. Anderson, my husband's name. I loved the personal touch it added but also how it leant to the idea of time travel. 


To finish off my cover I added a Classic Label sticker that I distressed and stamped with T 2 again a nod to Time Travel. I then stamped and distressed the Registered sticker. Because I wanted the side of my book box to be hinged rather than an actual drawer I used the sticky back canvas to make a hinge. I wanted the spine to open up so that I could add a secret message inside and also so that the inner box could be taken out and displayed. 
The hinged spine did not want to stay shut on its own so a simple closure made from a bit of trim did the trick. 


When you open the spine there is a Classic Label with a message. 


The message reads "If interested in time travel meet last Tuesday 3pm". The drawer needed a way to slide out easily so I made a little pull out of some Ruler Ribbon. 


The drawer inside features The Professor aka The Traveler. 


The background is a Journal Card distressed and stamped with the gears from Inventor 7. Layered behind the Professor is a ticket and a few gears. A vintage bulb is glued into the upper left corner. I think my favorite detail is the pocket square and gear. 


The sides of the box are lined with a rusted background embossed with 3D Foundry Texture Fade. 


I hope you enjoyed this project as much as I did. And be sure to keep an eye out for books that could contain a secret bit of magic.

Happy Creating ~ Jennalee 

Friday, May 17, 2019

ATC Ticket Journal

Hello and happy Friday!! It's Jennalee here today. Do you ever get inspired while cleaning up the random pieces on your table? That's how this ATC Ticket Journal came about. While I was cleaning up the aftermath of previous projects I ran across a photo with red stitching alongside a ticket and piece of floral ephemera from there the layers started to flow. The ATC Ticket Journal is the perfect size for a quick project you can complete in an afternoon. I also love that the chipboard is thin enough to stitch on your sewing machine.


I kept my layers simple using 3-5 pieces of ephemera. I love how the red stitching pops and adds so much detail. 


The Ticket Journal is the perfect size with 5 panels. Enough to tell a story but not overwhelming when it comes to decorating. 


Washi tape adds just the right amount of detail in the background. 


That pop of red sets my heart aflutter. 


I didn't decorate the back of the tickets yet so that I can have another reason to clean up the piles of inspiration that accumulate on my table. What's currently on your table?

Happy Creating ~ Jennalee 

Friday, May 3, 2019

Note to Self

Hello!! It's Jennalee here today. Does your creative mojo just ever fly away and leave you hanging? That's what happened to me this week. When I started this project I knew I wanted to play with the Ornamental Birdcage Shape Set. I had a completely different idea in mind when I started and then bam my mojo up and snuck out the door.

I loved how rusty and crusty the cage turned out so decided to keep it as the focus of my piece and build a collage around it with elements to remind myself that it's okay to need to rest and take a break.


The Ornamental Birdcages Shape Set comes with 3 different style cages in 3 sizes. 


I started by painting my cage with Raw Umber both front and back. 


Then using Distress Collage Medium and Paper Artsy's Rusting Powder rusted my cage. From chipboard to rusty crusty goodness!! 


I really loved the solemn graceful look of the woman in the Photobooth Photo and that button with the pop of original red thread spoke to me. As I was digging thru my Tim Holtz Ephemera pieces I found this "Handle with Care" label and it was perfect for my message to myself. 


The bottom corner of the frame says Cloudy days good as sunshine another excellent reminder!! 


Carrying on with my note to self theme I added the airmail label and the Story Clipping to remember. 


How do you handle your mojo leaving for vacation? I can usually find mine again after a nap and some chocolate and a good day of free play in the studio. 
Happy Creating ~ Jennalee 


Friday, April 19, 2019

Tag You're It Mini Albums

Hello and happy Friday!! It's Jennalee here today. I am on a bit of a book kick lately. They are the perfect project for using up scraps. I have seen some amazing matchbook albums on Instagram and was inspired by the size of them. So I decided to go small again. The cover of my books are made from Gypsy Soul Laser Cuts - Small Tag Set and Large Tags.  The chipboard tags provide a sturdy cover yet can still be stitched thru!!


The Small Tags Set come with 10 in the pack and measure 3.25 inches tall by 1.6 inches wide. 


The Large Tags come with 3 in the pack and are number 8 size. 


Fold the small tags at 1/2 inch from the bottom and then at 2.25 inches. 

I used my score board and bone folder to score my tags before folding. I found that lightly spraying the Small Tags helped create a cleaner fold. 


Fold the Large Tag at 3/4 inch from the bottom and then again at 3 5/8 inches. 

The larger tags are not as thick as the smaller ones and don't need to be sprayed. 


I used a glue stick to adhere scraps to both the front and back of both tags. I used a sanding block to remove any overhanging edges. 


A stitched on button and some vintage cotton thread make the perfect closure for the Small Tag book. 


I built up my layers and then stitched them together on with the sewing machine. I then set my stitches to a longer length and then stitched them into the tag cover. 
And added messy stitching to the top flap. 


The large tag book was assembled the same as the small one. Because there were more pieces of ephemera in the larger book stitching on my machine was a bit tricky. So keep that in mind and take it slow. 


Those layers make my heart flutter!! 


I love the wings peeking out!! 


These little books are the perfect way to spend an afternoon and would be perfect for mail art swaps.
Tag you're it!! I challenge you to make a book from a tag. 
Happy Creating ~ Jennalee