Showing posts with label Flourish Miniatures. Show all posts

Saturday, October 21, 2017

Clean and "Almost" Simple Spirited Card Set by Pam Bray


Happy Saturday Gypsy Soul Laser Cuts Fans!!! Pam here today sharing my Clean and "Simple" Spirited Card Set using some amazing GSLaser Cuts Chippies!!!


To begin by first painting the back of the four pieces of the Stackable Labels Shape Set with Carbon Black paint.


Emboss background paper; adhere to card base with pattern strip of paper to the bottom of the card base. Adhere a strip of "diamonds that has been cut from the Diamond Texture Sheet; adhere to top of card.


Adhere prepared labels to front of prepared card bases.


Spatter front of cards with paint; dry.


Place SRM Halloween Stickers to front of the matching labels from the Stackable Labels Shape Set.


Adhere prepared labels to front of cards.


Adhere Flourish Miniatures to bottom of card.


Make and adhere bows and flowers to place  on front of cards.


I hope you have enjoyed my Clean and "Almost" Simple Spirited Halloween Card set! So grab yourself  some of Gypsy Soul Laser Cuts Chippies  to create yourself or someone else a fun set of Halloween Cards. Hugs Pam

Gypsy Soul Laser Cuts

Other Supplies
Authentique Spirited Card Making Stack
SRM Halloween Stickers
Sizzix Basket Weave Embossing Folder
MayArts Ribbon
DecoArt Media Paint: Carbon Black and Titan Buff
Tiny Attacher
Prima Marketing Flowers
Xyron Adhesive
Paintbrush
Xyron Tape Runner
Hot Glue Gun and Glue Sticks

Monday, September 28, 2015

Inspirational mini-canvas set


Hi there! Lynne here sending greetings from beautiful, warm, sunny southwestern Ontario along with a sunny, happy set of canvases I created with lots of awesome goodies from Gina's store. The sentiments are from Teresa Collins' Nine & Co papers and are on 8x8 canvases.


I ran the border strip through an embossing folder, attached all the elements to the canvas, stenciled with texture paste, then coated the entire project (except for the sentiment) with gesso. I then used Twinkling H20s to add patches of various colours all over, covering the entire gessoed area. When those were dry I then applied another coat of gesso to blend and soften the colours. When that was completely dry I covered the sentiment with a piece of cardboard and misted the entire surface with a variety of colours until I achieved the intensity and blend I wanted. Splotches of black acrylic paint added contrast and tied the black elements of the sentiment pieces in with the rest of the project.


I know it sounds like a lot of steps were involved but they were all simple steps and the most time-consuming part of the project was allowing the layers to dry, although I did use the heat tool when I wanted to get to the next step a little sooner!


Thanks so much for stopping by and I wish you a wonderful, happy, sunny week!


Gina's Items Used


Other Items Used


Teresa Collins Nine & Co paper-cards


Colourarte Twinkling H20s


Prima and Crafter's Workshop stencils

Friday, September 18, 2015

Desk Picket Fence Clock


Hello ladies and gents! When I saw this picket fence clock, I was super excited to alter this.  I gave the fence a weathered paint look with a crackle technique.  The slates were painted with two coats of flat black paint, then  crackle medium.  Once it was dried, I added vintage ivory acrylic paint and then added black distress ink to all the edges.  


I added a birdcage, which I manipulated to give it some dimension. I pained it with Snow-Tex for more dimension and added a very small flower to the top. 


The clock face I used Prima paper along with the base of the fence. The numbers on the clock I painted with black ink, then used my finger to added gesso to make the numbers pop.  I also added gesso to the clock hands to make them stand out more.


The flourish details were inked with two different distress inks, Crushed Olive and Forest Moss, and then, using my finger, gesso was added for dimension.  I then added several flowers from my stash to finish it off.


I just love the way this came out!  Thanks for stopping and have a crafty day!


Gina's Designs Items Used:


Other Items Used:


Prima Stationer's Desk


Distress Inks: Forest Moss & Crushed Olive


Gesso


Wild Orchid Craft Flowers


Acrylic Paints: Ivory & Black


Folkart Crackle Medium


Snow-Tex

Wednesday, January 28, 2015

Mini Album by Dianna


Hi everyone, I hope the weather is treating you well and not dumping snow where you live.  Below are the first six pages of my first ever mini album.  This mini album was created for January's color challenge on Gina's Designs Craft Group located on Facebook.  A designer for Gina's Designs and co-host of the Craft Group Page, Deann McNulty, challenged members to create an item using the below colors. 
 I decided to challenge myself even more and create a mini album.  There was a lot of stress and yes, I will say it, cursing on my part, but it turned out to be a labor of love and something I really enjoyed creating.   Please enjoy the first six pages of this mini album (yes it is completed and you will have to visit the Craft Group page or my blog page to see the finished product in a couple of days).

The first page is one of the last pages that I created. It has two folds that are interactive and fold upward.  The key, flourish and double hearts are from Gina's Designs.  I sprayed them with a favorite of mine, Maya Mist -  Blue Agave and then used Stickles, a lime color, on them. All pages in this mini album were distressed with Vintage Photo ink.  The owl is from Rubber Moon.

The second page is a sideways interactive fold that was punched and attached to the folder.  The owl stamp was colored with Copic markers and placed on a Gina's Designs flourish and love ticket.  Both chipboard pieces were sprayed with Maya Mist.

The third page has Gina's Designs scribble frame hearts and flowers. I left the top open so that a picture can be placed inside. The butterfly is from Gina's delicate frames and ornaments.  I used Blue Agave on both, but with the butterfly, I sprayed it three times not waiting for it to dry. This gave it a tie dye effect. The owl is a punch from Hobby Lobby.

The fourth page is actually my first page. You can see the manilla folders used to create the 4 x 6 pouches that are used on each page.  Inside each pouch is a pull out for two pictures (one on each side).  The double hearts and dream butterfly frame are from Gina's Designs and sprayed with Maya Mist.  The pocket was made with Taylored Expressions, Tag Pocket.  I made the tags with my new Fiskers tag punch (very cool, it punches the tag, creates the hole and puts the eyelet). 

The fifth page is an interactive downward fold. The flag with the word stamp was made with a Fiskers punch and the dragonfly was a punch. The inside flower was made with punches.


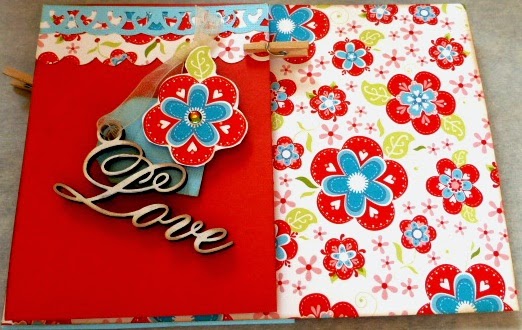
The sixth page was a downward interactive fold.  The Love is from Gina's Designs 10 words and top was painted white and distressed.  I punched out a small tag and cut out one of the flowers, poped it up and added a rhinestone.

Monday, January 5, 2015

Altered clipboard


Hi folks and Happy New Year! In the spirit of new beginnings, I decided to alter this basic clipboard to hang on my scraproom door to hold messages, reminders, quotes, or whatever...my memory is NOT my best         feature so I need all the help I can get!!


I painted the chipboard Flourish Miniatures with acrylic paint then sponged them with a lighter shade to soften the look; they're so pretty they didn't need much embellishing. The fairies were painted pale blue then heat embossed with Lindy's Silver Moon Turquoise embossing powder; love the glow it gives them! I also added one of the Cardstock Doilies, which I cut in two and added to both sides.


Thanks so much for stopping by and I wish you  a wonderful, creative, colorful New Year!!


Gina's Designs Products Used


Flourish Miniatures

Garden Fairies small


Other Products Used

Lindy's Stamp Gang embossing powder-Silver Moon Turquoise

Blue Fern Studios Montage papers

Monday, April 28, 2014

Celestial Stage by Nancy and Banner by Veronica

Today we have two projects to share.  First up is Nancy with one of our fun altered art pieces.  This piece can be decorated to suit any number of themes.

Hi everyone, Nancy here!  I had so much fun decorating this Stage.  I love anything to do with the sky, stars, moon and all things celestial, so I thought I'd call my creation "Reach For The Stars".  I added lots of textures to this piece with chunky glitter, glass beads, bead gel, shabby embossing powders, mica, gilder's paste, etc.

Gina's Designs Products Used:
Queen Anne's Lace

Next up is Veronica with a gorgeous vintage styled banner incorporating lots of fun chipboard shapes!

Hello Everyone! Veronica here, to share with you Gina's lovely C-R-E-A-T-E Dovetail Banner.


I added Gina's Doily Intricates to give the letters some pop.


Here is a her Butterfly Of Gears. Just adds a creative feel to the banner's theme.


Here I added one of Gina's String Alongs this one is" Sewing", and of course I couldn't finish without one of Gina's wonderful Flourishes Miniatures!
Thank you again for stopping by!

Gina's Designs
C-R-E-A-T-E Dovetail Banner
Butterfly Of Gears
String Alongs - Sewing
Flourish Miniatures
Cardstock Doily Set Intricates