
Showing posts with label Creepy Critters Shape Set. Show all posts

Wednesday, October 11, 2023

Spooky Stories Left Unspoken-A Peek-a-Boo Project

I enjoy listening to podcasts, Aaron Mahnke has many of my favorites on his Grim & Mild Channel-Lore, Cabinet of Curosities, 12 Ghosts and 13 Days of Halloween. His 2022 13 Days of Halloween was titled Devil’s Night. A 12-year old boy and his dog need to get home on the most dangerous night all year. They must cut through the chaos and mayhem to survive. New episodes are released nightly on 13 days leading up to All Hallows Eve. These Episodes are like radio movies, with a soundtrack and voice actors. For the most thrilling listen experience, it is recommended that you plug in your favorite headphones and enjoy these audio dense episodes. 


  1. Gather Supplies.
  2. Cut Pieces of Upcycled Cardboard Into 3 by 5 inch Pieces.
  3. Use Magazine Images to Create Backgrounds Securing with a UHU GlueStick.
  4. Add Focal Points Using More Magazine Images Securing with a UHU GlueStick.
  5. To Add a Vintage Appeal Gently and Randomly Use a Sanding Block to Distress Your Collaged Backgrounds.
  6. Use TH Distress Stains to Fill in the Scratches-I like Weathered Wood, Gathered Straw, and Iced Spruce.
  7. Add TH Barn Door Distress Stain to the Edges of Your Collaged Backgrounds. 
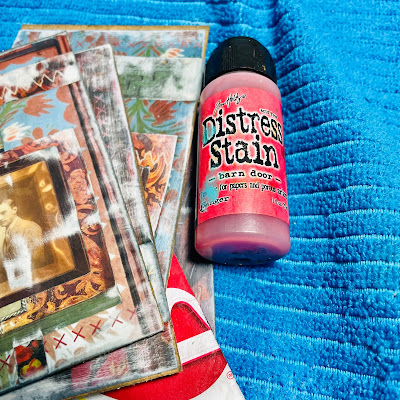
  8. Add Rub-Ons to Your Collages.
  9. Add Spiderwebs to Collages using a Foamie and Golden Interference Blue (Fine) Acrylic Paint.
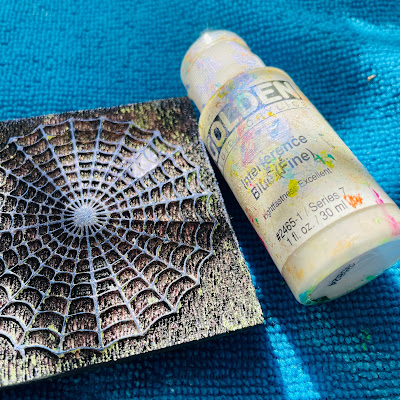
  10.  Use Embossing Dabber and Plastic Palette Knife to Add Clear and Vintage Beeswax Embossing Powders.
  11. Use a Heating Tool  to Cure the Embossing Powders- This Will Create a Encaustic Effect.
  12. Use Embossing Dabber and Plastic Palette Knife to Add Black Glint and Black Sparkle Embossing Powders to the GSLC Creep Critters. Cure with a Heating Tool.
  13. Use Brown and Magenta Acrylic Paints to Paint the GSLC 5-Inch Creepy Trees. When they are still Wet Sprinkle with Pure Sheen Black Glitter.
  14. Use Heavy Gel Matte Medium to Secure GSLC Prepared Piece to Collaged Backgrounds.
  15.  Press and Dry Complete Flat Weighted Down.
  16. Use an  Awl and  Centimeter Hole Ruler to Add Holes Along Chosen Parts of Collages.

  17. Then Add Embroidery Floss Using a  Needle.


Final Thoughts.

As I have stated before I am not a huge reader so Podcasts make me feel like I am at least “reading” an Audiobook. We have enjoyed watching “Lore-(TV series)” this anthology series brings to life Aaron Mahnke’s “Lore” podcast and covers the real-life events that spawned our darkest nightmares. It Blends dramatic scenes, animation, archive and narration. Lore reveals how our horror legends-such s vampires, werewolves and body snatchers- are rooted in truth.


I like how this artwork weaves together different elements and each seem to have a story to tell. If I were a more clever writer I might be able to reveal them to you but I fear I know them not. Maybe you will have a better chance at uncovering their secrets.


Supplies:  GSLC Creepy CrittersGSLC Creepy Tree 5 Inch, Upcycled Cardboard Pieces, Magazine Images, UHU GlueStick, Sanding BlockTH Distress Stain of Your Choosing, Rub-Ons, Foamie SpiderWeb, Golden Interference Blue (Fine) Acrylic Paint, Paintbrush, Embossing Dabber, Clear, Black Glint, Black Sparkle, and Vintage Beeswax Embossing Powders, Plastic Palette Knife, Heating Tool, Brown and Magenta  Acrylic Paints, Pure Sheen Black Glitter,Golden Heavy Matte Gel Medium, Awl, Centimeter Hole Ruler, Embroidery Floss, Needle


I cannot wait to see your interpretation of this project. Share it on the Gypsy Soul Laser Cuts Craft Group Page on Facebook. I would love to see what new creations you are working on!


Wednesday, July 12, 2023

Dragons on Parade-A Peek-a-Boo Project


I’m not sure why I have dragons on my mind in July. Maybe these mythical creatures remind of fireworks on the fourth of July or Visiting ChinaTown in Washington DC, years ago for Chinese New Year and seeing the Amazing Dragon dancing down the street with festive laughter and cheery merriment. I Have also throughly enjoyed watching the “How to Train Your Dragons” Movie series. Whatever the reason they are the inspiration of this artwork. 


  1. Gather Supplies.
  2. Cover GSLC Layered Shields With Silver Rub’n Buff using a Paintbrush.
  3. Glue Layered Parts Together with a UHU GlueStick. Dry Completely Pressed and Weighted Down.
  4. Use Polymer Clay, Moulds, Clay Cutters, Liquid Fly and Dragon Eye Cabochons to Create Focal Point for Your Prepared Layered Shields.
  5. Add Mica Powders to Glisten the Eyes.
  6. Use Liquid Clay to Secure Dragon Eye Layered Shield.
  7. Add Metal Embellishments-Nails, Screws, Eyelets, etc-With a bit of Liquid Clay.
  8. Cure in Polymer Clay as Instructed on Packaging.
  9. Once fully Cooled Added Patina and Interest with Waxes and Rub’n Buff.

  10. Add Further Layers with Collection of Acrylic Paints.
  11. As Pieces Needed More Interest I used the Bats for GSLC Creepy Critter Shape Sets.
  12. Use Embossing Stick on Rubber Texture Stamps.
  13. Sprinkle With Clear Embossing Powder.
  14. Cure With a Heating Tool.
  15. Use Acrylic Paints to Create Corresponding Wings for Your Dragon Eyes.
  16.  Cut Bats in Half and Secure to Back of Shield Using Clear Gorilla Glue.
  17. Allow to Dry Fully Pressed and Weighted Down.

Final Thoughts:

Many years ago we went to China Town In Washington, DC to Celebrate The Chinese New Year. It was my first time seeing the Dragon dance and the Lion Dance. Although similar in style are are uniquely their own.

Both dances are intended to bring luck and prosperity, a sentiment that’s very important to Chinese people.

The dances are often seen during Chinese New Year celebrations, but can also be part of other events throughout the year.

There is often some confusion when it comes to identifying a lion or a dragon dance – the exquisite costumes of the lion can often make it look similar to a dragon.

However, it’s quite easy to distinguish between the two.

In a lion dance, there are two performers making up each lion – one at the head, who defines the lion’s personality, and one at the back for the tail. Apart from their legs, they are completely covered by their costume.

For a dragon dance however, you have a minimum of nine performers, each holding up a section of the dragon, which is propped up on poles. The performers are completely exposed in this case.

Some of my favorite quotes from, How to Train Your Dragon.

“What you’re searching for isn’t out there, Hiccup. It’s in here.” 

“I wouldn’t kill him, because he looked as frightened as I was. I looked at him… and I saw myself.” 

“This is Berk. It’s twelve days north of Hopeless, and a few degrees south of Freezing to Death. It’s located solidly on the Meridian of Misery. My village. In a word, sturdy. And it’s been here for seven generations, but, every single building is new.

We have fishing, hunting, and a charming view of the sunsets. The only problems are the pests. You see, most places have mice or mosquitoes. We have… dragons.” 

“Legend says that when the ground quakes or lava spews from the earth it’s the dragons. Letting us know they’re still here. Waiting for us to figure out how to get along. Yes, the world believes the dragons are gone, if they ever existed at all.

But we, Berkians, we know otherwise. And we’ll guard this secret until the time comes when dragons can return in peace.”


Supplies:  GSLC Layered ShieldsGSLC Creepy Critters Shape Set, Polymer Clay, Clay Shape Cutters and Molds, Ebony and Silver Rub’n Buff, Paintbrush, UHU GlueStick, Liquid Clay, Dragon Eyes Cabochons, Mica Powders, Metal Embellishments-Nails, Screws, Eyelets, Blue and Golden Waxes, Collection Of Acrylic Paints, Embossing Stick, Clear Embossing Powder, Rubber Texture Stamps, Heating Tool, Gorilla Clear Glue Tube, 


I cannot wait to see your interpretation of this project. Share it on the Gypsy Soul Laser Cuts Craft Group Page on Facebook. I would love to see what new creations you are working on!


Thursday, October 25, 2018

Shabby Chic Halloween Dressform Hangup

Hi everyone!  Today we are going to make our Halloween costume … in miniature!  And we will be using the Gypsy Soul Laser Cuts Dressform Hang Up to begin the process.


To make the shabbiest, creepy dress possible, tear a piece of 12x12 double sided print card stock into irregular triangular shapes.


I found it easiest to use a ruler and tear the paper towards me.


Mist the triangles with water and carefully pleat and scrunch the shapes, allowing some of the reverse side of the print to show on the front.  Let the shapes dry.


Trace around the bodice portion of the hang up onto the back side of a piece of glittery fabric and cut out.


Ink up top portion of hang up with black pigment ink and heat emboss with Oil Rubbed Bronze embossing powder.  Don't worry if some of the embossing powder gets onto the bodice portion.  It will be covered up with our fabric piece.


Glue fabric to bodice portion of hang up, as shown.


Glue paper triangles together with hot glue at the top where it will be joined with the bodice.


You will need to scrunch it together enough so it will fit behind the bodice.


Cut strips of creepy cloth gauze and glue to the top of the skirt.


Glue skirt to bodice.


Wrap black lace around front of bodice and skirt and glue to the back.


I made a bow using black plastic netting from a bag that held produce and glued it to the top of the bodice.


Spray entire dress with Fully Purple mist and let dry.  Spread random patches of green glitter paint onto high spots of paper triangle strips.  You may want to enlarge the picture to see the colors better.


Paint the raven with Paynes Grey, then Black Ice glitter paint.  Paint the the bat with Berry Metallic, then Black Ice glitter paint.  Let dry.


Add dots of Lime Green Liquid Pearls to bat's eyes and one dot of Emerald Green Liquid Pearls to raven's eye. Let dry.  (I added tiny black dots to the eyes with a black Sharpie marker).


Glue bat to top of hanger and raven to bodice, as shown.

Lay out three lengths of chain, each one longer than the first.  My chain lengths measure approximately 3-1/2", 6-1/2", and 9".


Use jump rings to connect the ends of each chain length. They should drape as shown  below.


Add skull charms to each length of chain, as shown.


Use small brads to attach the jump rings on each side to the top of the skirt.  I simply pierced a small hole through the paper part of the skirt and inserted the brad prongs.  A touch of glossy accents will keep everything in place.


At the last minute, I found this tiny metal gear on my desk, and instead of risking losing it, I glued it to the raven's eye, then added a tiny dot of the same Liquid Pearls to the center.


Here is a closer look at the bat and his beady eyes.  I also glued a small skull charm to the center of the bow, as shown.


Find a nice place to hang your costume, and you will be ready for the mini Halloween ball.


Supplies Used:

GSL Dressform Hang Up
GSL Spooky Shape Set (bat)
GSL Creepy Critters Shape Set (raven)
Colorbox Black pigment ink
Emerald Creek Oil Rubbed Bronze embossing powder
DecoArt Acrylic Paints (Payne's Grey, Berry Metallic, Black Ice Glitter Paint)
Ranger Liquid Pearls (Lime Green, Emerald Green)
Tattered Angels Fully Purple spray mist
Black Creepy Cloth gauze (Dollar Tree)
Black plastic netting bag that held vegetables (used to make bow)
Charms (skulls)
Jewelry chain and jump rings

I hope you enjoyed my project today.  Be sure to check out the online shop for more chipboard ideas and inspiration.

Thanks so much for stopping by today, and have a very happy Halloween!

Barbara