
Showing posts with label Planter box with trellis. Show all posts

Friday, March 20, 2020

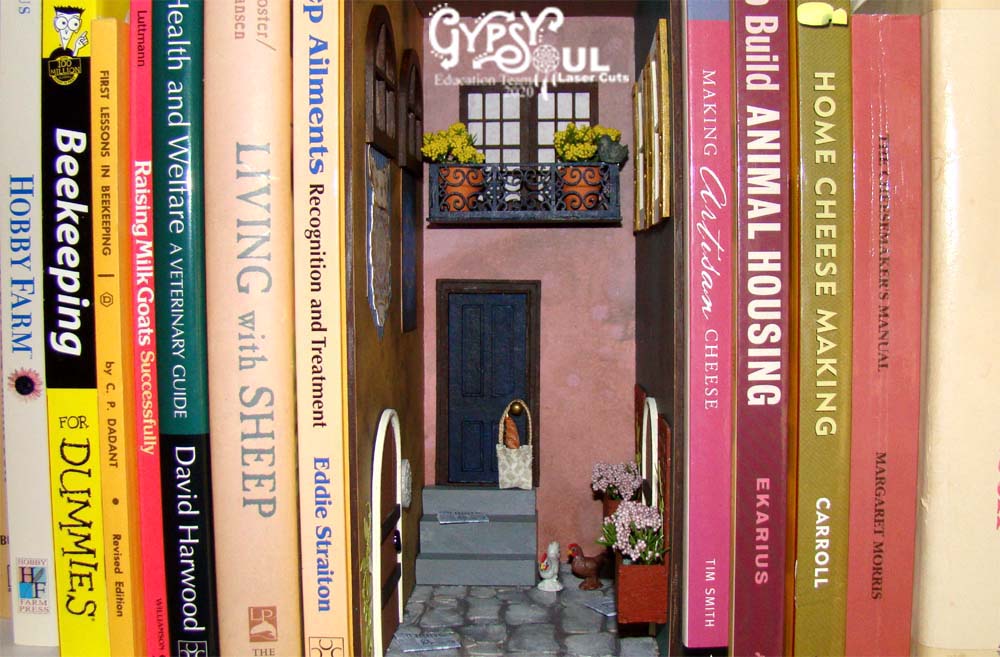
European Alley Book Nook

Hey, everyone! Connie here with a project that uses a brand new piece from Gypsy Soul Laser Cuts – a GSL Book Nook Box Large .
The nook is very simple to assemble with tacky glue, it's basically an open front box. Since it's just 4 inches wide when assembled, I decorated all of the surfaces before gluing it together, starting with the walls. I chose some lovely muted Idea-Ology papers from Tim Holtz. 
For the street, I knew I wanted to play with one of the GSL Cobblestone stencils. Before using it, I sprayed both sides with spray shellac. I was very careful not to stencil over the assembly tabs so I blocked those with painter's tape. I also knew I would have a set of wooden stairs at the back of the alley so blocked off the spot those would be glued down as well. 
I used Tim Holtz Matte Texture Paste for the stones. This was my first time using both a stencil and texture paste and I found it super easy.
And satisfying! I just lifted the stencil and painter's tape off while the paste was still wet, ran the stencil under water and it's ready for my next cobblestone project.  I let this dry overnight then painted the stones.
The ceiling was covered with a neutral paper. The stairs were made from one inch wooden blocks and lengths of wooden dowels glued together. 
The GSL Windows with Shutters 1 to 24 come with shutters whose sections are easily assembled with tacky glue.
The GSL 4 Panel Door 1 to 24 is assembled in a similar fashion.  It also comes with a door jamb.
I painted the shutters in a mustard yellow and the window in an off white. I glued a piece of tissue paper behind the windows and added a corgi saying hi.
The GSL Planter Box with Trellis 1 to 24 assembled easily. I added a small section of dry foam to hold the tiny blossoms. I painted a few sections of GSL Laser Cut Miniature Ivy available over at Alpha Stamps.
So cute when everything is assembled!
Here are the wall sections finished and ready for assembly. I used a GSL Rustic Door 1 to 24 on this wall as well as a bit of the miniature ivy. The medallion is molded bit of paper clay. There is a kitty asleep in one of the GSL Decorative Windows 1 to 12 and some pretty banners hanging from them. The one on the right is the EU flag.
The back wall has two more of the 1 to 24 windows as well as a Balcony 1:24 Scale. Someone left a gift hanging from the doorknob, a bag of wine and bread.
The right wall got the corgi windows, trellis boxes and another one of the rustic doors.
Here's how I made those rustic doorknobs. I took paper fasteners and painted them with black nail polish. Once dry, I cut the fastener head off and glued it in place. 
The bag was sewn from a scrap of fabric. The handle is made from braided embroidery thread.
So cute, I can't wait to make another!
An action shot (can you tell we're farmers...)?  Thanks for stopping by.
GSL Products Used

Balcony 1:24 Scale

Other Supplies Used
Tacky glue
Acrylic paint
Tim Holtz Idea-Ology papers
Spray shellac
Painter's tape
Tim Holtz matte Texture Paste
Paperclay
Printed images
Dry foam
Plastic flowers
Miniature resin wine bottle
Fabric scrap
Embroidery thread

Saturday, April 14, 2018

Gardening at Night by Betsy Skagen

 Spring has arrived and gardens are blooming. But beware those cute little garden gnomes...for at night they turn the garden into a place where evil resides.
Under the cloak of night  these gnomes cast wicked magic upon your garden. Innocuous plants turn into man-eating beasts while the gnomes themselves cart body parts from nearby cemeteries into their gardens. What they do with them, one can only imagine...and shudder.
I had such fun making the "Gardening at Night" scene (which by the way gives a subtle nod to R.E.M., my all-time favorite band). It all began when I assembled the 7 x 7 Corner Room Box and painted it with gesso. I gave it a base coat of green paint and then began adding different layers.

Slowly I added layers of several greens, as well as yellow, brown and black acrylic paint-- to create a lush plant background. I used a heat gun to dry between each layer so as not to muddy the colors.


Next, I assembled the Planter Box with Trellis and Little Birdhouse. I painted the trellis with a mixture of yellow and white acrylic paints and painted the birdhouse sky blue. 


I then inked the edges of the trellis and birdhouse with brown ink and a blending tool to give them an aged appearance.  
After placing florist's foam inside the planter, I inserted the carnivorous plants that I made from clay.  I also added black paint to plastic greenery, dried moss and miniature flowers and added those to the trellis.
Finally, I painted  a miniature bird with black paint and added it and the birdhouse to the trellis.
To make the wheelbarrow, I first assembled it all but the axle and wheels and painted it green. I then painted the axle green, the wheels brown and completed the assembly. 
Next, I cut apart a small plastic skeleton  and shortened the rib cage and limbs to create a more gnome-like shape. I then reassembled the skeleton using a strong adhesive.
Scraps of blue striped fabric made the perfect pants and I quickly turned a red circle of felt into a hat.
I painted doll limbs with brown paint make them appear dirty and cut a rusty miniature snow shovel into the shape of a spade. After piling the wheelbarrow dried greens, I added the limbs, spade and mushrooms. 
It is the little details that really make the scene.

I aged miniature pots by smudging white paint with my fingers and painting moss with white paint before gluing it to the pots. 


On the base of the Room Box I created a curved pathway with black stones and surrounded it with green moss. I also added plants to the walls of the Room Box. 

Next, I created an entrance to the garden from tree branches from our yard. Sometimes I soak the branches to make them more pliable, but these were bendy enough that I was able to just use wire and hot glue to create the archway. 

I secured the archway in place by punching holes in the Room Box and securing the branches with wire on the back side.
To finish "Gardeing at Night" I glued everything in place and added additional details such as a gnome holding a skull, rope ladder, mushrooms and creepy trees.  
Thank you for stopping by the Gypsy Soul blog. I hope this tutorial inspires you to make your own Night Garden. Remember to keep an eye out for those wicked gnomes! -Betsy

Great Stuff

Wheelbarrow 1:12
Planter Box with Trellis
Little Birdhouse
Skeletons
Garden gnome
Rope ladder
Rusty shovel
Mushrooms
Moss
Stones
Plastic greenery
Artificial flowers
Miniature trees
Florist's foam
Doll parts
Miniature bird
Polymer clay
Wooden dowel
White cardstock
Gesso
Acrylic paint
Red felt
Fabric
Cotton ball
Tree branches and twigs
Wire
Brown ink
Beacon Fabri-Tac
Beacon 3-in-1
Hot glue gun