
Showing posts with label Honeycomb & Bees Small. Show all posts

Wednesday, May 25, 2022

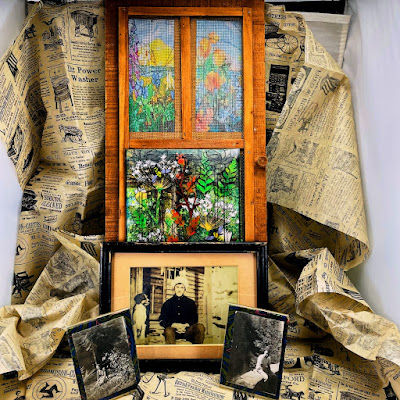
Screen Door is Always Open-A Peek-a-Boo Project

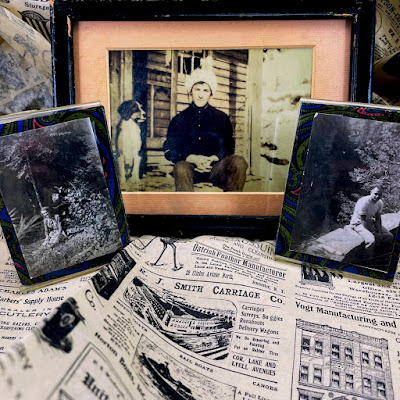
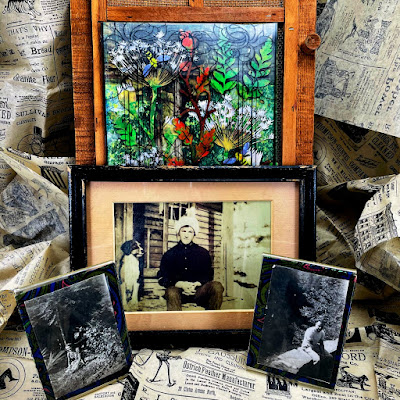
This is Jon David Lowe for Gypsy  Soul Laser Cuts, as I stated in my last post I grew up in Pennsylvania in the countryside. Our family homestead was sold in 2021 after the passing of my mum. Before I moved in our condo, I had a screen door from the property that was rescued from the woodshed before it was torn down in 2019. All that remains is a photograph of my grandfather sitting on the front porch of their humble home with that screen door behind him. Memories linger on long after the properties or the touchstone keepsakes have departed. My momma had an open door policy, but it wasn't known as that back in day. They are the inspiration for this artwork.

1.  Gather your supplies.

2.  Use a variety of acrylic paints to paint GSLC Acorn Border SetGSLC Queen Anne's LaceGSLC Fern Fronds, and GSLC Honeycomb & Bees Small.

3.  Cut a piece of Bookboard, for the Section of  Small Vintage Screen Door Reproduction you Will be Using.

4.  Find a Magazine Picture you find Pleasing.

5.  Use a Sanding Block to Add Patina and Scratches.

6.  Use TH Distress Stain to Highlight Areas you Have Distressed.

7.  Decide on How you Would Like to Arrange Your GSLC Painted Pieces.

8.  Make Transparency Copies of Stained Glasses you Will Use for Top Panels of Small Vintage Screen Door Reproduction and a Stain Glass Pattern for the Larger Portion.

9.  Use Golden Heavy Gel Matte to Attach GSLC Painted Pieces.

10.                Use Double Sided Tape to Attach Prepared Pieces to the Small Vintage Screen Door Reproduction.

Some Final Thoughts.


A screen door on a porch seems so enchanting to me. The screen door on my parents back porch was well worn and often left open much to my momma's chagrining. You could hear her calling "Close that door, were you born in a barn? You'll let the flies in!"

Strange the memories that stick, the childhood embarrassments of being from the wrong side of the tracks or not as affluent as those living in the towns, become the badges of grace and gratitude in our older years. I'm thankful for my upbringing and the values I grew up knowing.

 My momma always said anyone was welcome into our home as long as they did not mind the mess. We were not fancy people and never ones to try to impress our neighbors. My parents never had a credit card, if we didn't have cash to pay for it we didn't need it.

Our garden was not planted just for us was always plenty to share, our kohlrabi, rhubarb patch, and beets were favorite of many who would stop by. Growing up going to a small Baptist Church-where mom was on the flower committee, it was with pride that we would carry the wildflower mixed bouquets up the alters before anyone arrived and we always ask who were gonna give the flowers to after the service.  Momma was certain our bouquets were prettier than those who bought them from a florist. If were ever given a casserole or a pie we never returned the dish empty but always  added a treat of our own. It was the philosophy of "leaving it better than you found it, if you can't say something nice don't say anything at all, and please and thank you."

"If the sight  of blue skies fill you with joy, if a blade of grass springing up in the fields has the power to move you, if the simple things of nature has a message that you understand, rejoice, for your soul is alive." Eleonora Duse

 "Be thankful for what you have. Appreciate the small and simple things."Kyle Carpenter

 We have found that if we are happy with the ordinary we do not need the extravagances that other believe will make them happy, the better job, the bigger house, the prettier lover, the expensive vacations, the list goes on and on. We have two things we like to do each weekend we are home Sushi Saturday and Challah Bagels on Sunday Morning. These two pleasures make the worst of weeks bearable and worth the effort to endure.

 Supplies:  GSLC Acorn Border SetGSLC Queen Anne's LaceGSLC Fern FrondsGSLC Honeycomb & Bees Small, Variety Acrylic Paints, Bookboard, Magazine Picture, Sanding block, TH Distress Stains-Blue, Brown, Yellow, Vintage Screen Door Reproduction, Transparencies of Stained Glass Panels, Heavy Gel Matte,

I cannot wait to see your interpretation of this project. Share it on the Gypsy Soul Laser Cuts Craft Group Page on Facebook. I would love to see what new creations you are working on!


Wednesday, November 28, 2018

Saving the Bees

One of my favorite authors is Sue Monk Kidd, I remember reading her haunting and compelling Secret Life of Bees book many years ago. I love stories that are character driven and challenging to our senses. I like how it offered us insight to forgiveness and how many times in life we need to offer ourselves some grace. "The world will give you that once in awhile, a brief timeout; the boxing bell rings and you go to your corner, where somebody dabs mercy on your beat-up life" It also shows the difference between appearances and reality.  "Someone who thinks death is the scariest thing, doesn't know a thing about life." This is in part my inspiration for this project.
1.  Take GSLC embellishments apart, I am using Honeycomb and Bees-Small, Flourished Frame Connie, and Catweed Shape Set.

 2.  Use decorative scrapbook paper to build a substrate for your design, I glued mine on a piece of cardboard to give it stability.
3.  Before gluing decorative paper to the cardboard I distressed the edges using Wendy Vecchi Acorn Ink and a blending tool.
4.   Use versa mark and Torched Copper enamel and walnut stain embossing powders to age GSLC Connie Frame. Curing with a heating tool until you are satisfied with the process.
5.  Glue GSLC Frame on top of decorative paper, centering it.
6.   Distress GSLC Honeycomb first using Ranger Brick Embossing Powders and a heating tool. Add further layers dry brushing on Copper, Antique Gold, and Quinacridone Gold Acrylic Paints.
 
7.   Emboss the GSLC bee bodies with versa mark and Wendy Vecchi Tree Branch embossing powders and heating tool.
8.  Emboss the GSLC bee wings with versa mark and Perfect Peacock embossing powders and heating tool.
9.  Add strips to GSLC bee Bodies using a black sharpie and use also on bee legs and antennas.
10.                Start assembling composition using Weldbond and scissors to cut section of the honeycomb.
11.                Using alcohol ink and a blending tool to color GSLC Catweed Shape Set. I used autumn colors of green, yellow, orange, red, and brown.
12.                Spray with rubbing alcohol and water to further distress the Catweed
13.                Add these to your composition using scissors and Weldbond to layer on top of what you have added so far.
14.                Place assemblage inside of decorative frame.Some final thoughts.
It is sad to hear of all of the sorrows that the honey bees are encountering, in another life I'd love to be a beekeeper, to in some small way restore the balance of these incredible creatures. One of my favorite beverages is to take equal small portions of honey and coconut palm sugar and add to half and half and fill to top with iced coffee. It is refreshing and is my go to second breath after coming home from teaching all day and wanting to create in the art studio.
 One final quote from the book:
“Knowing can be a curse on a person's life. I'd traded in a pack of lies for a pack of truth, and I didn't know which one was heavier. Which one took the most strength to carry around? It was a ridiculous question, though, because once you know the truth, you can't ever go back and pick up your suitcase of lies. Heavier or not, the truth is yours now.”
Sue Monk Kidd, The Secret Life
 
 
Supplies:  Gypsy Soul Laser Cuts-Honeycomb and Bees Small, Gypsy Soul Laser Cuts-Flourished Frame Connie, Gypsy Soul Laser Cuts-Catweed Shape Set, Decorative 5 by 7 Frame, Decorative Scrapbook Paper,  Wendy Vecchi Acorn Permanent Ink, Blending Tool, Versa Mark, Tim Holtz Walnut Stain Embossing Powders, Ice Resin Torched Copper, Heating Tool, Weldbond, Ranger Brick Embossing Powder, Wendy Vecchi Tree Branch Embossing Powder, Extreme Peacock Embossing Powder, Black Sharpie, Copper, Antique Gold, and Quinacridone Gold Acrylic Paint, Paintbrush, Alcohol Inks in Autumn Hues, Rubbing Alcohol and Water in Spray Bottles, Scissors

I cannot wait to see your interpretation of this project. Share it on the Gypsy Soul Laser Cuts Craft Group Page on Facebook. I would love to see what new creations you are working on!


Saturday, April 28, 2018

Mine Tags Taste like Honey


I have always been drawn to encaustic art, yet I have never quite managed to begin the process for using it in my own crafting. For quite awhile I had been planning on using Gypsy Soul's Honeycomb & Bees in an encaustic project--because shouldn't every honeycomb project be created with beeswax?

That is why I was delighted when Seth Apter developed his Vintage Beeswax Embossing Powder. I combined the Honeycomb & Bees with the Embossing Powder to create a faux encaustic look on  three golden honey-colored tags.
To make the tags, I began by collaging vintage dictionary pages about bees onto manilla tags.


Next I cut the Honeycomb into sections and painted them and two of the bees 
with yellow paint. When dry, I added flecks of white paint and inked the edges with brown ink.
I hope you forgive me, but I had so much fun creating these tags that I forgot to take photos of the next few steps.

I spritzed the tags with Tattered Leather Spray and dried them with a heat gun. I then flicked droplets of High Impact and Glimmer Glam Paint onto the tags. After drying with a heat gun, I inked the edges of the tags with brown ink. 
Next I dabbed tiny drops of glue randomly on the tags and added gold flakes to the tags. I also covered one of the bees with gold flakes.  

After adhering the honeycomb and bees to the tags, I covered each of the tags in embossing ink and coated with Vintage Beeswax embossing powder. I set the powder with a heat gun and repeated this process four more times to give the tags the encaustic look. 
Finally, I painted each tag with matte medium to remove the glossiness. After the tags were dry, I threaded ivory ribbons through the holes. 

Thanks for stopping by the blog today. I hope that this project inspires you to BEE creative. Have a fantastic week. - Betsy

Great Stuff

Honeycomb & Bees- Small
Seth Apter's Vintage Beeswax Embossing Powder
Acrylic paint
Vintage Photo Distress Ink
Tattered Angels Glitter Glam Paint
Tattered Angels High Impact White Paint
Tattered Angels Glimmer Mist Tattered Leather Spray
Embossing Ink
Gold flakes
Matte medium
Ribbons

Sunday, March 19, 2017

Bee Home Decor Plaque by Ginny

Hey there Peeps! I'm rustling up some home décor today for my project inspired by my love of bees.  Our neighbor is a beekeeper so we get to enjoy lots of them in our flowering trees. Also my very good friend is also a beekeeper and provides us with gorgeous fresh honey : )


Here's how I prepared the chippies...

All these fabby elements will be wiped with a cloth to prepare them for finishing.
Some of the pieces have been finished in patterned papers. Some have been inked black and some have been heat embossed.
A variety of embossing was done in metallic shades and the bee was just colored with a Spectrum Noir marker.
Gypsy Soul Laser Cut Supplies~
Honeycomb & Bees Small,
Title Queen Bee,
Filigree Frames Set 
Chickenwire Mini Album

Okay that's all for me. Wishing everyone a happy and productive day with lots of time to be creative : ) G