Top Menu
Wednesday, November 25, 2020
Falltime Faeries-A Peek-a-Boo-Project
Tuesday, November 24, 2020
Documenting December
Hello everyone, I can hardly believe that we are nearing the end of November. When the pandemic hit, it seemed as though all of the months started blurring together, and before I knew it, six months had passed, then seven, etc... I've heard a lot about how people like to do daily journal entires for the month of December, helping them to stay focused on the joys of the season and allowing them to highlight and appreciate some of the important moments. I think this year, more than ever, this will be a valuable exercise. For this reason, I have created a December journal. Today, I am sharing the journal I made for "documenting December." I start with a die cut journal base made from the Eileen Hull Sizzix Journal die. I cover the die cut pieces with some of my favorite Tim Holtz holiday papers and use a bunch of Gypsy Soul Laser Cut chipboard pieces as embellishments inside. There are so many different Christmas and holiday chipboard pieces in the GSLC shop to choose from. This post will highlight some that I use in this journal.


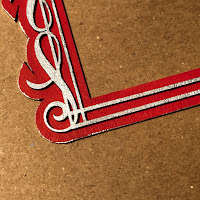
On the cover, I add an altoids tin topper 1 piece in each corner. I love how the design of these pieces plays off the paper pattern. For these pieces, I coat one side with Versamark embossing ink and then randomly sprinkle Distress embossing glaze in rustic wilderness onto the ink. The embossing powder melts when heated. To give it a grungy look, I sand off areas of the glaze, allowing the chipboard to show through. If you happen to add to much powder and are not happy with the shine, you can use a piece of steel wool to dull the finish. Its best to only add the embossing to one side of the piece, this will allow you to easily secure it to the cover with craft glue.
Be safe and take care,
xxx
Gypsy Soul Laser Cuts used:
Monday, November 23, 2020
Three Easy Pieces
That's all it takes to construct one of
Gypsy Soul Laser Cuts Wallet Style Folio.
Once you receive your chipboard kit
you'll see that each piece is pre-scored.
Fold the score lines as shown in the photos below.
Saturday, November 21, 2020
Farmer's Market Honey Display
Happy Saturday, everyone! This is a project that takes me down memory lane. My husband and I have kept bees off and on over the years and I spent many seasons at our local farmer's market selling our honey (and lamb, eggs, produce, beeswax candles, soap & pottery). The GSL Mini House Room Box 4 Cubbies gave me the idea to make a miniature farm stand display that would make a beekeeper proud. Let me take you through how it came together.
Here are the chipboard pieces laid out. The interior of the house has interlocking pieces that make up the cubby sections.After assembling the interior, side walls and bottom of the piece using tacky glue, I painted the cubby walls and front edges with off white acrylic paint. I also painted the interior surface of the roof pieces the same color.
The attic section of the house was papered in Graphic 45's Olde Curiosity Shop Parlor Wall, which has a lovely bee pattern. The cubby walls were papered in one of Authentique's Latest and Greatest papers. The floors got a woodgrain paper from Honey Bee Stamps Home Essentials.

The roof got a shingles paper also from the Home Essentials collection. I used a black and gray check paper from Kaisercraft's Looking Glass Collection for the house's exterior walls.
I made some fun things to go inside the display, starting with miniature candles made by dipping white florist wire in melted beeswax from our hives. Once cooled, they went on a small brass hook. I added a few descriptive signs.

I got some UV resin supplies for my birthday and these little yellow bears were my first resin project. I turned them into honey bears by adding lids made from small beads and painted toothpicks.
We never had an observation hive to take to the farmer's market but a lot of honey vendors do. I started with a printed image and cut craft sticks to size. They were glued together and painted brown.
For a hive cover I glued on a small piece of transparency on top.
Once the glue was dried I simply cut away the excess.
Finishing touches include a spray of embellishment flowers in the attic space, along with a bee I made from pom poms and transparency wings.
The honey bears look so cute together! Any self respecting honey vendor has entered a jar or two in the county fair and come home with a ribbon or two (we have!). I felt this display deserved a few ribbons made from brads and blue (or course) ribbon. When I was making the dipped candles I poured the leftover melted wax in a rosebud mold and added a piece of florist wire for a candle wick. The honeycomb candles are made with small strips of hive foundation wax sheets wrapped around florist wire.
These floral candles on the left are simply molded polymer clay fitted with a florist wick. The observation hive cubby also contains resin honey jars.
I wish we had a real life size one of
these! Thanks for stopping by!
GSL Products Used
GSL Mini House Room Box 4 Cubbies
Other Supplies Used
Tacky glue
Acrylic paint
Graphic 45 Olde Curiosity Shop Parlor Wall
Authenitque Latest & Greatest
Honey Bee Stamps Home Essentials
Kaisercraft Looking Glass Collection
Printed images
Polymer clay
White florist wire
Beeswax
Resin bears & jars
Metal beads
Toothpicks
Embellishment flowers


