Top Menu

Sunday, April 30, 2017

The start of something new . . .

I love trying various techniques on Gypsy Soul Laser Cuts chipboard. And being on the Prima Marketing Educator Team allows me to marry both products.


With the start of a new mini-book, I'm needing something for the cover. The theme of the book is outdoors/summer/bees/butterflies but not a beach theme (I'm landlocked here in the Midwest). I chose Gypsy Soul Laser Cuts Grass & Foliage.

Here are the steps to this little project:

  1. Paint the chipboard with a layer of Prima's White Gesso. Let dry.
  2. Add a layer of Prima's Clear Crackle Texture Paste. You can see from the photo below that I dab it on rather than perfectly paint it. This will allow various crackle and not such an *even* crackle. Let dry.

3.  Once the crackle is dry, add a layer of your favorite paint. Mine for this project is Prima's Opal Magic Violet-Green. The variances of this paint is gorgeous. Let the paint layer dry.


4.  Next, it's time for another layer. The buttery texture of Prima's waxes are incredible. And do they smell luscious! For this chippie I used Bronze Age and Lucky Emerald. I applied with my finger and slightly rubbed it into the paint.


And the finished product:


Here's the mini-book cover in it's completed state:


Hope you enjoyed this simple tutorial. Thanks for visiting today!

Gypsy Soul Laser Cuts Education Team
Prima Marketing Endorsed Educator


Saturday, April 29, 2017

My Secret Garden

I love Spring and I love flowers, so I decided to make a garden with a dimensional card and loads of flowers from GSLCuts.


I started off by making the card up so that I could decide where to place everything.


 Then chose what I wanted to use on the card, I have already gessoed all the "ingredients"


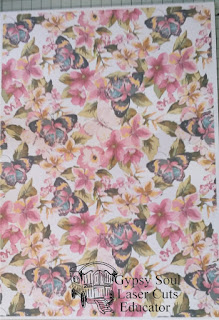
I had this sheet of floral and butterfly paper in my stash which I decided was just the right colours for the background on my card, so covered both sides and the front of the folded parts of the card.


This lovely arch is just the right thing to put on the front of the card so that you look through into the garden. I gessoed it then coloured it with silver  gilding polish, after which I coloured all the leaves with green, I used undiluted water colour paint for this.


Then it was just a case of where to put everything, I started with the bridge and stuck that to the back of the card. Still at the back but in front of the bridge at either side I used Daisies on the left and Yarrow on the right with their leaves joining in the middle.

The row in front I used a small leafy tree on the right and buds from the Queen Anne lace on the left, the bench in the middle is a die that I had in my stash, and the butterfly is one from a set.

The first row is made up of Queen Anne's Lace and long stemmed rose, but I used the flower rather than the stem.

Which brings me to the front: I had to have a watering can for all those flowers, so I cut one out on my silhouette machine, I die cut some leaves and intertwined those up the side and on the top, then added some flowers from my stash and some butterflies and dragonflies in among the leaves.

I had one small space left at the bottom of the front so decided that whoever looked after this garden had to have some transport, so cut a bicycle out from one of my dies.


I must say here that the bicycle and the bench could have also come from GSL cuts but unfortunately I  decided to add these after I had started, so I hadn't ordered them, but have given you the links so that you can remember.

This card looks very "busy" but it really is very easy to make, so why not have a go and see what sort of garden you can invent, you don't have to use the same flowers or archway because GSLcuts has loads more, so have a look and see what you can do.

GSL cuts items:
Archway chipboard shape
bridge
daisies
yarrow
leafy tree small
Queen Anne's lace
longstem rose
butterflies and dragonflies 

Other items used:  
white card
patterned card
Creative expressions gilding polish
undiluted water colour paint
Glue
Leaf die
flowers
 

Friday, April 28, 2017

Madam Zorba's Gypsy Table


Hey crafters, welcome back - Jess here to show you another miniature project with GSLC products. This week I'm showing you how to make a platform and a tablecloth to put on the table and chairs set from GSLC.


To begin with, I cut off a piece of pink insulation foam (I get mine from Home Depot). I'm using 1 inch thick foam. Then I glue on 1 inch high balsa wood to cover up the foam. The balsa is super easy to sand down and cut to shape.


I've base painted my table and chairs set black here and fit them on the base to make sure everything will fit alright in the end - looks like we're good to go.


Using the top of the table as an idea - I found a lid and traced it onto a completely dried out baby wipe. You can see here about how much larger you'll need to make the circle compared to the table. Using scissors, cut the circle as neatly as possible.


This is a simple picture for a finicky part. I hot glued the top of the table cloth down - that's easy enough. Then comes a "pinch and fold" technique - I do 4 points first (like a crosshair), and then in between those. So, pinch, fold over and hot glue to hold it.


Then paint the whole top and undercoat black. It takes a while to dry because it sucks up the paint so well.


I added my own colour scheme to the table cloth - a shimmering green, and I dry brushed the chairs with a dark green as well. And I painted the base they sit on with shades of black and grey. Then you just have to add your own decorations to the scene. For mine, I added gypsy decorations, for Madam Zorba - check out the finished project below!


The entire view.


Other side.


Some occult books and a candle set.


A tarot card reading set up.


Ouija board set up and some money that's been made for seances.


Another stack of occult books


Of course more books!

GSLC Materials


The Crafty Goblin Materials


Thursday, April 27, 2017

Black Dragon Treasure Chest

Hi everyone!  Barbara here on the Gypsy Soul Laser Cuts blog today.  I love this Treasure Chest, and had so many ideas running through my head.  I finally settled on an oriental theme.

And here is my finished Black Dragon Treasure Chest   I'm on the lookout for some small but really cool feet for it.  Until then it will go without feet, but it still looks pretty good, nonetheless.


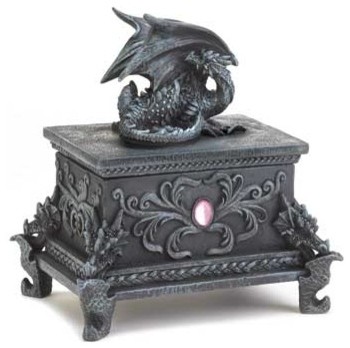
This was my inspiration piece:

Black Dragon Treasure Box


1.  Assemble bottom of chest.  Set aside to dry.

bottom of chest pieces


2.  Assemble top.  Adhere glue to center cut out piece only...

top pieces


... and lay border and center cut-out rectangular piece on top of solid piece, using the border to help center the cut out rectangular piece.


Remove border.


Flip top over and put glue on border...


... and adhere to top, as shown.  Set aside to dry.


3.  Turn bottom of chest over and add glue.

Bottom of chest with slightly larger chipboard piece (left)


Center and glue bottom of chest to slightly larger chipboard piece, as shown.  Set aside to dry.


4.  Place box top on box to check fit.


Glue chipboard strips around box bottom and top edges, as shown.  Remove top to make sure the pieces are tight up against the top edge.  Add clips to hold in place, if needed.


5.  While bottom is drying, start painting the lid and two dragons with black chalk  paint.  Paint both sides of the top as well as the two dragons.  Set aside to dry.


6.  Paint box bottom with the black chalk paint, inside and out.  Set aside to dry.


7. Mark the center of two pieces from the Punch Elements Deco set by drawing a pencil line from the points shown in the photo.  Punch hole where the "X" crosses and use that as a template to mark the second piece.  Paint the two pieces with the black chalk paint, as well as the corresponding circles.  Don't punch holes in the circle pieces because they are going to be used behind the elements to level them when we glue them down.


8.  Dry brush all pieces with Cascade chalk paint, or any color that looks like a blue patina. 

Remove most of paint from stencil brush onto paper towel
before dry brushing pieces 


9.  Glue black lace around top and bottom of the box bottom.


10.  Dry brush the lace with Cascade chalk paint, or whatever you used to dry brush your box.


11.  Glue a second circle to the painted one.  Insert butterfly embroidered fabric brad through deco element and add two brass pieces to each side, as shown.


Find the center of the box side and glue the double thick circle to the box.


This will give you a level area to glue the deco element.  You may need to clamp in place while it dries.


12.  Glue two dragons onto top, as shown.  Let pieces dry before handling.  A quick grab tacky glue works well at keeping the dragons upright while drying.


13.  Add more metal embellishments to the sides and top, as shown.  


Supplies Used:

GSL Treasure Chest
GSL Dragons Shape Set
GSL Punch Elements Deco
Chalk Paint (Black, Cascade)
Metal embellishments
Black lace
Butterfly embroidered fabric brad (Paper Studio)
Assorted Brushes
Quick Grab Tacky Glue
Stencil brush
Assorted paint brushes

I hope you enjoyed my project today.  If you see something online that inspires you, why not give it a try to emulate it, as I have done with this Black Dragon inspired chest.  Gypsy Soul Laser Cuts has a huge line of chipboard for you to work with, so go check it out and see what catches your fancy!!!

Thanks so much for stopping by, and always take time to play!

Barbara